

What “Phone Was Hanged Up” Actually Means
IIf you searched ‘phone was hanged up,’ you’ve landed in exactly the right place and this phrase actually points to two different problems depending on what you meant.
When your phone is hanging, the touchscreen ignores every tap and swipe, which might make you think you have an unresponsive touchscreen problem but it could be a phone hanging issue instead.
I’ve worked through this specific issue on multiple Android and iOS devices. This guide covers every practical solution, from a 10-second force restart to deeper settings adjustments most people never find.
Phone Hanging vs Phone Freezing: Are They the Same?
Yes, phone hanging and phone freezing describe the same problem. Both mean your phone is not responding locked up, unresponsive to every tap, swipe, or button press.
When your phone reaches this state, the device has stopped processing commands. The screen might still be on, but nothing you do gets through. Throughout this guide, I use both terms interchangeably because they describe the exact same experience.
The distinction between ‘hang up’ (ending a call) and ‘hanging’ (a frozen device) only matters for grammar. Practically, both point to the same frustrating situation: an unresponsive phone that needs attention.
Frozen Phone or Dropping Calls? Find Your Problem First
Finding the right fix starts with identifying the right problem. Two very different issues get searched under the same phrase, and the solutions are completely different.
Question 1: Does your phone screen freeze and refuse to respond to touch?
If your phone is stuck on one screen and ignores every tap or swipe, you have an unresponsive phone. The display may still be on, but the device isn’t processing your input. This is a performance problem — fixes start in the next section.
Question 2: Do your calls cut off automatically mid-conversation?
If calls keep dropping without you touching anything, that’s a network or app conflict issue. Different causes, different fixes.
Here’s the key distinction: A frozen screen means your phone’s processor or memory is struggling. Call drops almost always point to network problems or software conflicts with your calling app. Full internal storage can contribute to both, but the solutions are different.
Identify which problem matches yours, then jump to that section. You’ll solve it much faster.
How to Fix a Frozen Phone Right Now
When your phone freezes and won’t respond to touch, the fastest fix is a force restart. I’ve used this method on dozens of completely unresponsive devices it’s the single most reliable first step.
Unlike a normal shutdown, a force restart uses physical button combinations to cut power and reboot immediately a process that works differently than a standard reboot because it bypasses the operating system’s normal shutdown sequence.

seconds to force restart your Android phone.
One quick check before proceeding: Was your phone recently dropped before the screen froze? If yes, jump to the dropped phone section below physical damage needs a different approach entirely.
If there was no drop, let’s get that frozen screen working.
Force Restart a Hanging Phone With These Button Combos
The button combination depends on your phone model. Here are the force restart steps for the most common devices.
For Samsung Phones: Press and hold the Power button and Volume Down button simultaneously. Keep both buttons held until the screen goes completely black. Wait for the Samsung logo, then release. The entire process takes about 10 to 15 seconds. Don’t release early or the restart won’t complete.
For Google Pixel Phones: Press and hold the Power button for 10 to 15 seconds. Wait until the screen goes black and the Google logo appears. Release when you see the boot screen.
For iPhone 8 and Newer: Press and quickly release Volume Up. Press and quickly release Volume Down. Press and hold the Side button until the Apple logo appears, then release. The order matters — do the volume buttons first in exactly that sequence.
For iPhone 7 and iPhone 7 Plus: Press and hold the Power button and Volume Down button together for 10 seconds until the Apple logo appears.
For iPhone 6s and Older: Press and hold the Power button and Home button together for 10 seconds until the Apple logo appears.
For Older Android Phones With a Home Button: Press and hold the Power button and Home button together. Keep holding until the screen goes black and your brand logo appears, then release.
If Your Phone Was Dropped Before It Froze, Read This First
If your phone was recently dropped before the screen became unresponsive, you may be dealing with hardware failure rather than a software freeze and this distinction matters because no button combination will fix physical damage.
The component responsible is the digitizer: the layer inside your screen that registers touch. When it cracks or disconnects from impact, the screen can look completely normal while ignoring every tap similar to other physical screen damage that occurs from drops, which may appear as lines, discoloration, or unresponsive areas.
Here’s how to identify which situation you’re facing:
Software freeze: Phone was working normally, then froze suddenly with no recent drop. Hardware damage: Phone was dropped, then immediately became unresponsive — or certain areas of the screen register touch while others don’t.
Force restart methods only resolve software problems. If your phone was dropped within the last day or two before the screen froze, take it to a repair professional rather than troubleshooting further. You’ll save hours working on a problem that has a physical cause.
Force Restart Didn’t Work? Try This Next
If the first force restart didn’t bring your phone back, work through these steps before trying anything more advanced.
Step 1: Charge Your Phone First
Plug into a charger and wait 15 minutes. A completely drained battery can look identical to a frozen screen the device simply won’t respond without power. If your phone won’t charge properly or you suspect charging problems, that could be contributing to the frozen screen appearance.
Step 2: Repeat the Force Restart
If the phone turns on but the screen stays unresponsive, try the force restart a second time. Some stubborn software glitches require two or three restarts to fully clear from memory.
Step 3: Boot Into Safe Mode (Android Only)
If your Android phone turns on but freezes immediately again, safe mode helps identify whether a problem app is causing the issue. It temporarily disables all third-party apps so you can test the device without them.
For Android phones: Hold the Power button until the power menu appears on screen. Press and hold the Power Off option until a prompt appears asking to reboot into safe mode. Tap OK to confirm. Use the phone normally for 10 to 15 minutes. If the hanging stops, a recently installed app is the cause.
Note for iPhone users: iOS does not have a standard safe mode equivalent accessible through button combinations. If your iPhone keeps freezing after multiple restarts, the recommended next steps are checking your recently installed apps through the App Store update history, or contacting Apple Support directly for device diagnostics.
For Android phones:
- Hold the Power button until you see the power off option
- Press and hold the power off option until you see “Reboot to safe mode” appear
- Confirm the choice
- Use your phone for 15 minutes; if it works fine in safe mode, a recently installed app is the culprit
For iPhone:
- Force restart using the method for your iPhone model (covered earlier)
- Immediately after the Apple logo appears, press and hold the Volume Down button
- Continue holding until the “Slide to Power Off” screen disappears and your phone fully boots
- If your iPhone works fine after this, a recently installed app is likely causing the issues
your phone is running in diagnostic mode.
Why Does My Phone Keep Hanging Up? 8 Real Causes
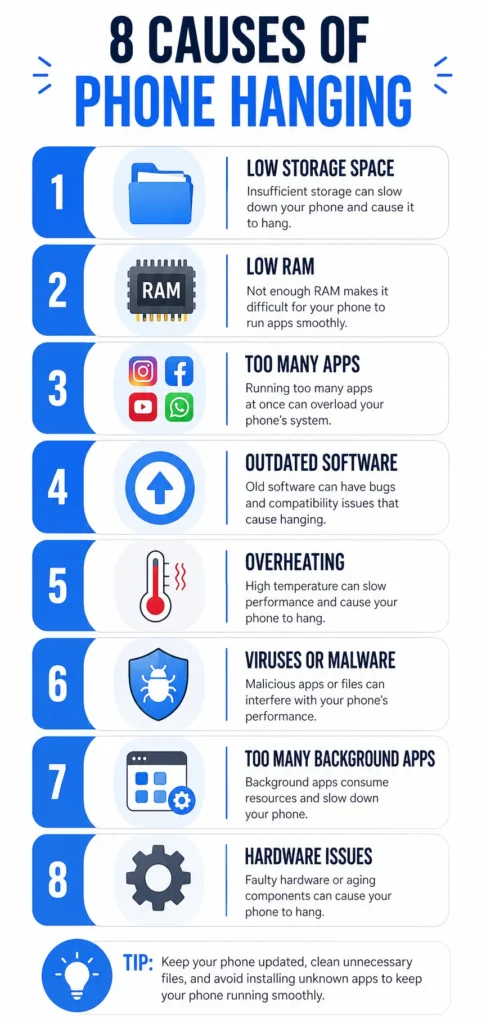
Your phone keeps hanging because something is overwhelming its ability to process tasks smoothly from storage issues to overheating problems that throttle performance. Here are the eight most common causes identifying yours makes fixing it significantly faster.
- Low Storage Space Chokes Your Phone’s Operations
- Insufficient RAM Forces Your Phone to Struggle
- Too Many Background Apps Drain Resources
- Outdated Software Creates Compatibility Problems
- Heavy Apps Running on Weak Hardware
- App Crashes and Software Conflicts
- Malware and Viruses
- Overheating Problems
apply the right fix faster.
1. Low Storage Space Chokes Your Phone’s Operations
When internal storage gets too full, the Android operating system struggles to perform basic functions. The system needs free space to create temporary files during normal operation when that space disappears, app crashes, lag, and frozen screens follow.
Keep at least 10 to 15 percent of your storage free at all times. On a 64GB phone, that means roughly 6 to 10GB open. I cover exactly how to recover that space in the cleanup fixes section later in this guide.
2. Insufficient RAM Forces Your Phone to Struggle
RAM is your phone’s working memory — the space it uses to keep active apps running simultaneously. Phones with only 1GB, 2GB, or 3GB of RAM freeze more frequently because the device can’t maintain enough processes at once. When RAM fills up, the processor constantly shuffles data in and out, causing noticeable lag and freezing.
Older and budget devices carry a higher risk of this problem because manufacturers minimized RAM to reduce costs. If you experience regular freezing on a low-RAM device, the Developer Options fix covered later in this guide delivers a meaningful performance improvement.
3. Too Many Background Apps Drain Resources
Every app running in the background consumes RAM and processor power — even apps you haven’t touched in days. When dozens of background processes compete for limited resources, your phone slows to a crawl or freezes completely.
The biggest offenders are apps that auto-refresh: social media, messaging, navigation, and email clients. These wake up regularly even when you’re not using them, quietly draining available memory throughout the day without you noticing.
4. Outdated Software Creates Compatibility Problems
Running an outdated operating system causes software conflicts with newer apps. Developers optimize their updates for current system versions, so older Android OS versions struggle to run modern apps smoothly.
A pending system update often contains specific bug fixes designed to prevent hanging and freezing. Go to Settings > About Phone > Software Updates to check manually. If an update is waiting, install it it may be the only fix you need.
5. Heavy Apps Running on Weak Hardware
Running heavy applications on a phone with limited RAM or a weak processor is one of the most overlooked causes of hanging and it’s not something any setting can fully fix.
If you’re running resource-intensive games or video editing apps on a budget phone with 2GB or 3GB of RAM, expect regular freezing. The processor simply gets overwhelmed when an app demands more computing power than the hardware can deliver.
6. App Crashes and Software Conflicts
Sometimes a single poorly coded app causes your entire system to freeze. When an app crash occurs, it locks up system resources and prevents other apps from functioning normally. Software conflicts happen when two apps attempt to access the same system resource simultaneously, causing the processor to stall.
I’ve seen phones hang repeatedly because of one problematic app that looked completely harmless in the app drawer. A banking app, a utility app, or a poorly optimized social media app can trigger repeated freezing across the entire device — even when that app isn’t currently open.
The safe mode test covered earlier in this guide is the most reliable method for confirming whether an app conflict is your actual problem.
8. Overheating Problems
Heat causes your phone to protect itself by slowing down, which I’ll cover in the second subsection.
7. Malware and Viruses
Malware infection causes phone hanging by running silently in the background, consuming large amounts of RAM and processor power without your knowledge. Mobile viruses launch unauthorized background processes that drain your system resources and slow everything to a crawl.
The tricky part is that you may see no obvious signs beyond the hanging and general slowness. Malware often disguises itself inside legitimate-looking apps, so nothing suspicious appears in your app list which is exactly what makes it difficult to identify and remove.
How to Check for Malware:
- Open your phone settings and check your battery usage or RAM usage screens
- Look for an unfamiliar app consuming large amounts of resources—that’s a red flag
- Download a reputable antivirus app like Bitdefender, Norton, or Kaspersky and run a full system scan
- Review the scan results carefully
What to Do If You Find Malware:
- First, try uninstalling the suspicious app through safe mode (use the safe mode method covered earlier in this article)
- Uninstall any apps you don’t recognize
- If the malware infection persists or you can’t identify the source, a factory reset is the most reliable solution
- Back up your important data first, then reset the device to remove all malware completely
8. Overheating Problems
When your phone gets too hot, the Android operating system deliberately throttles the processor to prevent hardware damage. This protective feature is called thermal throttling the device sacrifices performance to stay within safe temperature limits. An overheating phone feels warm or hot to the touch and typically shows sluggish response times or outright freezing shortly after the temperature rises.
Why Phones Overheat: Charging while using: Running apps while charging forces both the battery and processor to work hard simultaneously, generating significant heat. Demanding apps: Games and video editing apps push the processor to its limits during extended sessions. Environmental heat: Direct sunlight or a hot car can cause rapid, dangerous temperature spikes. Aging battery: Frequent overheating during light use often indicates a deteriorating battery.
How to Prevent Overheating: Stop using your phone while it charges, especially with heavy apps or games running. Remove your phone case when the device feels hot cases trap heat against the body. Close unused background apps to reduce the processing load. Let your phone rest and cool down naturally before resuming demanding tasks. If overheating persists during light use, have the battery tested by a professional.
Why Phones Overheat:
- Charging while using: Using your phone while charging generates extra heat because the battery is working hard while the processor is also active
- Demanding apps: Running resource-intensive games or editing apps for extended periods pushes the processor to its limits
- Environmental heat: Leaving your phone in direct sunlight or a hot car can cause rapid overheating
- Aging battery: If your phone overheats frequently even during light use, the battery might be failing
How to Prevent Overheating:
- Stop using your phone while the device is charging, especially if you’re running heavy apps or games
- Remove your phone case if the device feels hot because cases trap heat against the body
- Close background apps that you’re not actively using
- Give your phone a break and let the device cool down naturally before using demanding applications again
- If overheating persists during light use, have your battery tested by a professional
Calls Cutting Off on Their Own? Fix This Differently
When calls keep dropping mid-conversation without you touching anything, the problem is almost always network-related rather than a frozen screen issue. Call dropping typically happens because of weak signal, temporary carrier glitches, or corrupted cache in your Phone app.
The fixes are quick most people solve this within a minute.
Try Flight Mode First (Takes 15 Seconds)
Flight Mode is the fastest fix for call dropping it takes about 15 seconds and resolves most temporary network glitches.
Here’s how to do it: Swipe down from the top of your screen to open Quick Settings. Tap the airplane icon to enable Flight Mode. Wait 10 seconds. Tap the airplane icon again to turn Flight Mode off.
Your phone reconnects to your carrier network with a fresh signal, clearing the temporary glitch that was causing calls to disconnect.
Test the fix: Make a call immediately after. If it stays connected, you’re done. If calls still drop, move to the next fix.
Clear Your Phone App Cache and Storage
Corrupted cache files in your Phone app cause call dropping more often than most people realize. The app stores temporary data that can become corrupted over time, interfering with call stability.
Important: Clearing your Phone app cache does NOT delete your contacts or call history. Contacts are stored separately in your Google account. I’ve cleared this cache numerous times without losing a single contact.
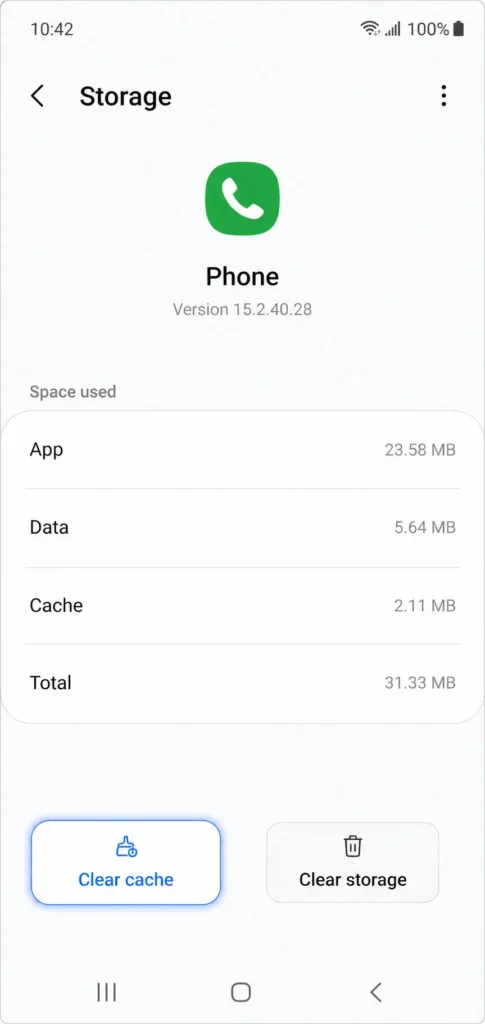
Full method: Open Settings. Tap Apps or App Management. Find and tap Phone (called Dialer on some devices). Tap Storage & Cache or Storage. Tap Clear Cache. Only tap Clear Storage or Clear Data if Clear Cache alone doesn’t resolve the issue.
Faster shortcut: Long press the Phone app icon on your home screen. Tap App Info. Tap Storage. Tap Clear Cache. (Only tap Clear Data as a last resort it resets the app completely.)
Reboot your phone after clearing the cache, then test your calls.
After clearing the cache and storage, reboot your phone and test your calls again.
clearing doesn’t resolve the issue.
Reset Your Network Settings
If clearing the Phone app cache didn’t fix call dropping, resetting your network settings often solves persistent connection problems. This network reset clears all saved Wi-Fi networks, Bluetooth pairings, and mobile data settings back to factory defaults.
Important: You’ll need to reconnect to your Wi-Fi network afterward, but this process fixes deep network issues that cause calls to cut off automatically.
How to reset network settings:
- Open Settings
- Tap System or General Management
- Tap Reset or Reset Options
- If clearing the Phone app cache didn’t fix call dropping, a network settings reset often resolves persistent connection problems. This clears all saved Wi-Fi networks, Bluetooth pairings, mobile data configuration, and any saved VPN settings back to factory defaults.
- Note: You’ll need to re-enter your Wi-Fi password and reconfigure any VPN connections after this reset.
- How to reset network settings: Open Settings. Tap System or General Management. Tap Reset or Reset Options. Tap Reset Wi-Fi, Mobile, and Bluetooth. Confirm the reset.
- Your phone restarts automatically. After rebooting, reconnect to your Wi-Fi network and test your calls.
- Confirm the reset
Your phone will restart automatically. After the reboot, reconnect to your Wi-Fi network and test your calls.
Check Your Internal Storage
Full internal storage causes call drops because your phone needs free space to create temporary files during active calls. When storage is completely full, the system cannot perform this step.
Go to Settings > Storage to check your current usage. If you’re above 90 percent capacity, this is likely contributing to your call problems. Delete photos, videos, or unused apps until at least 10 to 15 percent of storage is free.
Reboot Your Phone as a Final Step
If calls are still dropping after all the above fixes, do a full reboot. Turn your phone completely off, wait 30 seconds, then turn it back on.
A full reboot clears system cache and restarts all network services from scratch. The combination of clearing Phone app data plus a fresh reboot resolves the majority of stubborn call dropping cases.
If calls still disconnect after this, the problem is likely your carrier network or a hardware issue. Contact your mobile carrier to check for known network problems in your area or continue to the last resort options covered below.
The Accessibility Settings That Make Your Phone Feel New Again
Most Android users never open the Accessibility menu for performance purposes but inside it are three settings that directly reduce phone lagging without requiring any technical knowledge.

between “Display” and “Apps.”
These settings weren’t designed for performance optimization, but adjusting them makes your touchscreen noticeably more responsive. I’ve applied these changes on multiple devices and the difference is immediate.
Here’s exactly what to change and why each one matters.
Change Touch and Hold Delay to Short
Your phone has a setting controlling how long you must hold the screen before it registers a long press. If this is set to Medium or Long, the touchscreen feels slow because the system intentionally waits before acknowledging your input.
Setting Touch and Hold Delay to Short makes every press register immediately.
How to change this setting: Open Settings. Tap Additional Settings (or System on some phones). Tap Accessibility. Tap Physical or Interaction and Dexterity. Find Touch and Hold Delay. Change it to Short.
The change is immediate taps and long presses respond noticeably faster throughout the whole interface.
How to change this setting:
- Open Settings
- Tap Additional Settings (on some phones this is just called System)
- Tap Accessibility
- Tap Physical or Interaction and Dexterity
- Find Touch and Hold Delay
- Change the setting from Medium or Long to Short
The difference is immediate. Your phone now registers touch commands faster, which reduces the lag feeling when you tap apps or buttons.
Developer Options: The Hidden Android Fix Most People Never Use
Set Time to Take Action Back to Default
Time to Take Action controls how long your phone waits before automatically dismissing certain notifications or messages. If this setting is set to 10 seconds or 30 seconds, your phone delays certain responses while waiting for the timer to finish.
Changing Time to Take Action to Default removes the unnecessary countdown and makes the system respond immediately to your inputs.
How to adjust this setting:
- Open Settings
- Go to Additional Settings or System
- Tap Accessibility
- Look for Time to Take Action
- Change the value to Default
Time to Take Action controls how long your phone waits before dismissing certain notifications or system prompts. If set to 10 seconds or 30 seconds, the system holds back responses until the timer completes, creating small but noticeable delays throughout daily use.
Setting this to Default removes the countdown and allows the system to respond immediately.
How to adjust this setting: Open Settings. Go to Additional Settings or System. Tap Accessibility. Find Time to Take Action. Change the value to Default.
These delays accumulate across hundreds of daily interactions. Removing them takes five seconds and delivers an immediate improvement in how quickly the phone responds to you.
Turn Off Animations to Stop Wasting Resources
Every action on your Android device involves a visual animation. When you open an app, close an app, or switch between screens, the Android operating system plays smooth animations to make transitions look polished.
Every action on your Android device triggers a visual animation. Opening an app, closing it, switching screens the operating system renders smooth transitions each time. This rendering consumes processor power on every single interaction.
Disabling animations frees that processing power and lets apps open and close instantly with no visual delay.
How to disable animations: Open Settings. Tap Additional Settings or System. Tap Accessibility. Tap Vision or Display. Find Remove Animations or Disable Animations. Toggle the switch to enable it. (Enabling ‘Remove Animations’ means animations are turned off.)
After this change, every interaction on your phone happens instantly. Some people miss the visual transitions, but if your phone lags regularly, the speed improvement is worth it
After enabling this option, everything on your phone happens instantly without sliding or fading effects. Some people miss the smooth visual transitions, but the speed improvement is worth the trade if your phone is frequently lagging.
Why These Settings Work So Well
These three Accessibility settings work because they reduce unnecessary processing delays built into the Android operating system. Touch and Hold Delay adds waiting time to every long press. Time to Take Action creates countdown timers that slow system responses. Animations force your processor to render visual effects for every screen transition.
Removing these delays frees up your processor and makes your phone performance feel dramatically faster, especially on older devices or phones with limited RAM.
These three Accessibility adjustments work because they eliminate artificial processing delays that Android builds in by default. Touch and Hold Delay adds waiting time before every long press. Time to Take Action holds system responses in a countdown. Animations require the processor to render transitions on every single screen interaction.
Removing all three frees your processor to focus on what you’re actually doing — which produces a noticeable performance improvement on older devices or phones with limited RAM.
All three changes are completely safe and reversible. If you prefer the original feel, everything resets in seconds.
Developer Options: The Hidden Android Fix Most People Never Use
Most Android users troubleshooting performance issues never discover Developer Options. The menu is deliberately hidden because it contains powerful settings designed for app developers. Two specific settings inside it are highly effective for anyone dealing with phone lagging.
I’ve applied these changes on multiple Android devices and the speed improvement is immediate. All changes inside Developer Options are completely reversible at any time.
How to Turn On Developer Options (Step by Step)
Developer Options is a hidden menu you unlock by tapping a specific setting seven times. It sounds unusual, but this is the official method built into every Android device.
How to unlock Developer Options: Open Settings. Scroll down and tap About Phone. Find Build Number. (Samsung users: go to About Phone > Software Information to find it.) Tap Build Number seven times in a row. Your phone counts down and displays a message after each tap. After the seventh tap, you’ll see: ‘You are now a developer.’
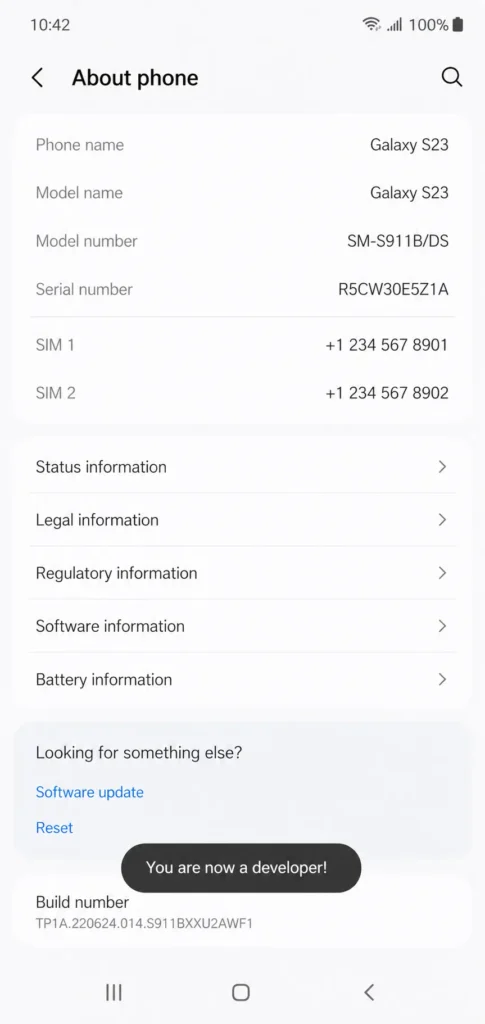
Developer Options is now active.
Go back to the main Settings screen — Developer Options now appears as a new menu item.
The Build Number location varies slightly by manufacturer, but the seven-tap method works on all Android devices.
Once you see the confirmation message, Developer Options is active and ready to use.
The Two Settings to Change Right After You Enable It
With Developer Options unlocked, focus only on these two settings. Avoid changing anything else unless you know exactly what it does.
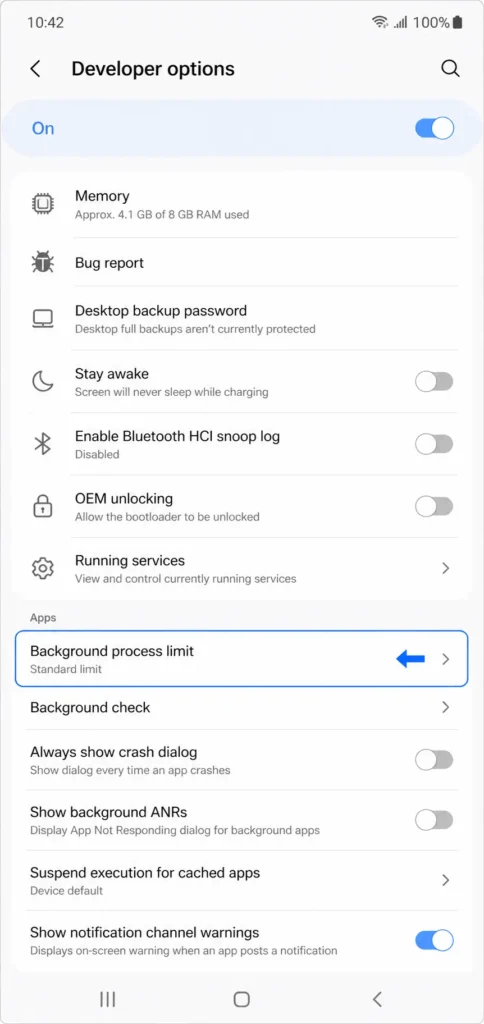
Setting 1: Background Process Limit
Background apps are one of the leading causes of RAM problems on Android. Every app that stays active in the background consumes memory, even if you haven’t used it in hours. Over time, they stack up and drain available RAM until performance drops or the phone freezes.
Inside Developer Options, scroll down and find Background Process Limit. By default, it allows multiple background apps to run simultaneously.
Change Background Process Limit to No Background Processes.
Important caveat: This setting prevents all background apps from running, which can delay push notifications for some messaging and email apps. If you notice delayed or missing notifications after making this change, switch the limit to ‘At most 2 processes’ instead — this still significantly reduces background RAM usage while keeping notifications functioning normally.
Setting 2: Animation Scales (All Three)
Inside Developer Options, you’ll find three animation settings: Windows animation scale. Transition animation scale. Animator duration scale.
All three are set to 1x by default, meaning Android renders full-speed animations for every tap, app open, and screen transition consuming processor resources continuously.
Set all three to Animation off.
After this change, apps open and close instantly. The lag feeling disappears because your processor stops rendering animations and focuses entirely on running your apps.
I applied both settings on an older phone running 3GB of RAM, and the difference in tap-to-open speed was immediately apparent.
limit” it’s usually in the Apps section.
A Quick Note on Reversibility
If you want your animations back or prefer to allow more background processes, return to Developer Options and change the settings to their original values. Nothing you adjust here permanently alters your phone, and all your data and apps remain completely untouched.
These two Developer Options changes are among the most effective no-cost performance improvements available on any Android device and they take less than two minutes to apply.
5 More Fixes If Your Phone Still Keeps Hanging
If your phone is still hanging after the earlier fixes, the problem likely comes from accumulated junk that builds up quietly over months of regular use. Work through these five fixes in order from easiest to most thorough.
Fix 1: How to Clear App Cache Without Losing Your Data
App cache is the collection of temporary files your apps store to load faster. Over time, cached data grows large and becomes corrupted, which causes app crashes and contributes to phone hanging.
Clearing app cache is completely safe and removes no personal data. Your photos, messages, login details, and saved content stay exactly where they are.
App cache is the collection of temporary files your apps store to load faster. Over time, this cached data grows large and becomes corrupted, triggering app crashes and contributing to phone hanging.
Clearing app cache is completely safe and removes no personal data. Your photos, messages, login details, and saved content remain exactly where they are. The only thing you lose is temporary files that the app rebuilds automatically on next use.
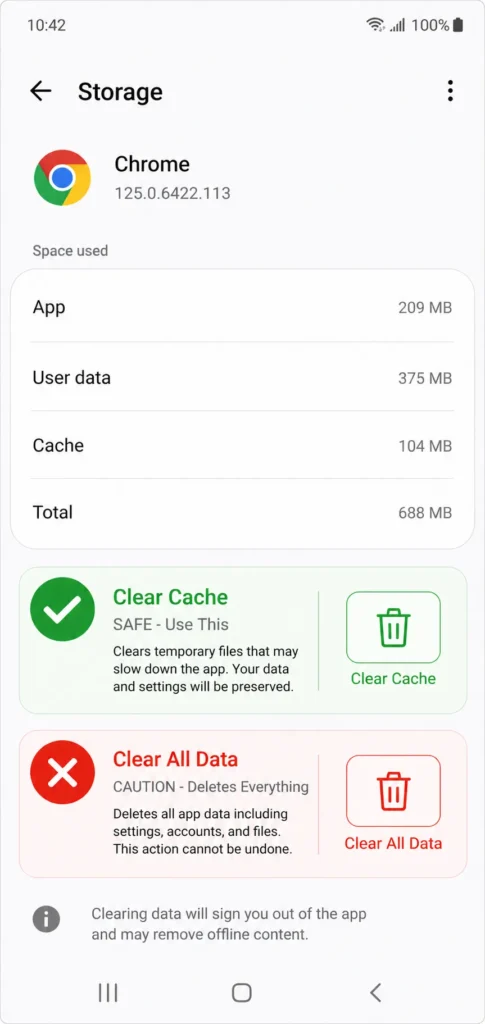
Which apps to target first: Chrome, YouTube, and Facebook are the biggest cache offenders on most Android phones. These apps accumulate hundreds of megabytes within weeks of regular use.
How to clear cache for any app: Open Settings. Tap Apps or Application Manager. Tap Manage Apps. Select the app you want to clear (start with Chrome or YouTube). Tap Storage or Storage and Cache. Tap Clear Cache.
Critical warning: You’ll see two buttons on this screen Clear Cache and Clear All Data (or Clear Storage). Only tap Clear Cache. Tapping Clear All Data resets the app completely, removing your login sessions, preferences, and saved content inside the app.
content including logins and saved preferences.
I make this distinction clear because the two buttons sit close together and look nearly identical. Clear Cache is always the safe choice for routine phone maintenance.
Repeat this for your heaviest-use apps, then restart your phone and check whether the hanging has reduced.
Which apps to target first:
Chrome, YouTube, and Facebook are the biggest cache offenders on most Android phones. These apps build up hundreds of megabytes of cached data within weeks of regular use.
Here’s how to clear cache for any app:
Repeat this process for your heaviest apps, then restart your phone and check whether the hanging has reduced.
Fix 2: Use Your Phone’s Built-In System Cleaner
Most Android phones come with a built-in System Cleaner or Phone Manager tool that most people never open.
Most Android phones include a built-in System Cleaner or Phone Manager tool that most users never open. This tool scans system cache and temporary files across all apps simultaneously and can safely free up significant storage space in a single tap.
Look for a built-in app called Phone Manager, Device Health, or Files. Open it, find the Clean or Optimize option, and follow the prompts to remove identified junk files.
This tool is safer than third-party cleaning apps because the built-in cleaner understands your phone’s file structure and won’t accidentally remove files the system depends on.
Fix 3: The Leftover Folders Nobody Tells You to Delete
When you uninstall an app, the app itself is removed but the folders it created in your internal storage often remain. Most users don’t realize this, and it explains why storage can still feel full even after deleting apps.
These leftover folders accumulate silently. Old podcast apps, video editors, download managers, and social media apps all create their own storage directories that outlast the apps themselves.
How to find and delete leftover folders: Open your phone’s built-in File Manager. Navigate to Internal Storage or Internal Memory. Browse through the folder list. Look for names that match apps you’ve already deleted. Tap and hold any recognized leftover folder. Delete it.
I’ve recovered a gigabyte or more of storage this way on a single device. With more free internal storage, your phone has the space it needs to create temporary files and run smoothly.
This is why your phone sometimes shows nearly full storage even after yoOnce your internal storage has breathing room, phone performance improves noticeably because the system has space to create the temporary files it needs to run smoothly.
Fix 4: Move Apps to Your SD Card
If your internal storage stays consistently full and you have a microSD card installed, moving some apps to the SD card frees up valuable internal space.
If your internal storage is consistently full and you have a microSD card installed, moving eligible apps to the SD card frees up valuable internal space.
On most modern Android phones, you can do this natively: go to Settings > Apps, select an app, tap Storage, and look for a Change option to move it to your SD card.
For older devices that don’t offer this native option, search the Google Play Store for a ‘Move to SD Card’ app several reliable tools handle the transfer with just a few taps.
Not every app supports SD card storage because some require internal memory to function properly. But games, media apps, and most utility apps transfer without problems.
Not every app supports moving to SD card because some apps require internal storage to function properly. But many games, media apps, and utility apps transfer without any problems.
Fix 5: Force Stop Background Apps Draining Your RAM
Background apps that you opened hours ago continue consuming RAM even when you’re not actively using them. Battery optimization settings sometimes prevent Android from closing these automatically.
Force stopping unused apps immediately frees RAM and reduces phone lagging.
How to force stop a background app: Open Settings. Tap Applications or Apps. Select the app you want to stop. Tap Force Stop. Confirm the action.
Repeat for any app you haven’t used in the past few hours. Your phone’s available memory increases immediately, giving your active apps more resources.
Force stopping unused apps immediately frees up RAM and reduces phone lagging.
How to force stop a background app:
- Open Settings
- Tap Applications or Apps
- Select the app you want to stop
- Tap Force Stop
- Confirm the action
Repeat this for any app you haven’t used in the past few hours. Your phone’s available memory increases immediately, and your active apps get more resources to work with.
When None of These Fixes Work: Last Resort Options
If you’ve worked through every fix in this article and your phone is still hanging, freezing, or dropping calls, the problem runs deeper than routine maintenance can solve. If you’ve worked through every fix in this article and your phone is still hanging, freezing, or dropping calls, the problem runs deeper than routine maintenance can solve. At this point, there are three remaining paths.
Safe mode identifies whether a problem app is the culprit. A factory reset clears everything and starts fresh. And sometimes the right answer is professional repair especially when the issue is hardware-related.
There are three remaining paths forward. Safe mode helps identify software conflicts. A factory reset clears everything and starts fresh. And sometimes the honest answer is that professional repair is the right call.
How to Boot Into Safe Mode to Find the Problem App
Safe mode is a diagnostic state where your Android phone runs using only its original built-in apps.
Safe mode is a diagnostic state where your Android phone runs using only its original built-in apps. It temporarily disables every third-party app you’ve installed, making it the most reliable tool for identifying whether a rogue app is causing your phone to hang.
If your phone works perfectly in safe mode but freezes in normal mode, a third-party app is definitely causing the problem.
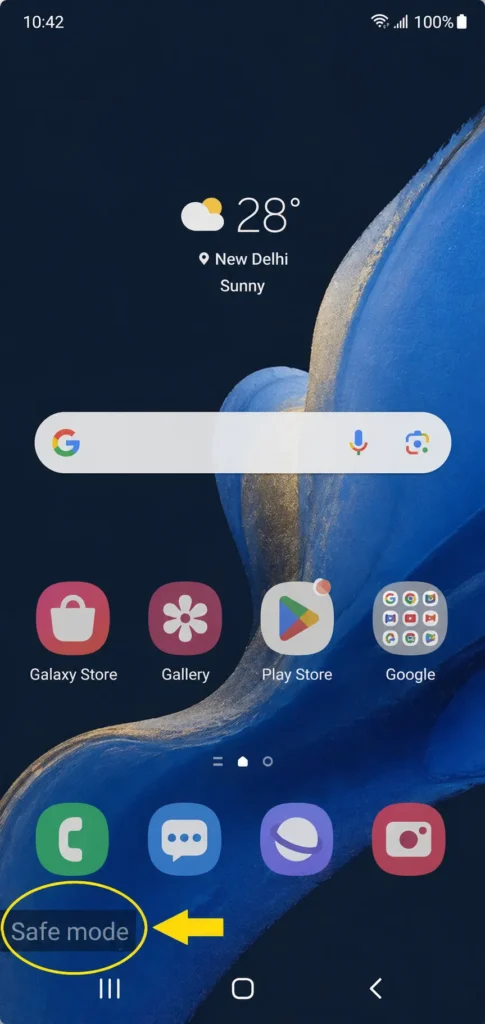
How to enter safe mode on Android: Press and hold the Power button until the power menu appears. Press and hold the Power Off option on screen. When prompted to reboot into safe mode, tap OK. Your phone restarts with ‘Safe mode’ displayed in the bottom corner.
Use the phone normally for 10 to 15 minutes. If the hanging stops, an app is the cause.
How to identify the culprit: Think back to the last app you installed before the hanging started and uninstall that first. If you can’t identify one app, uninstall your most recently added apps one at a time until the freezing stops in normal mode.
To exit safe mode, restart your phone normally.
Factory Reset: What It Does and How to Do It Without Losing Everything
A factory reset, also called a hard reset, returns your phone completely to the state it was in when you first bought it. A factory reset erases all apps, settings, photos, messages, and personal data from the device.
A factory reset — also called a hard reset — returns your phone to the exact state it was in when you first bought it. This erases all apps, settings, photos, messages, and personal data.
This is permanent and cannot be undone. Everything stored only on your device will be gone.
Back up these items before resetting: Photos and videos (upload to Google Photos or transfer to a computer). Contacts (sync to your Google account via Settings). Important messages or documents. App login details and passwords.
How to perform a factory reset: Open Settings. Tap System or General Management. Tap Reset or Reset Options. Tap Factory Data Reset or Erase All Data. Read the warning screen carefully. Enter your PIN or password when prompted. Confirm the reset.
Your phone will take several minutes to complete and restart fresh. A factory reset resolves almost every software-related hanging problem because it removes every corrupted file, problematic app, and software conflict simultaneously.Everything stored only on your phone will be gone.
Back up these things before you reset:
- Photos and videos (upload to Google Photos or transfer to a computer)
- Contacts (sync to your Google account in Settings)
- Important messages or documents
- App login details and passwords you might forget
How to perform a factory reset:
- Open Settings
- Tap System or General Management
- Tap Reset or Reset Options
- Tap Factory Data Reset or Erase All Data
- Read the warning screen carefully
- Enter your PIN or password if prompted
- Confirm the reset
Your phone will take several minutes to complete the reset process and restart fresh. After the factory reset, your phone’s internal storage is completely clear and the operating system starts from scratch.
Factory reset resolves almost every software-related hanging problem because the reset removes every corrupted file, problematic app, and software conflict at once.
Signs It’s Time to See a Repair Shop Instead
Knowing when to stop attempting software fixes saves you significant time and frustration. Some phone problems have physical causes that no software solution will ever resolve.
I’ve seen people spend days trying fix after fix on phones that had hardware failure. The software fixes never worked because the real problem was physical damage the whole time.
Visit a repair professional if your phone shows these signs:
- Your screen is unresponsive after multiple force restart attempts and the phone was recently dropped. A damaged digitizer caused by physical impact cannot be fixed with any button combination or software tool.
- Your touchscreen responds inconsistently, with some areas of the screen registering touch and other areas completely dead.
- Your phone shows signs of liquid exposure, including a pink or red indicator inside the SIM card tray, unusual spots under the display, or corrosion around charging ports.
- Your battery is visibly swollen or your phone back cover bulges outward. A swollen battery is a hardware issue that requires immediate professional attention.
- Your phone has been freezing consistently for more than two years despite all maintenance attempts, which may indicate the hardware is simply aging beyond its reliable performance life.
Visiting a repair professional is not admitting defeat. Repair shops can diagnose hardware failure in minutes and often fix touchscreen and battery issues at a fraction of replacement cost.
Knowing when to stop attempting software fixes saves significant time and frustration. Some phone problems have physical causes that no software solution will ever resolve.
Visit a repair professional if your phone shows any of these signs:
Your screen is unresponsive after multiple force restart attempts and the phone was recently dropped. A damaged digitizer from physical impact cannot be fixed by any button combination or software tool.
Your touchscreen responds inconsistently — some areas register touch while others don’t respond at all.
Your phone shows signs of liquid exposure: a pink or red indicator inside the SIM card tray, unusual spots under the display, or corrosion around charging ports.
Your battery is visibly swollen or the back cover bulges outward. A swollen battery requires immediate professional attention.
Your phone has been freezing consistently for more than two years despite all maintenance attempts, which likely indicates the hardware is aging past its reliable performance life.
Visiting a repair shop is not admitting defeat. Professionals can diagnose hardware failure in minutes and often fix touchscreen and battery issues at a fraction of replacement cost. Knowing when to get professional help is the right call for your device and your time.
Stop Your Phone From Hanging Before It Starts
The best way to deal with phone hanging is to stop the problem from developing in the first place. The best way to deal with phone hanging is to stop it from developing. A monthly maintenance routine takes less than 10 minutes and prevents most hanging problems from recurring.
Here’s the checklist I follow each month.
Here is the monthly checklist I follow to keep my phone running smoothly.
Keep Your Storage Comfortably Free
Running your internal storage close to full is one of the fastest ways to degrade phone performance. I recommend keeping at least 1 to 2 gigabytes free as an absolute minimum for best performance, aim for 10 to 15 percent of total storage remaining open.
Each month, spend a few minutes reviewing your photos, downloads, and apps. Delete what you no longer need and move photos to cloud storage or a computer to keep space consistently available.
I recommend keeping at least 1 to 2 gigabytes of storage free at all times as an absolute minimum. For best phone performance, aim for 10 to 15 percent of your total storage remaining free.
Each month, spend a few minutes reviewing your photos, downloads, and apps. Delete content you no longer need and transfer photos to cloud storage or a computer to free up space consistently.
Install System Updates Without Delay
Software updates are not just about new features. System updates frequently contain specific bug fixes that prevent screens from freezing and improve overall stability.
When an update notification appears, schedule it for a time when you’re not actively using the phone, such as overnight. To check manually, go to Settings > About Phone > Software Updates. Checking once a month ensures your phone always runs the most stable version of its operating system.
Avoid Multitasking Overload on Budget Phones
While smartphones are designed for multitasking, doing too much at once on a budget phone with low RAM will cause the device to freeze. While smartphones are designed for multitasking, doing too much at once on a budget phone with limited RAM will cause the device to freeze. This is a consistent pattern on phones running 2GB or 3GB of RAM.
If your phone sits in the budget or mid-range category, be realistic about simultaneous app use. Close apps when you’re done with them rather than leaving everything open in the background. This single habit makes a noticeable difference in day-to-day performance.
If your phone sits in the budget or mid-range category, be realistic about how many apps you run simultaneously. Close apps you finish using rather than leaving everything open in the background. This single habit makes a noticeable difference in day-to-day performance.
Run Your Built-In System Cleaner Monthly
Most Android phones include a built-in system cleaner tool that removes junk files, temporary files, and cached data that accumulates over weeks of normal use. Running the system cleaner once a month prevents the gradual buildup that eventually causes phone lagging.
Open your Phone Manager or Files app, find the Clean or Optimize option, and let the tool do its work. The process takes about one minute and can free up significant storage space each time.
Adjust Screen Timeout and Battery Optimization Settings
Setting your screen timeout to a shorter duration, such as 30 seconds or one minute, reduces unnecessary processor activity when you set your phone down. Combined with battery optimization settings that restrict background app activity, these small adjustments reduce the load on your phone throughout the day.
Setting your screen timeout to a shorter duration — 30 seconds or one minute — reduces unnecessary processor activity whenever you set your phone down. Combined with battery optimization settings that restrict background app activity, these small adjustments reduce the daily load on your phone.
Go to Settings > Display > Screen Timeout and adjust to the shortest duration that feels comfortable. For battery optimization, go to Settings > Battery > Battery Optimization and ensure it’s enabled for apps you don’t need running continuously.
Keep Developer Options Active for Ongoing Performance
If you followed the Developer Options section earlier in this article and disabled animations and background processes, keep those settings enabled permanently. Developer options settings do not reset automatically, so your phone continues benefiting from those performance improvements every single day.
If you followed the Developer Options section and disabled animations and background processes, keep those settings enabled permanently. Developer Options settings do not reset automatically, so your phone continues benefiting from those improvements every day.
Check your Developer Options settings once a month, especially after a major system update, which occasionally resets certain preferences.
Bookmark this checklist and revisit it on the first day of each month. Ten minutes of consistent phone maintenance prevents hours of frustration from dealing with a frozen or hanging phone.
“Hanged Up” or “Hung Up” — Which One Is Actually Correct?
If you searched for ‘phone was hanged up,’ you’re not the only one — thousands of people search this phrase every month, and the confusion is completely understandable.
The correct phrase is ‘hung up,’ not ‘hanged up.’ The verb ‘hang’ is an irregular verb in English, which means its past tense doesn’t follow the standard pattern of simply adding ‘-ed’ to the end.
The phone-related meaning ending a call or a device that froze always uses ‘hung’ as the past tense. The word ‘hanged’ exists in English, but it’s reserved for a very specific historical context unrelated to phones or calls.
Here’s the easy way to remember it: you hang a picture, and the picture is hung. You hang up a call, and the call was hung up. Neither situation ever uses ‘hanged.’
Is It Correct to Say My Phone Hanged?
No, saying “my phone hanged” is not grammatically correct in standard English. The correct past tense when talking about a phone call or a frozen device is “hung.” So the right phrases are “my phone hung up,” “the call hung up,” or “my phone hung” when describing a frozen device.
The word “hanged” exists in English, but the language reserves “hanged” for a very specific and narrow historical context. Outside of that single context, every other use of the verb “hang” uses “hung” as its past tense form.
This is one of those grammar quirks that trips up native English speakers and learners alike. The verb “hang” is what linguists call an irregular verb because the correct past tense form does not follow the standard pattern of simply adding “ed” to the end.
So why do so many people say “hanged up” naturally? Because adding “ed” to create a past tense feels instinctive in English. Most verbs work that way. When someone says “my phone hanged up” or “the call hanged,” they’re applying a logical pattern that simply doesn’t apply to this particular word.
Here’s how to remember the correct form:
When you end a phone call, you say the call was “hung up.” When your Android operating system freezes and stops responding, you say your phone “hung” or is “hanging.” Neither situation ever uses “hanged.”
A simple way to remember this: if you’re talking about phones, calls, pictures on a wall, or anything similar, always use “hung.” You hang a picture and the picture is hung. You hang up a call and the call is hung up.
Getting this right takes one moment of awareness, and after that it becomes second nature.
Frequently Asked Questions
Will clearing my phone app’s cache delete my contacts or call history?
No, clearing your Phone app cache will not delete your contacts or call history. Contacts are stored in a separate app and synced to your Google account they exist completely independently from the Phone app’s cache. Clearing Phone app cache only removes temporary files the app uses to load faster.
Call history might reset in some cases, but only if you select Clear All Data rather than Clear Cache. Always choose Clear Cache specifically it is completely safe for all personal information.
Is it “phone was hanged up” or “phone was hung up”?
The grammatically correct phrase is “phone was hung up,” not “phone was hanged up.” The verb “hang” is an irregular verb in English, which means its past tense doesn’t follow the standard pattern of adding “ed” to the end.
When you’re talking about phones, calls, or objects in general, always use “hung” as the past tense. You hung up the call. The picture was hung on the wall. Your phone hung when the screen froze.
The word “hanged” exists in English, but it’s only used in very specific historical contexts related to execution by hanging. In all other situations involving phones, calls, or everyday objects, “hung” is the correct form.
Both versions are commonly searched because adding “ed” feels natural in English, even though it’s incorrect in this case.
What do I do if my phone is completely frozen and the screen won’t turn on at all?
Start by plugging your phone into a charger and waiting 15 minutes. A completely drained battery can look identical to a frozen phone because the device won’t respond to anything you do.
After 15 minutes of charging, try a force restart using the button combination for your device. Press and hold the Power button and Volume Down buttons together for at least 15 seconds until the screen goes black and you see your phone’s logo.
If your phone was recently dropped before it froze completely, the digitizer screen component may have suffered physical damage. Physical damage from drops cannot be fixed with any button combination or software method. In that case, a repair shop is your best option rather than continuing troubleshooting attempts.
A frozen screen with no response after multiple force restart attempts usually indicates either a drained battery, corrupted software, or physical damage to the digitizer.
Why do my calls keep hanging up automatically on Android?
Call dropping on Android phones usually happens because of corrupted cache in your Phone app or glitches in your network configuration. The problem is almost always fixable with simple steps.
Try these fixes in order. First, enable Airplane Mode for 10 seconds then turn it off. This resets your network connection with your carrier. Second, clear your Phone app cache through Settings > Apps > Phone > Storage & Cache > Clear Cache. Third, reset your network settings through Settings > System > Reset > Reset Wi-Fi, mobile and Bluetooth.
Full internal storage can also cause calls to drop because your phone needs free space to process active calls. Check your storage and delete unnecessary files if you’re near full capacity.
If calls continue dropping after these steps, contact your mobile carrier to check for network issues in your area.
How do I stop my Android phone from hanging permanently?
Keep your internal storage above 2 gigabytes free at all times as an absolute minimum. Use Developer Options to limit background processes by setting Background Process Limit to No Background Processes. Clear your app caches monthly, keep your software updated with every system update, and use your phone’s built-in System Cleaner weekly.
For budget phones with limited RAM, avoid running resource heavy applications that exceed your device’s hardware capacity. Running demanding games or editing apps on a phone with 2GB or 3GB of RAM will cause frequent freezing because the processor simply cannot handle the load.
Consistent prevention is far easier than dealing with repeated hanging problems. A simple monthly maintenance routine takes about 10 minutes and prevents most hanging issues from developing in the first place.
Is it safe to use Developer Options on my Android phone?
Yes, Developer Options is safe when you stick to the specific settings covered in this article: limiting background processes and disabling animations. Both are reversible and carry zero risk of data loss.
One note: setting Background Process Limit to ‘No Background Processes’ can delay push notifications for some messaging and email apps. If you notice this after applying the change, switch to ‘At most 2 processes’ instead — this still improves performance while keeping notifications working normally.
Your contacts, photos, messages, and all personal data remain untouched when adjusting Developer Options.
Can I fix a hanging phone without losing my data?
Yes, most of the fixes throughout this article carry zero data loss risk. Force restart, Accessibility settings adjustments, Developer Options changes, clearing cache, and resetting network settings all preserve your photos, messages, contacts, and all personal data completely.
Only a factory reset erases everything on your phone, and that should only be attempted as an absolute last resort after backing up all your important data first. Even then, a factory reset solves hanging problems in cases where nothing else works.
Start with the safe fixes first. Most phone hanging problems resolve without ever reaching the point where factory reset becomes necessary.


