

Why Your Phone Stops Charging (The 3 Main Culprits)
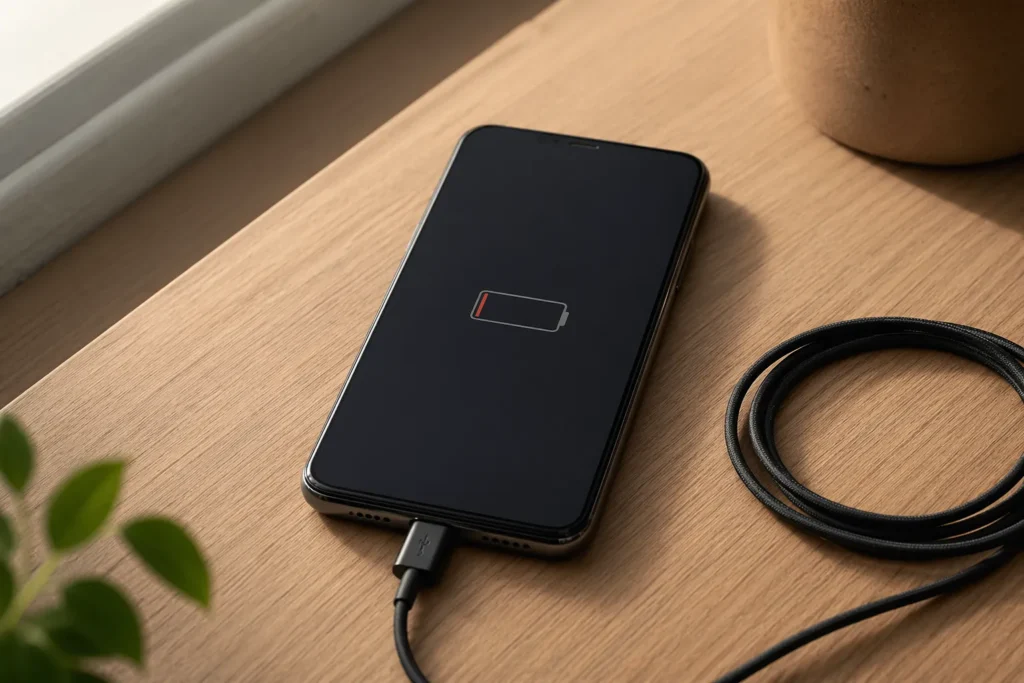
If you’re wondering why my phone not charging, I know exactly how frustrating that feels. Your battery icon sits stubbornly at 1%, the charger is plugged in, and nothing happens. But here’s the good news: this is actually one of the most fixable phone problems out there. Over the past decade, I’ve personally helped troubleshoot hundreds of charging issues, and roughly 90% resolve with simple home fixes that don’t require a repair shop at all.
When your phone stops charging, it almost always comes down to three main categories of problems. Understanding which category applies to your situation is the first step toward getting your device working again. Let me walk you through what’s typically happening inside your phone when it won’t accept a charge.
The #1 Reason: Pocket Lint and Debris Buildup
The most common culprit by far is debris accumulation inside your charging port what technicians call dirty charging port syndrome. I see this charging port problem far more often than anything else, and what’s happening is actually simple to understand.
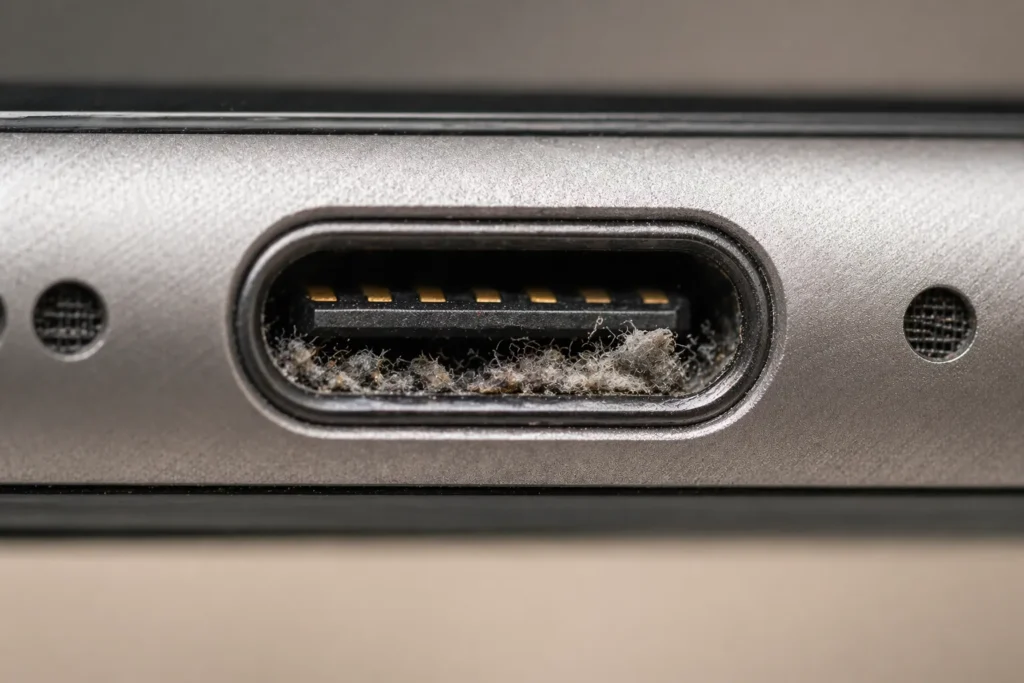
Over time, pocket lint, dust, and small debris particles naturally accumulate in the charging port on your phone. The biggest culprit? Pocket lint from keeping your phone in your pocket or bag. Every single time you plug in your charger, you’re actually compressing this debris deeper into the port. It’s like pushing dirt further into a clogged pipe with every connection attempt. Eventually, the accumulated gunk creates a barrier that prevents a solid electrical connection between your cable and the phone’s internal charging contacts.
This debris buildup doesn’t just happen overnight. It’s a gradual process that accelerates each time you use your charger. The worst part? You probably won’t notice it happening until one day you plug in and nothing occurs. The phone doesn’t even acknowledge the charger is there.
The good news is that dirty charging ports are completely fixable at home. This single issue accounts for roughly 90% of phone charging issues that people experience, which means you have an excellent chance of solving this without spending a dime on repairs.
The #2 Reason: Your Cable or Charger Is Failing
The second most common problem is a defective charging cable or damaged charger. Here’s what I’ve learned from years of troubleshooting: cables fail much more frequently than the wall adapters themselves.
Original chargers rarely stop working on their own. It’s the USB cables that take the punishment. Think about how you use a charging cable. You bend it, coil it, stuff it in bags, and plug and unplug it dozens of times per week. That constant flexing eventually weakens the internal wires inside the cable. Even though the cable looks fine on the outside, the internal copper wires can break, fray, or disconnect.
When a cable starts failing, you might notice the phone only charges when the cable is held at a specific angle, or it charges intermittently. Eventually, it stops working altogether. The tricky part is that a failing cable can make you think your phone’s charging port is the problem when really it’s just the cable.
This is why I always recommend testing with a different charger first. If your phone charges perfectly with someone else’s cable or adapter, you’ve just identified the problem without spending money at a repair shop.
The #3 Reason: Software Glitches or Battery Issues
Sometimes the problem isn’t hardware at all. Software charging glitches happen when your phone’s operating system freezes or malfunctions in a way that prevents it from recognizing the charger.
Software glitches are particularly common when you’re using third-party chargers or low-quality non-original adapters. I’ve seen cases where substandard chargers send confused signals to the phone, causing the system to hang or behave erratically. The battery itself can also degrade over time, especially if you’ve had the phone for several years.
An old or degraded battery might refuse to accept a charge
even when the hardware is functioning normally this is what
we call battery not charging syndrome. If your battery also
shows signs of battery degradation issues, both problems
likely stem from the same root cause: age and battery health.
The encouraging part about software related issues is that they’re often temporary and can be resolved with a simple restart or a few system adjustments that I’ll show you later.
Fake Charging: The Confusing Problem That Mimics a Real Issue
Let me explain a confusing problem that trips up most people: fake charging. This is when you’re asking “why does my phone say its charging but it’s not actually gaining power?” The diagnosis and solution are completely different from true charging failure, which is why I’m addressing it separately.
Fake charging is when your phone displays the charging icon and behaves as if it’s accepting power, but the battery percentage doesn’t actually increase. Or worse, the battery percentage actually drops while the phone insists it’s charging. Your screen might show the lightning bolt symbol or the charging animation, but nothing is actually happening inside the battery.
This specific problem requires a different troubleshooting approach than phones that don’t respond to the charger at all. The diagnosis path is slightly different, and knowing you have fake charging instead of true no-charging can save you hours of frustration trying the wrong fixes.
I mention this here because if you’re in this situation, you’ll want to jump to the section specifically addressing fake charging later in this guide. It’s a distinct problem with its own solutions.
Here’s What This Means for You
You’ve just learned the three main culprits behind charging failures, which puts you ahead of most people experiencing this problem. You know what to look for and what questions to ask yourself about your specific situation.
The pathway forward is clear. You’re going to start with the simplest, quickest fixes that address the most common problems first. If those don’t work, I’ll guide you through more detailed diagnostics to pinpoint exactly which component is actually failing. And if you end up needing professional help, you’ll understand exactly what’s wrong and what it should cost.
The fact that 90% of charging issues can be resolved at home means you have a very good chance of getting your phone working again without a repair bill. Let’s move forward and get your phone charging again.’
QUICK FIXES (START HERE 5 MINUTE SOLUTIONS)
Why My Phone Not Charging: 5 Quick Fixes to Try First
Before spending money on repairs, try these five simple fixes first. Most phones that won’t charge start working again within minutes of attempting these steps. I’ve personally watched countless people skip straight to professional help when their phone would have charged perfectly with just a case removal or outlet swap. Let’s get your device working again without wasting time on complicated troubleshooting.
These fixes are arranged in order of how often they actually solve the problem. Start at the top and work your way down. If one of them works, you’re done. If none of them work, you’ll at least know you’ve eliminated the most common issues, and we’ll move to deeper diagnostics in the next section.
Fix #1: Remove Your Phone Case (Takes 10 Seconds)
Your phone case might be the reason your phone won’t charge, and this is honestly the quickest thing to check. Protective cases, especially thicker or bulkier ones, can sometimes prevent the USB cable from seating fully into the charging port, blocking the connection between your cable and the phone’s internal contacts.
When a charging cable doesn’t insert all the way, it can’t make a solid electrical connection with the internal contacts. The phone might not even recognize that a charger is attached. I’ve seen people replace chargers entirely when all they needed to do was remove their case and try again.
Just slide your phone out of its case. Now plug your charger in firmly and see if it recognizes the connection. You should hear a subtle notification sound or see a charging symbol appear on your screen. If you hear or see that notification, congratulations—your problem is solved. You’ve just saved yourself from hours of troubleshooting. If nothing changes, move to the next fix.
Fix #2: Try a Different Cable and Adapter
The charging equipment itself fails far more often than people realize. Cables wear out from constant bending and use, while adapters can stop working from electrical issues what technicians call a faulty power adapter. Here’s the best way to test which one is actually broken.
Borrow a known working charger from a friend or family member. Use both their cable and their wall adapter together, and plug it into a working wall outlet you’ve already tested. Plug that borrowed charger into your phone and wait about 30 seconds. If your phone suddenly shows the charging symbol and springs to life, you’ve identified the problem. Your original charger or cable is damaged and needs replacement.
The key part: you want to identify specifically whether the cable or the adapter is the problem. Try swapping just the cable first. Keep using the borrowed adapter but use your original cable. If the phone charges, your cable was the issue. If it doesn’t charge, your adapter was the problem. This small test saves you money because you only need to replace the broken component, not the entire charging setup.
If your phone charges with the borrowed equipment but not with yours, a defective charging cable or damaged charger is likely your issue. Both are inexpensive to replace compared to other phone repairs.
Fix #3: Test a Different Power Outlet
Sometimes the problem isn’t your phone or even your charger. Power source problems are real the wall outlet itself might not be delivering power properly. This is easier to test than you’d think.
Walk to a different room and find another wall outlet. Plug in a lamp or phone charger and verify that the outlet actually has power. Now plug your phone charger into that different outlet and try charging again. If your phone charges from the different outlet but didn’t charge from the first one, you’ve found your culprit. The original outlet is faulty and needs to be checked or replaced.
Power source problems account for more dead battery situations than most people realize. An outlet that looks normal might have an internal electrical issue that prevents devices from charging properly. Sometimes the problem is as simple as a tripped breaker or a loose electrical connection inside the wall.
If your phone charges from the different outlet, that original outlet was the problem. Go back and try plugging something else into it to confirm. If nothing works in that outlet, it’s time to contact an electrician to have it inspected. Your phone is completely fine in the meantime.
Fix #4: Restart Your Phone (Force Restart If Needed)
Software charging glitches happen when your phone’s system freezes and prevents it from recognizing the charger. A simple restart can clear this problem. Power off your phone completely using the normal power button shutdown sequence. Wait about 30 seconds. Then turn it back on and plug in your charger immediately.
Give the phone another 30 seconds to recognize the charger after it boots back up. If it recognizes the charging connection, the software glitch is resolved and you’re back in business.
If a regular restart doesn’t work, try a [force restart] (sometimes called a soft reset). This is a more aggressive restart that clears deeper system issues. The button combination varies depending on your phone model. For most Android phones, hold the power button and volume down button simultaneously for about 15 seconds until the screen goes black. If you need detailed Android-specific instructions, you can reference step-by-step guides to how to reset Android phones.
For iPhones, the combination is different depending on your model, but generally involves quickly pressing volume up, then volume down, then holding the side button.
A force restart sometimes solves charging recognition problems that a normal restart misses. After the force restart, plug in your charger and wait to see if the phone recognizes it.
Fix #5: Wait 30 Seconds and Try Again
This sounds too simple, but sometimes the charger just needs a moment to establish a proper connection. Plug your phone in, then step away from it. Don’t touch the phone, don’t move the cable, don’t wiggle the connector. Just leave it alone for 30 full seconds.
The phone’s system and the charger’s circuitry sometimes need a brief moment to communicate and establish a charging connection. You might not see any sign of charging immediately, but patience here can make the difference. After 30 seconds, check if the charging symbol appears on your screen. Sometimes this simple waiting period is all that’s needed.
Still Not Working?
Getting through all five quick fixes without success actually tells you something important. Most of the easiest and most common problems are now eliminated. That narrows down where the real issue actually lives.
The next section covers the number one fix that solves roughly 90% of remaining charging cases. This fix involves cleaning your charging port in a specific way with the right tools, and it’s something you can absolutely do yourself at home.
THE #1 FIX – CLEAN YOUR CHARGING PORT
How to Clean Your Charging Port (The Right Way With Exact Tools)
A dirty charging port is responsible for roughly 90% of phones that won’t charge. The good news is that learning how to clean your charging port takes about 10 minutes and costs nothing. I’m going to walk you through exactly how to do this so thoroughly that your phone starts charging again.
Most people try to clean their charging port and do it wrong, which is why I’m giving you the precise method that actually works. You’ll use three specific steps with tools you probably already have at home. Once you understand the technique, you’ll never waste time guessing about whether your phone is broken again.
Why This Works: Understanding Pocket Lint Compression
Let me show you what’s actually happening inside your charging port. Over time, pocket lint, dust particles, and charging port lint naturally accumulate in that small opening on your phone. But the problem isn’t just the accumulation itself. Every time you plug in your charger, you’re pushing that debris deeper into the port.
Think of it like compressing garbage into a trash can. The first piece goes in easily. By the hundredth piece, everything is packed tight and nothing fits anymore. Your charging cable is doing the same thing to the debris inside your port. With each plug and unplug cycle, the gunk gets compressed further and harder to dislodge. Eventually the debris creates a barrier thick enough that the cable can’t make proper electrical contact with the internal charging pins.
This compression happens gradually, so you don’t notice until suddenly your phone stops charging entirely. The debris has become so compacted that a surface-level cleaning won’t remove it. You need a more aggressive approach to break that compaction and extract what’s trapped inside. Knowing this helps you understand why gentle cleaning sometimes fails and why you need to go deeper into the port.
Tools You’ll Need (All Household Items)
You probably have every single tool already sitting in your home. There’s nothing special to buy, and you don’t need any expensive equipment.
Here’s your complete toolkit:
Here is everything you need, most of which is already in your home:
A soft-bristled toothbrush (an old one works perfectly) is your starting tool. Hard bristles can scratch the interior of the port, so older and worn down is actually better here.
A wooden toothpick is the most important tool for deep cleaning. Never use plastic and absolutely never use metal. I’ll explain the specific consequence of metal tools shortly.
Isopropyl alcohol from any drugstore is optional but highly recommended. Fast-evaporating isopropyl alcohol is ideal because it dries without leaving residue inside the port.
Wood-pulp tissue or a non-woven face towel wraps around the toothpick to carry the alcohol into the port. Regular tissue works in a pinch but may fall apart when dampened.
A hairdryer on the cool setting dries the port after cleaning. Cool air only, never hot.
Compressed air is an alternative if you’re uncomfortable inserting anything into the port. It’s safer but less effective against compacted debris.
That’s genuinely all you need. Most people have these items already. If you don’t have isopropyl alcohol, you can still clean effectively with just the toothbrush and toothpick.

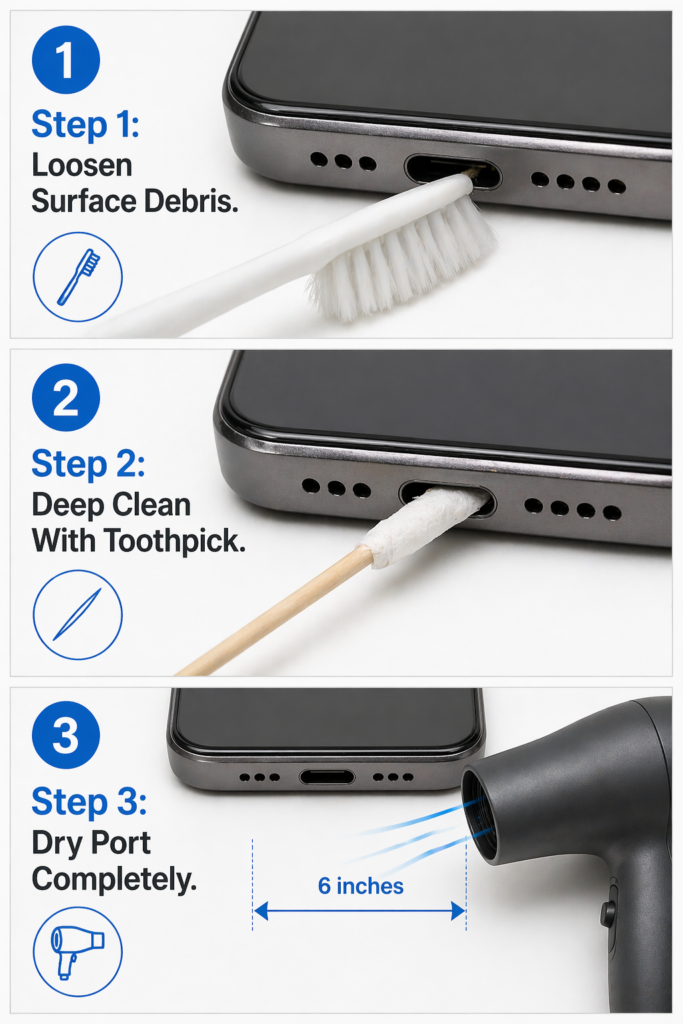
Step 1: Loosen Loose Debris With Toothbrush
Start with the gentlest approach. Take your old toothbrush and gently brush the opening of the charging port. You’re not trying to penetrate deep inside yet. You’re just sweeping away loose dust and lint particles that are sitting on the surface.
Hold your phone at an angle so gravity helps the debris fall away from the port. Brush gently in and out of the opening, using light pressure. You’ll be surprised how much dust comes out with just this basic brushing. Don’t press hard or scrub aggressively. The goal is to remove what’s loose without forcing anything deeper.
This first step removes the easy stuff. You might even hear or see debris falling out. If you look closely with good lighting, you can sometimes see how much lint and dust was sitting right at the entrance of your charging port. Once the loose debris is removed, you’re ready for the more detailed cleaning.
Step 2: Deep Clean With Wooden Toothpick (The Critical Step)
Now comes the most important step: removing the compacted debris that’s been pushed deep into the port.
Take your wooden toothpick and gently insert it into the charging port. Move slowly and use gentle pressure. You’re not trying to stab or force anything. You’re carefully loosening and extracting the compressed debris that’s stuck inside.
For better results, wrap a small piece of wood-pulp tissue around the tip of the toothpick. Now dip that tissue-wrapped end into a small amount of isopropyl alcohol. The alcohol helps dissolve the built-up gunk and makes it easier to extract. Gently insert the tissue-covered toothpick into the charging port and move it slowly back and forth.
Be methodical about this. Work your way around the inside of the port, gently probing different areas. You’ll feel slight resistance as you encounter accumulated debris. Work on that resistance carefully until you feel it loosen. You might be shocked at how much material comes out. I’ve seen people pull out gunk that looks like it couldn’t possibly have fit in such a small space.
The wooden toothpick is gentle enough not to damage the delicate internal pins and connectors, but firm enough to break up and extract compacted debris. This combination makes it the perfect tool for this task. Keep going until you feel like you’ve covered the entire interior of the port and the resistance has decreased significantly.
Step 3: Dry the Port Completely (Don’t Skip This)
After you’ve extracted all that debris, any remaining alcohol or moisture needs to evaporate completely before you plug in your charger. This is important because you don’t want any liquid near the electrical connections.
Use a hairdryer on the cool or low setting to blow air into the charging port. Hold it about six inches away and direct the airflow into the port opening. Do this for about two minutes to ensure all moisture has evaporated. The cool air from the hairdryer will help the alcohol evaporate without generating heat that could damage sensitive components.
Once you’ve finished with the hairdryer, wait another minute or two before plugging in your charger. This gives any remaining moisture time to evaporate naturally. Now plug in your charger and see if your phone recognizes it. In most cases, you’ll immediately see the charging symbol appear on your screen.
If it worked, congratulations. Your charging port is now clean and your phone is charging normally again. If it didn’t work on the first try, you might need to repeat this cleaning process one more time, focusing on any areas that still feel resistant.
Critical Warning: Never Use Metal Tools
This warning matters more than any other tip in this guide: using metal tools is the single biggest mistake people make when cleaning their charging port.
The inside of your charging port contains delicate metal pins and connectors that form the charging circuit. If you use a metal tool like a needle, paperclip, or pin, you risk scratching or damaging these internal contacts. Metal also conducts electricity, which means you could accidentally short circuit the internal charging circuit.
Even a tiny scratch on those internal pins can prevent proper charging connection. In the worst cases, a damaged charging port requires professional replacement, which costs between 100 to 150 dollars. A wooden toothpick costs nothing and does the job perfectly without risk. The difference in cost is enormous, and the difference in safety is even more important.
The rule is simple: wooden or plastic tools only, never metal. Your phone’s charging port is too fragile and too expensive to repair if you damage it with the wrong tool.
The Alternative Method: Compressed Air
If you’re uncomfortable inserting anything into your charging port, even a wooden toothpick, compressed air offers a safer alternative.
Purchase a can of compressed air from any electronics or office supply store. Follow the instructions on the can and blow short bursts of compressed air directly into your charging port. The force of the air dislodges and ejects dust and debris without requiring you to insert any tool into the port itself.
Compressed air is gentler and carries virtually no risk of damaging internal components. The tradeoff is that it’s typically less effective than the toothpick method for removing heavily compacted debris. If your debris buildup is mild to moderate, compressed air might solve the problem completely. If the buildup is severe, you might need to follow up with the toothpick method for better results.
Either way, once you’ve cleaned your charging port, your phone should charge again. This simple maintenance fix solves the majority of charging problems without requiring professional help or replacement parts.
DIAGNOSE CABLE VS. ADAPTER VS. PORT FAILURE
Why Is My Phone Charger Not Working? A Smart Diagnostic Guide
If you’ve cleaned your charging port and your phone still won’t charge, you have an actual hardware failure somewhere in your system. The good news is that you can figure out exactly which part is broken without guessing. This section teaches you how to test systematically so you only replace what’s actually faulty.
Most people don’t realize they can diagnose charging problems like a technician would. You’re going to learn three different testing methods that get progressively more technical. Start with the simplest approach first. If that doesn’t give you an answer, move to the next method.
Method 1: Borrow a Known-Working Charger
The fastest way to identify a broken charger is to test your phone with someone else’s charging equipment. This is straightforward but incredibly effective.
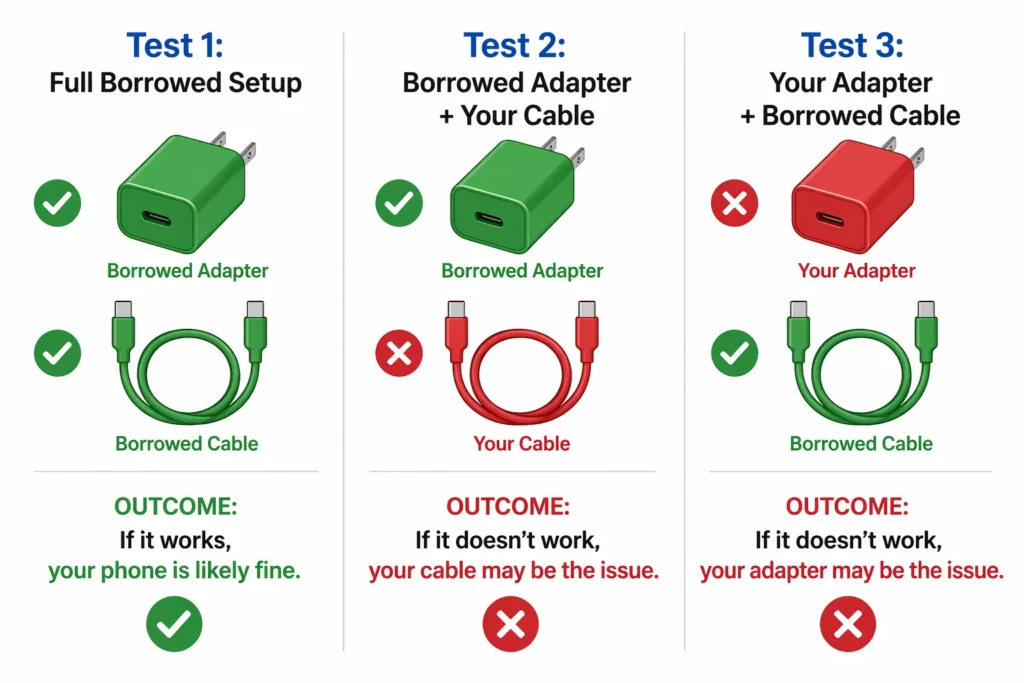
Ask a friend or family member if you can borrow their charger. Make sure they use the same type of phone or at least the same charging connector type as you do. Plug that borrowed charger into your phone and wait about 30 seconds. If your phone immediately shows the charging symbol and starts accepting power, you’ve just identified the problem. Your original charger is faulty.
The critical next step is determining if the problem is the cable or the wall adapter. Keep using the borrowed wall adapter but swap back to your original charging cable. If your phone charges with the borrowed adapter and your cable, your adapter is what’s broken. If it doesn’t charge, your cable is the problem.
Try one more combination: use your original adapter with the borrowed cable. If it charges, your cable is definitely the culprit. If it doesn’t charge, your adapter is faulty. This simple swap test tells you exactly which component needs replacement without any guesswork.
A defective charging cable is far more common than a faulty adapter. In my experience, cables fail at roughly three times the rate of adapters because they absorb all the physical stress of daily use. If your cable is the problem, you’ll spend about 15 to 30 dollars on a replacement. If your adapter is broken, replacement costs around 20 to 40 dollars depending on your phone brand.
Method 2: Use the Ampere or Charger Tester App
This method is more technical but gives you precise information about whether your charger is actually delivering proper power through correct voltage regulation.
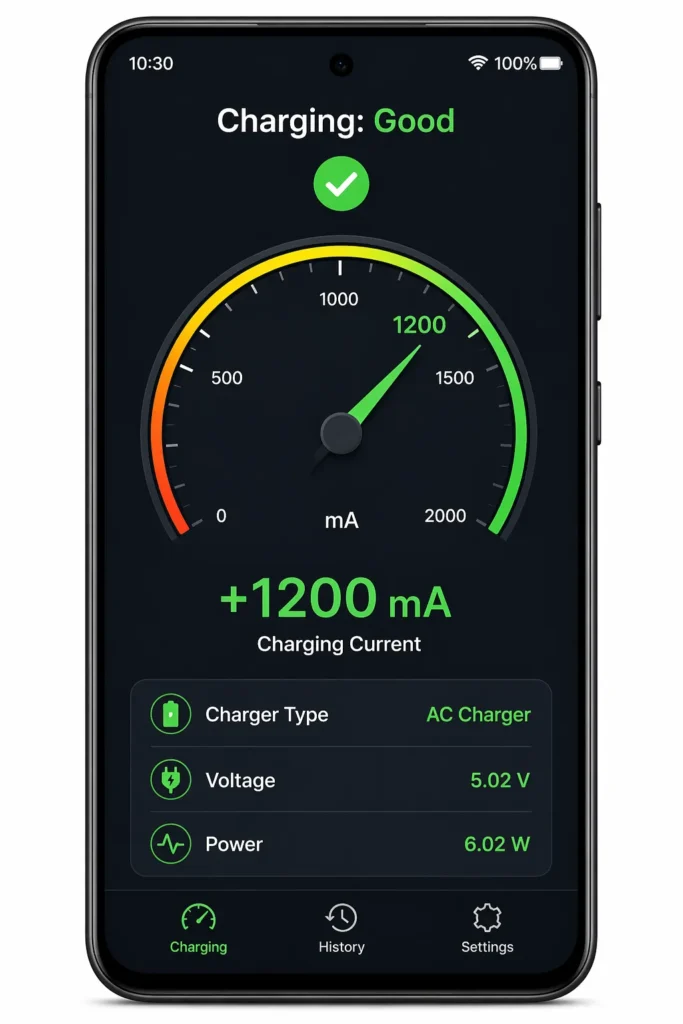
Download the Ampere app or Charger Tester app from your phone’s app store. These apps measure the actual electrical current flowing from your charger into your phone. Your phone needs at least some battery power to run the app, so this method works best if your phone has a bit of charge left or if you can charge it temporarily with a borrowed charger.
Open the app and plug in your charger. Wait five to ten seconds for the app to read and display the charging amperage. The app shows a number measured in milliamps, which is abbreviated as mA.
What you’re looking for is the current output. A healthy charger delivering normal power shows a reading between 500 and 1500 milliamps depending on your phone type. Most modern phones that support fast charging technology expect around 1000 to 1500 milliamps. If your app reads over 1000 milliamps, your charger is delivering power properly and is working fine.
If the reading is under 500 milliamps, your charger is either low quality or damaged. It’s not delivering enough power, which causes slow charging issues even when the phone technically recognizes the charger. Some cheap or knockoff chargers intentionally deliver low power, which is why this app is so useful for identifying poor quality equipment.
If the reading is extremely high, over 2000 milliamps, that indicates a problem with the charger. Excessive amperage puts dangerous stress on your phone’s internal charging circuit and can cause permanent damage over time.
This app gives you concrete data instead of guessing. You can take a screenshot of the reading and show it to a technician or retailer if you need to explain why your charger isn’t working properly.
below 500 mA means it needs replacing.
Method 3: Test With Wireless Charging (If Your Phone Supports It)
If your phone supports wireless charging, you have a clever diagnostic approach that rules out wireless charging problems and helps narrow down whether your issue is the cable, adapter, or physical charging port itself.
Borrow or use a wireless charging pad and place your phone on it. If your phone charges wirelessly without any issues, you now know that the charging port on your phone is working fine. The problem must be either your cable or your adapter.
Why does this matter? A wireless charger completely bypasses your phone’s charging port and cable. It communicates with your phone through electromagnetic waves instead of direct electrical contact. If wireless charging works but wired charging doesn’t, the fault is definitely in your cable, adapter, or the physical connection between them and your phone’s port.
This eliminates the most expensive repair possibility. Port replacement costs 100 to 150 dollars. Cable or adapter replacement costs only 20 to 50 dollars. If wireless charging works, you’ve just saved yourself potentially hundreds of dollars by confirming that your phone’s port is still intact.
If wireless charging doesn’t work either, then you might have a deeper internal problem with your phone’s charging circuit itself. At that point, professional diagnosis becomes necessary.
Interpreting Your Results: What the Readings Mean
Here is what your diagnostic results actually mean so you know exactly what to do next.
If a borrowed charger fixed the problem immediately, your original charger is broken. Use the swap test from Method 1 to identify whether it’s the cable or the adapter.
If you used the Ampere or Charger Tester app, interpret your reading like this:
Over 1500 milliamps: Your charger is working well. The problem is not your charger. Look elsewhere.
Between 500 and 1500 milliamps: Your charger is functional but possibly running below peak capacity. Charging may be slow. Consider replacement if you want faster charging.
Under 500 milliamps: Your charger is definitely not delivering adequate power. It’s either damaged or low quality. Replace it.
If wireless charging worked but wired charging didn’t, your charging port is intact. The problem is your cable or adapter. Replace just the faulty component.
If neither wireless nor wired charging works, your phone likely has an internal charging system problem that requires professional diagnosis.
These diagnostic methods remove the guesswork from charging problems. You now know exactly what’s broken instead of just guessing and hoping. That knowledge saves you money because you replace only what actually failed instead of replacing multiple components unnecessarily.
SOLVE FAKE CHARGING PROBLEMS
Why Does My Phone Say Its Charging But It’s Not? Here’s the Answer
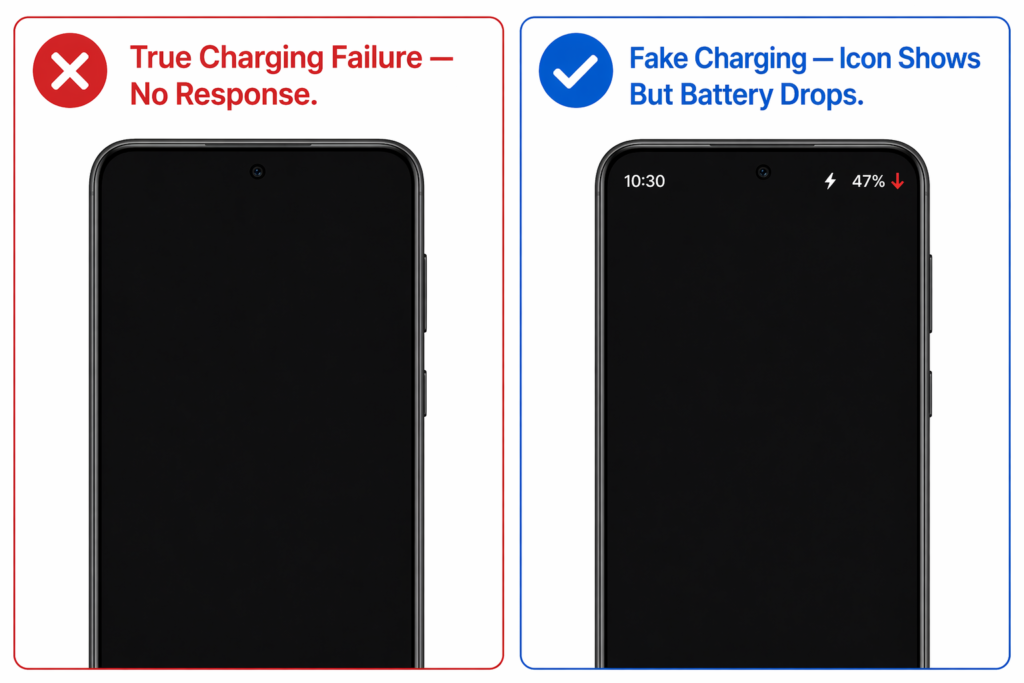
Fake charging is a frustrating problem that confuses most people because their phone is displaying charging signals while simultaneously refusing to actually charge. Your screen shows the lightning bolt icon or the charging animation, but your battery percentage stays at the same level or even drops lower. This is a completely different problem from a phone that doesn’t respond to the charger at all, and it requires a different diagnosis approach.
I want to explain this problem specifically because many people don’t realize it’s distinct from true charging failure. If you’re in this situation, you need to know that the fixes are different and the root causes are different. Let me walk you through what’s actually happening and how to solve it.
What Fake Charging Means
Fake charging occurs when your phone displays the charging symbol and behaves as though it’s receiving power, but the battery percentage doesn’t actually increase. Sometimes the battery percentage even decreases while your phone insists it’s charging. This creates the frustrating experience of thinking your problem is solved when you plug in your charger, only to discover hours later that your battery has gotten worse instead of better.
This is distinct from a phone that won’t charge at all. A phone with true charging failure shows zero response to the charger. No charging symbol appears. No notification sounds. The screen stays completely dark. Fake charging is the opposite. The phone acknowledges the charger and behaves normally except for the one crucial part: the battery doesn’t actually accept power.
The reason fake charging deserves its own section is that the diagnosis and solutions differ significantly from complete charging failure. You’re going to approach this problem differently than you would approach a phone that doesn’t respond to the charger at all.
Why It Happens (3 Main Causes)
Fake charging usually stems from one of three sources. Understanding which one applies to your situation guides you toward the right fix.
The most common cause is a partially dirty charging port. When your charging port contains some debris but not enough to completely block the connection, the cable can partially seat inside the port. The connection is incomplete, which tricks your phone’s system into thinking it’s charging when it’s actually only getting trickle power at best. Your phone displays the charging symbol because it detects some electrical contact, but the current is too weak to actually charge the battery. Meanwhile, your phone continues running and consuming power, so the battery percentage drops.
The second cause is a faulty charging cable that sends confused signals to your phone’s system. A damaged cable can make intermittent contact with the charging port or send abnormal electrical signals that confuse your phone’s charging circuit. Your phone interprets these signals as charging and displays the charging icon, but the cable isn’t actually delivering usable power. The phone is essentially fooled into thinking it’s charging when it isn’t.
The third cause is a software charging glitch or charging circuit malfunction. Your phone’s operating system can sometimes misinterpret the charging status due to a software bug or outdated battery health information. Alternatively, the charging circuit itself can malfunction, causing your phone to display charging signals without actually accepting current from the charger.
Fix #1: Clean the Port Again (More Thoroughly)
Since partial port blockage is the most common cause of fake charging, thorough port cleaning should be your first attempt at solving this problem.
Go back to the how to clean charging port method I described earlier, but be even more thorough this time. The fact that you’re getting fake charging signals tells me that some electrical contact is happening, which means debris is partially blocking but not completely blocking the port. You need to remove every trace of that debris to create a solid connection.
Pay special attention to the sides and back of the charging port where lint tends to accumulate. Use the wooden toothpick method with alcohol and work methodically through different areas of the port. Sometimes what looks clean on the surface still has compacted debris hidden in the corners or along the edges. Once you’ve finished cleaning, use the hairdryer to dry the port completely.
After cleaning, test your phone with the charger. The battery percentage should start increasing within a few minutes if the port cleaning solved the problem. If you still see fake charging, move to the next fix.
Fix #2: Try a Different Cable and Adapter
A faulty charging cable is a prime suspect in fake charging situations. The cable can be sending false signals to your phone while delivering inadequate or no actual power.
Borrow a working charger from someone and test your phone with both the borrowed cable and the borrowed adapter. If your phone charges normally with the borrowed equipment, your original cable or adapter is the problem. Use the component swap testing method I described in the diagnostic section above to identify whether it’s the cable or the adapter that’s faulty.
A defective charging cable might still make electrical contact with your phone’s port, which is why your phone displays the charging symbol. But the damage inside the cable prevents proper power delivery. When you switch to a functional cable, the connection becomes solid and charging proceeds normally.
Fix #3: Force Restart and Clear Battery Cache
Software glitches can cause fake charging by making your phone misread its charging status. A force restart, sometimes called a soft reset, clears these glitches by restarting your phone’s system completely from scratch.
Power off your phone completely using the force restart method for your specific device. I covered the exact button combinations for Android, iPhone, and Samsung earlier in this guide. After the force restart completes, plug in your charger immediately and wait a few minutes to see if the battery percentage starts rising.
After the force restart, plug in your charger immediately and wait a few minutes to see if your phone begins charging normally. If you still see fake charging, your software might need a deeper fix. Some Android phones have a battery cache that stores charging information. You can clear cache through your phone’s settings under Storage or Device Care, though the exact location varies by manufacturer.
If none of these fixes resolve the fake charging problem, you likely have a hardware issue with your phone’s charging circuit that requires professional diagnosis. At that point, contact a technician who can test your phone’s internal charging components.
SOFTWARE TROUBLESHOOTING & BATTERY OPTIMIZATION
Software Fixes That Solve Charging Problems
Sometimes your phone’s charging problem isn’t hardware at all. Your operating system can develop glitches that prevent your phone from recognizing the charger or accepting power properly. The good news is that software issues are often fixable with settings adjustments and restarts that you can do yourself in minutes.
I’m going to show you specific techniques that address software charging glitches. These methods work across most phones, and I’ll also include device-specific instructions for Samsung users since Samsung phones have unique diagnostic tools built into their settings.
The Three-Button Force Restart (Different by Device)
A force restart is more powerful than a normal shutdown and restart because it clears deeper software issues that interfere with charging recognition. If you haven’t tried the force restart method for your specific device yet, follow the button combination instructions in the Quick Fixes section above. Complete the force restart, then immediately plug in your charger before trying anything else in this section.
For Most Android Phones:
Simultaneously press and hold the power button and the volume down button together. Keep holding both buttons for about 15 seconds until your screen goes black. Your phone may vibrate or show a recovery menu. Just wait until the screen turns completely dark. Then release both buttons and let your phone restart normally. Once it boots back up, plug in your charger immediately and wait to see if charging begins.
For Samsung Phones:
Press the power button and the volume down button at the same time and hold both for approximately 10 to 15 seconds. You might see a power menu appear or the screen might go black. Either way, keep holding until you see signs of the restart sequence. Once the phone restarts, plug in your charger right away.
For iPhones:
The method depends on your iPhone model. For iPhone 8 and newer, quickly press the volume up button, then quickly press the volume down button, then press and hold the side button until you see the Apple logo appear. For older iPhones with a home button, press and hold both the top button and the home button until the Apple logo shows up.
For Google Pixel Phones:
Hold down the power button and volume down button simultaneously for about 10 seconds until the phone restarts. The screen may show the boot animation or a menu before fully restarting.
A force restart clears temporary software glitches and resets your phone’s charging detection. After the restart, give your phone 30 seconds to fully load before judging whether charging is working. Sometimes the system needs a moment to recognize the charger after booting. For detailed Android reset instructions if you need additional guidance beyond the basic force restart procedure, you can consult a comprehensive reset guide.
Disable and Reset Fast Charging
If fast charging not working is your main issue, the fast charging feature itself might be stuck or malfunctioning. Here’s a reset trick that works surprisingly well.
Go to your phone’s Settings menu and find the Battery option. Look for any settings related to fast charging, charging speed, or charging optimization. The exact location varies by manufacturer but it’s typically under Battery or Device Care.
If fast charging is currently enabled, turn it off completely. Let your phone sit without charging for three to five hours. During this time, your phone’s charging circuit completely resets. After those hours pass, go back into Battery settings and turn fast charging back on.
This simple disable-and-enable cycle often resets whatever was preventing fast charging from functioning. It’s one of those fixes that seems too simple to work but genuinely does in many situations. The reason it works is that your phone’s charging system sometimes gets confused about the charging status and needs that complete reset to restore normal function.
Android Only: Change USB Configuration in Developer Options
This is an advanced technique that changes your phone’s USB charging protocol to prioritize power delivery over data transfer. Most phones are set to allow both data and charging simultaneously, which can sometimes interfere with proper charging.
To access Developer Options, go to your phone’s Settings and find About Phone. Look for a field called Build Number. Tap that Build Number field repeatedly, usually seven to ten times, until you see a message saying you’ve unlocked Developer Options.
Go back to Settings and look for Developer Options, which should now be visible. Once inside, scroll down to find Default USB Configuration. Tap that option and select Charging Phone Only. This setting tells your phone to ignore data transfer requests when plugged in and dedicate all resources to charging instead.
Changing this setting sometimes solves charging problems for Android users because it eliminates the competing demands on your phone’s charging circuit. The USB port no longer tries to manage data transfer and charging simultaneously, which removes a source of potential conflict.
Enable Airplane Mode While Charging
Enabling airplane mode while charging is one of the most underused speed improvements available. Background apps and system updates consume power even while your phone is plugged in, which directly slows down charging.
Enable Airplane Mode before you plug in your charger. Swipe down from the top of your screen to access Quick Settings and tap the Airplane Mode icon. Your phone disconnects from cellular networks and Wi-Fi, which stops background apps from draining power and prevents system updates from downloading mid-charge.
With Airplane Mode on, all the charging power goes directly into your battery instead of being divided between charging and powering background processes. Your phone charges noticeably faster with Airplane Mode enabled. This is especially useful if you need your phone charged quickly or if your phone is charging slowly for no obvious hardware reason.
Just remember to turn off Airplane Mode after your phone finishes charging so you can receive calls and messages again.
Clear Cache and Background Processes
Your phone’s cache stores temporary data from apps and the system itself. Over time, this cache can become corrupted or bloated, which sometimes interferes with charging recognition. When you clear cache, your phone is forced to rebuild fresh temporary files, removing any corrupted data that may be causing charging misreads.
For most Android phones, go to Settings, find Storage or Device Care, and look for the clear cache option. Confirm when your phone asks if you’re sure, and let the process complete. Clearing cache removes temporary files but never deletes personal data or apps.
Additionally, close unnecessary background apps before charging. Open your recent apps list by swiping up from the bottom or tapping the recent apps button. Swipe away any apps you don’t need running. The fewer apps consuming battery power, the more charging capacity is available for actually charging your battery.
Samsung Only: Use Built-in Diagnostics
Samsung Galaxy charging diagnostics are built directly into the phone’s settings, a feature most users never discover. This tool tells you exactly whether your cable is working properly and whether your battery health is acceptable.
Go to Settings and find Battery. Scroll down and look for Diagnostics or Phone Diagnostics. Tap to open the diagnostic tool. Select Cable Charging and connect your charger. The diagnostic tool tests your charging cable while plugged in and reports whether the cable is functioning normally.
Also check the Battery Status option within diagnostics. Samsung displays your battery health status as Life: Good, Life: Normal, or similar ratings. A battery showing poor health likely needs replacement even if charging technically works.
This diagnostic tool is incredibly valuable because it gives you definitive information about your cable and battery health directly from Samsung. If diagnostics says your cable is working normally, you know the problem lies elsewhere. If it reports a cable issue, you can replace it with confidence that you’ve identified the actual problem.
ADVANCED RECOVERY – WHEN PHONE WON’T TURN ON OR CHARGE
Phone Stuck on Black Screen and Won’t Charge? Recovery Menu Trick
If your phone displays a completely black screen and won’t respond to anything, there’s still hope. I have a recovery method that can revive phones that appear completely dead. This technique works when your phone’s battery is so drained that the normal startup process won’t initiate, but there’s still enough charge in the battery to access the recovery system.
This is an advanced method, so I’m going to walk you through it carefully. The key is understanding the specific sequence of button presses and knowing that patience is crucial. Some people try this once and give up too quickly. The method works, but it requires you to wait without touching your phone.
When to Try This Recovery Method
This recovery method is your last resort for phones showing a black screen with no response. Your phone won’t turn on with the power button. It shows no signs of life when you plug in a charger. The screen remains completely black even after charging for hours.
Before attempting this method, you should have already tried the basic fixes. You’ve removed the phone case, tried different chargers, and tested different power outlets. You’ve attempted a normal power off and restart. Nothing has worked, and your phone still sits completely dark and unresponsive.
If this describes your situation, you have nothing to lose by trying this recovery method. It’s your best chance of reviving the phone yourself before taking it to a technician.
The Recovery Menu Charging Strategy (Step-by-Step)
This process requires you to access your phone’s recovery menu, which is a low-power system that runs independently from your phone’s main operating system. Here’s the exact sequence.
First, locate your phone’s power button and volume down button. Hold both buttons down simultaneously and keep holding them. After about 10 to 15 seconds, you might see the Android logo appear or a boot animation begin. Do not release the buttons yet.
The moment you see any sign of the recovery menu or boot process, you need to plug in your charger while continuing to hold both buttons. This is easiest if you have the charger positioned nearby before you start, so you can plug it in quickly with one hand while your thumb continues holding the buttons. Keep holding both buttons for another 10 to 15 seconds after plugging in the charger.
After about 30 seconds total of holding both buttons with the charger connected, a menu should appear on your screen. This is the recovery menu. It might show options like Reboot System, Wipe Data, or Recovery Mode depending on your phone model. The exact appearance varies but you’ll recognize it as a text menu.
Important: Do not select Wipe Data or Factory Reset under any circumstances. Selecting either of those options will erase everything on your phone. You only want to reach this menu so your phone can charge in low-power mode.
Once the menu appears, release both buttons immediately. Your phone has entered the recovery mode, which is exactly what you want. The recovery menu uses very little power, which allows your phone’s battery to trickle charge while in this low-power state.
This is the critical part: do not touch your phone. Do not try to navigate the menu. Do not press any buttons. Just leave your phone sitting there with the charger plugged in.
Why You Must Wait 30 Minutes (The Trickle Charge Explanation)
The reason you need to wait at least 30 minutes is because your phone’s battery is completely depleted. A fully drained battery can’t power up the main operating system. However, it can slowly accumulate a small amount of charge through trickle charging, which is a slow, low-power charging process.
The recovery menu uses minimal power compared to your phone’s normal operating system. Your phone’s main Android or iOS system requires significant power to load. The recovery menu requires only a fraction of that power. By leaving your phone in the recovery menu while charging, the battery slowly builds up enough charge to boot the main system.
Think of it like filling a tank with a very small hole. A drained tank won’t start a car’s engine. But if you let a small amount of fuel slowly drip in through a small opening for 30 minutes, eventually you’ll have enough to try starting the engine. Your battery works similarly. The 30 minutes allows the battery to accumulate enough charge to power up your phone’s full system.
After 30 minutes of charging while sitting in the recovery menu, your battery should have enough juice to boot normally. Press the power button once and see if your phone starts up. It should turn on and begin its normal startup sequence.
Once your phone turns on, let it continue charging until the battery reaches at least 80 percent before unplugging the charger. A phone with very low battery from complete drain can be unstable. Charging it to 80 percent ensures the system is stable.
What to Do If Recovery Menu Appears But Nothing Happens
Sometimes the recovery menu appears and the phone charges while sitting in that menu, but pressing the power button doesn’t result in startup. Your phone remains stuck in the recovery menu.
If this happens, your battery is likely too degraded to hold a charge even after recovery menu charging. The battery might have internal damage or have reached the end of its usable lifespan. This situation requires professional help.
A technician can open your phone and test the battery directly, then replace it if necessary. Battery replacement typically costs between 50 and 100 dollars depending on your phone model. It’s a straightforward repair that brings most phones back to life.
If you’ve made it through the 30 minute wait and the recovery method didn’t work, you can feel confident that you’ve exhausted the safe at-home options. Professional repair is your next step, and you’ll know that the issue is likely battery or internal damage that requires specialized equipment to address.
DEVICE-SPECIFIC GUIDANCE
Is Your Device iPhone, Samsung, or Pixel? Device-Specific Fixes
Your phone’s charging system works differently depending on the manufacturer. iPhone uses a different charging connector and system than Samsung or Google Pixel. The troubleshooting methods that work for one brand may not apply directly to another. In this section, I’ll give you the exact steps for your specific device so you’re not guessing whether you’re doing things correctly.
Find your device type below and follow those instructions. The fixes I’ve already covered apply to your phone, but the device-specific details in this section will fine-tune your approach and show you features unique to your brand.
iPhone Users: Lightning Port and Apple-Specific Fixes
iPhones use the Lightning connector, Apple’s proprietary charging port that differs significantly from the USB-C standard found on Android phones. Because the Lightning port has a unique internal design, cleaning and troubleshooting lightning port issues requires extra care compared to USB-C devices.
When cleaning an iPhone’s Lightning port, use the same gentle approach I described earlier with the wooden toothpick and alcohol. However, the Lightning port is slightly more delicate than USB-C ports. The internal connectors in a Lightning port are smaller and closer together. Use extra care when inserting any tool. Move slowly and deliberately. Light pressure is all you need.
For force restart on iPhones, the method depends on your specific model. On iPhone 8 and newer models, quickly press and release the volume up button, then quickly press and release the volume down button, then press and hold the side button until you see the Apple logo appear on the screen. For older iPhones with a home button, press and hold both the top button and the home button simultaneously until the Apple logo shows. The screen may show a shutdown slider first. Keep holding until you see the Apple logo, which indicates the forced restart is happening.
Some newer iPhones have built-in battery health diagnostics. Go to Settings, then Battery, then Battery Health and Information. This shows your battery’s maximum capacity compared to when the phone was new. If maximum capacity has dropped below 80 percent, your battery is degrading and may struggle to charge or hold charge. Battery replacement at an Apple Store costs between 50 and 100 dollars depending on your iPhone model.
If you’ve tried all the troubleshooting steps and your iPhone still won’t charge, Apple has an official diagnostics tool called Apple Diagnostics that runs hardware tests. Visit an Apple Store or authorized service provider to run these diagnostics. They can pinpoint whether the problem is the Lightning port, the charging circuit, or the battery itself.
Samsung Galaxy: Built-in Diagnostics and Settings
Samsung Galaxy charging troubleshooting has one significant advantage over other brands: Samsung builds diagnostic tools directly into the Settings app that most users never discover. These tools can tell you exactly what’s wrong without guessing.
Go to your phone’s Settings menu and find Battery. Look for an option called Diagnostics or Phone Diagnostics and tap it. You’ll see several testing options. Select Cable Charging and plug your charger into your phone. The diagnostic tool will test your charging cable while connected and report whether the cable is functioning normally. This is incredibly useful because it gives you definitive information about whether your cable is working.
Also check the Battery Status option within the diagnostics menu. This shows your battery’s current health status, typically displaying Life Good, Life Normal, or Life Poor depending on battery condition. A battery showing Life Poor has degraded significantly and may need replacement even if charging technically works.
For Samsung-specific charging settings, go to Settings and find Battery. Look for options called Charging Settings, Fast Charging, or Charging Optimization. Sometimes fast charging gets stuck in a strange state where it displays as enabled but doesn’t function. Try disabling all charging optimization and fast charging features, wait a few minutes, then re-enable them. This reset often fixes charging speed issues.
The force restart method for Samsung phones is slightly different than generic Android. Hold the power button and volume down button simultaneously for about 10 to 15 seconds. You might see a menu appear asking if you want to turn off the phone. Keep holding both buttons until the phone turns completely off and restarts. Once it boots back up, plug in your charger immediately.
Samsung also includes a feature called Protect Battery in some models. This feature limits charging to 85 percent to extend battery lifespan. If you’re wondering why your phone won’t charge past 85 percent, check this setting. You can disable Protect Battery if you need your phone to charge to 100 percent.
Google Pixel: USB-C Fast Charging and Developer Mode
Google Pixel phones use the USB Type-C standard for charging, which is now the most common connector across Android devices. Google Pixel charging supports fast charging, but this feature can sometimes malfunction or quietly disable itself without any notification.
To check Pixel-specific charging settings, go to Settings and find Battery. Look for Charging Settings or Fast Charging options. Ensure fast charging is enabled. If your Pixel is charging slowly despite fast charging being enabled, try disabling it completely. Wait five minutes, then re-enable it. This reset usually restores normal fast charging speed.
Pixel phones have a feature called Adaptive Battery that learns your charging habits. Sometimes this feature can interfere with charging if the system becomes confused about your usage patterns. Go to Settings, find Device Care or Battery, and look for Adaptive Battery. Try disabling it temporarily to see if charging improves.
The USB-C port on Pixel phones is robust but still benefits from the cleaning method I described earlier. Use a wooden toothpick gently to remove debris from the port. Be careful not to damage the flat pin connectors inside the USB-C port. These pins are larger than Lightning port connectors but still require careful handling.
For force restart on Google Pixel phones, hold the power button and volume down button simultaneously for about 10 seconds. You’ll see the power menu appear. Keep holding both buttons until the phone turns off and restarts. The Pixel logo will appear as the phone reboots.
Google Pixel phones include a built-in Battery Health tool. Go to Settings, find Battery, and look for Battery Health or Similar Usage. This shows how your battery’s capacity compares to other devices the same age. If your battery is significantly degraded compared to the average, battery replacement is likely needed.
Generic Android Devices: General Android Troubleshooting
If you have an Android phone from a manufacturer other than Samsung or Google, the general troubleshooting methods I’ve covered in earlier sections apply directly to your device.
The force restart method for generic Android phones is to hold the power button and volume down button simultaneously for 10 to 15 seconds until the phone powers off and restarts. Once it boots back up, plug in your charger.
For generic Android phones, you can enable Developer Options to access the USB configuration settings I mentioned in Section 6. Go to Settings, find About Phone, and tap Build Number repeatedly until you unlock Developer Options. Then access Default USB Configuration and select Charging Phone Only to prioritize power delivery over data transfer.
The port cleaning, cable testing, and software fixes I described earlier work on any Android phone regardless of manufacturer. If your generic Android phone still won’t charge after trying these methods, you may need to visit a local repair shop for professional diagnosis.
The key thing to remember is that despite different manufacturers, most phones share similar charging principles and troubleshooting approaches. If the steps I’ve outlined don’t work for your specific phone, your manufacturer’s support website usually has device-specific instructions that can guide you further.
WHEN TO REPAIR VS. REPLACE & COST EXPECTATIONS
When to Replace Phone Charging Port vs. Full Phone: Cost Guide
At some point during this troubleshooting process, you’ll need to decide whether paying for professional repair makes sense or whether you should replace your phone instead. Phone repair costs vary significantly based on what’s broken, and understanding those costs upfront gives you real leverage when speaking to technicians. Let me walk you through realistic numbers and a decision framework.
Understanding repair costs upfront prevents surprises when you contact a technician. It also helps you know whether you’re getting charged fairly or being overcharged. Let me walk you through realistic costs and help you make an informed decision.
Realistic Repair Costs Breakdown
Phone repair costs vary based on what component is actually broken. Here are the typical ranges you can expect when you take your phone to a professional technician.
Professional diagnostics usually cost between zero and 50 dollars. Many repair shops offer free diagnostics before charging for repairs. Some shops charge a diagnostic fee that gets credited toward the repair cost if you proceed. Always ask upfront whether diagnostics are free before authorizing any work.
Battery replacement typically costs between 50 and 100 dollars depending on your phone brand and model. Original manufacturer batteries cost more than third-party options but last significantly longer. iPhones and Samsung phones generally fall on the higher end of this range.
Charging port replacement, which involves repairing the internal charging circuit and port assembly, costs between 100 and 150 dollars. This price includes both labor and the replacement component. It’s more expensive because it requires full phone disassembly. Some manufacturers charge more for this repair than others.
Charger or cable replacement is the cheapest fix. A new charging cable costs between 15 and 50 dollars depending on whether you buy an original manufacturer cable or a third-party alternative. A replacement wall adapter costs about 20 to 40 dollars.
If your phone has internal damage to the charging circuit or motherboard, repair costs climb significantly. Full motherboard repair or replacement typically costs 150 to 300 dollars or more. At this price point, replacing your phone starts to look more reasonable.

The Original vs. Cheap Parts Dilemma
When your repair technician quotes you a price, you might be tempted to save money by using cheap replacement parts instead of original manufacturer parts. I need to explain why this usually ends badly.
Cheap replacement parts often lack the protective components found in original parts. Original charging ports and power boards include integrated circuits, resistors, and capacitors that protect your phone’s internal systems. Cheap local replacement parts frequently omit these protective components to save manufacturing costs.
When you use cheap replacement parts, you might initially save 30 to 50 dollars on the repair. But within weeks or months, you’ll experience new problems. Cheap charging ports often result in slow charging that never returns to normal speed. Cheap power boards can cause network signal issues or microphone problems. Some users report audio distortion, call quality issues, or inability to connect to cellular networks after using cheap replacement parts.
The hidden cost of cheap parts is that you end up paying for repairs again and again as different components fail. You’re also stuck with a phone that doesn’t work optimally even after paying for repairs. Always ask your technician whether they’re using original manufacturer parts or cheap third-party alternatives. If they can’t guarantee original parts, find a different repair shop.
Original chargers rarely fail on their own, which is why I always recommend testing thoroughly before replacing one. But if replacement becomes necessary, spend the extra money on an original or certified charger. The price difference is usually only 10 to 20 dollars, and the reliability difference is enormous.
Repair vs. Replace Decision Tree
Here’s how to decide whether repair or replacement makes sense for your situation.
First, determine your phone’s current value. A brand new phone of your model costs a certain amount. Look up the current retail price. Now estimate what you’d get if you sold your broken phone or traded it in. The difference between those numbers is your effective replacement cost after accounting for trade-in value.
Next, add up all likely repair costs. If diagnostics reveal a dead battery, add 50 to 100 dollars. If the charging port is damaged, add 100 to 150 dollars. Include the diagnostic fee itself. This is your total repair cost.
Compare repair cost to replacement cost. A general rule is this: if repairs cost less than one-third of your phone’s replacement cost and your phone is less than two years old, repair makes sense. If repairs approach half or more of the replacement cost, replacement becomes the smarter choice.
For example, if a replacement phone costs 600 dollars, repairs under 200 dollars usually make sense. If repairs would cost 300 to 400 dollars, you’re getting close to the cost of a replacement phone with a warranty and a fresh battery.
Also consider your phone’s age. A phone that’s four or five years old is reaching the end of its supported lifespan anyway. Even if repairs are cheap, replacing the phone gets you a newer device with better security updates and longer software support.
Questions to Ask Your Technician
Before authorizing any repair work, ask specific questions that protect your interests.
First, ask whether the technician performs diagnostics before starting repairs. You want confirmation that they’ve identified the exact problem before charging you for work. A reputable technician always diagnoses first and quotes the price before opening up your phone.
Ask whether they use original manufacturer parts or third-party replacements. Get this commitment in writing if possible. If they use third-party parts, ask why and whether they offer a warranty on those parts. Original parts cost more but perform better and last longer.
Ask about the warranty on their repair work. Reputable repair shops warranty their work for 30 to 90 days. If something goes wrong with the repair within that timeframe, they fix it at no additional cost. If a technician won’t warranty their work, that’s a red flag.
Ask about your phone’s water resistance after repairs. Some repairs compromise the water-resistant sealing of your phone. Ask whether the technician can restore water resistance or whether you need to avoid water contact after repairs.
Finally, ask for an itemized invoice that shows what parts were replaced, what labor was performed, and what warranty coverage you receive. Never authorize repairs without understanding exactly what you’re paying for and what you’re getting in return.
CRITICAL MISTAKES TO AVOID (DON’T DO THIS!)
4 Dangerous Mistakes That Make Phone Charging Worse
Some fixes seem like they would work but actually make your problem dramatically worse. I’m going to explain what these mistakes are and exactly what happens when you make them. Understanding these pitfalls protects your phone and saves you from turning a fixable problem into a catastrophic one.
The reason I’m including this section is because I want to prioritize your phone’s safety over quick solutions. These are mistakes I see people make repeatedly, and they always regret them. Let me walk you through what to avoid and why it matters.
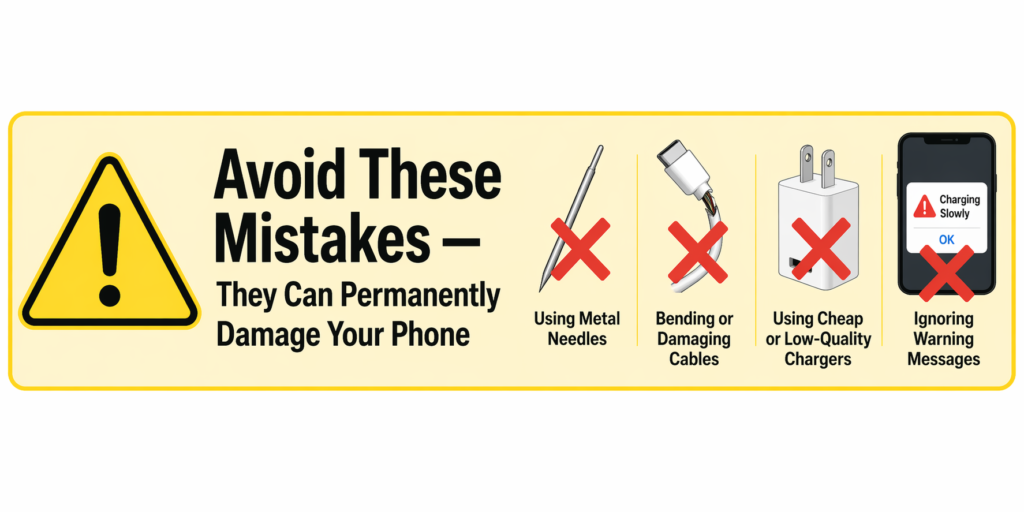
Mistake #1: Using Metal Tools to Clean the Port
Never use metal objects like needles, pins, paperclips, or any metal tool to clean your charging port. This is the single most important warning I can give you about port cleaning.
Inside your charging port are delicate metal pins and connectors that handle the electrical connection between your charger and your phone. These internal components are tiny and fragile. When you insert a metal tool into the port, you risk scratching or bending these pins. Metal also conducts electricity, which means you could accidentally short circuit the internal charging circuit.
Even a tiny scratch on those internal pins can be irreversible. If you damage the pins, the only fix is professional port replacement, which costs between 100 and 150 dollars. You went from a problem that might cost nothing to fix with cleaning to a problem that costs hundreds of dollars to repair professionally.
A wooden toothpick accomplishes the same cleaning goal without any risk. Wood doesn’t conduct electricity and won’t short circuit anything. Wood is soft enough that it can’t scratch the internal pins the way metal can. The price difference is essentially zero. Always use wood or plastic, never metal.
Mistake #2: Bending the Cable or Placing Weights on Phone to Force Connection
I understand the temptation here. Your phone only charges when the cable is held at a specific angle or when you place a weight on the cable to hold it in place. It seems like a temporary solution that lets you keep using your phone while you figure out the real problem.
This is a trap. Using this workaround for even a few days will eventually cause permanent damage to your phone’s internal charging circuit and charging port.
Every time you bend the cable or apply pressure to maintain that awkward connection, you’re sending unstable electrical signals through your phone’s charging system. The charging circuit isn’t designed to handle the interrupted, fluctuating power that results from loose connections. This constant electrical stress gradually degrades the internal components of your charging system.
Within weeks, this workaround will ruin your motherboard or charging port permanently. You’ll go from having a fixable problem that costs 20 to 50 dollars to repair to having catastrophic internal damage that costs hundreds of dollars or requires complete phone replacement.
I’ve seen people use this workaround and later discover they’ve destroyed the entire charging circuit. The damage is irreversible at that point. Stop using that workaround immediately. Charge your phone properly or not at all. Don’t risk permanent damage to save yourself the inconvenience of fixing the problem properly.
Mistake #3: Using Cheap Replacement Parts to Save Money
When a repair shop quotes you for charging port replacement or a new charging PCB, the price can seem high. You might be tempted to use cheap third-party replacement parts instead of original manufacturer parts to save 30 to 50 dollars.
This is false economy. Cheap replacement parts are manufactured without the protective components found in original parts. Original parts include integrated circuits, resistors, and capacitors designed to protect your phone’s system from electrical fluctuations and power surges. Cheap knockoff parts often omit these protective components entirely.
When you install cheap parts, your phone might work for a few weeks or even a few months. But eventually, you’ll experience new problems. Your charging becomes extremely slow and never returns to normal speed. Your cellular network signal becomes weak or drops out frequently. Your microphone stops working properly, making calls sound distorted. Your audio quality degrades.
You saved 30 to 50 dollars on the initial repair but created 200 to 300 dollars worth of new problems. Now you’re paying for repairs again to fix issues caused by cheap parts. Every time you use the phone, you’re dealing with suboptimal performance and dropped calls.
Always insist that your technician use original manufacturer parts. The price difference is usually only 10 to 20 dollars more than cheap alternatives. That small extra investment ensures your phone works properly after repair and lasts longer without developing new problems.
Mistake #4: Ignoring Software Signals (Update Notifications and Battery Health Warnings)
Your phone displays notifications for a reason. When you see battery health warnings or system update notifications, ignoring them is a mistake that costs you down the road.
Battery health warnings mean your battery is degrading. If you ignore these warnings and keep using your phone with a degraded battery, the battery becomes increasingly unstable. An unstable battery causes charging problems because the battery can’t reliably accept or hold a charge. You end up paying for battery replacement when you could have replaced it early before problems cascaded.
System updates often include battery and charging optimizations. When your phone prompts you to update, installing that update can sometimes fix charging issues that software glitches created. By postponing updates indefinitely, you’re prolonging any software-related charging problems your phone has.
Firmware updates also include security patches and system stability improvements. A phone running outdated firmware is more likely to experience software glitches that interfere with charging. Staying current with updates prevents many charging problems before they start.
When your phone shows you a warning or notification about battery health or software updates, take it seriously. These messages exist because your phone’s system has detected an actual problem. Addressing problems early prevents them from becoming expensive repairs later. The time you spend installing an update now saves you the time and money of fixing serious problems in the future.
PREVENT FUTURE CHARGING PROBLEMS
How to Prevent Charging Issues (So You Never Have This Problem Again)
You’ve just spent time troubleshooting and possibly paying for repairs to get your phone charging again. The last thing you want is for this problem to happen again. This section shifts from fixing problems to preventing them. These habits will extend your phone’s lifespan and keep charging working reliably for years.
Prevention is always cheaper and easier than repair. A few simple habits now save you from frustration and expense later. Let me walk you through the practices that keep phones charging perfectly throughout their entire lifespan.
Use Quality Chargers (Original or Certified Only)
The charger you use every day has more impact on your phone’s long-term health than almost anything else. Avoiding cheap third-party chargers and investing in quality certified equipment now prevents charging problems down the road.
Original manufacturer chargers cost more upfront than cheap knockoffs, but the difference is usually only 15 to 25 dollars. That small investment pays for itself by avoiding future repair costs. Original chargers are engineered to deliver exactly the right voltage and amperage for your phone. They include protective circuits that prevent power surges from damaging your phone’s battery or charging system.
Cheap third-party chargers cut corners on these protective components. They deliver inconsistent power that stresses your battery and charging circuit over time. Every time you use a cheap charger, you’re gradually degrading your phone’s charging system. After months of using cheap chargers, your phone’s charging fails prematurely.
If you must buy a third-party charger, look for certified options from reputable manufacturers. Check the product listing for certifications like UL Listed, FCC approved, or manufacturer certification. These certifications mean the charger has been tested and meets safety standards. Avoid generic no-name chargers with no certifications. The money you save on a cheap charger gets spent on premature repairs or battery replacement.
Protect Your Charging Port (Port Covers or Cases)
Pocket lint and dust accumulate in your charging port naturally over time. You can’t stop this completely, but you can slow it down significantly with simple protection measures.
Use a charging port cover when your phone isn’t charging. These inexpensive plastic or rubber covers fit over your charging port and keep debris out. They cost just a few dollars but extend the time between port cleanings. You can find port covers for virtually any phone model online.
Additionally, keep your phone in a protective case that doesn’t block the charging port. A case that’s too tight or too thick can prevent your cable from seating properly in the port. Make sure your case has an open charging port area without a membrane or cover that could trap debris. A well-designed case protects your phone while keeping the charging port accessible and clean.
Store your charger and cables carefully. Don’t coil cables tightly or bend them sharply. Don’t stuff them into bags or pockets where they might get damaged. Use cable organizers or clips to keep chargers organized and protected. Proper storage extends cable lifespan by years.
Charge in Cool Environments (Thermal Management Matters)
Heat is the enemy of lithium-ion batteries and charging systems. Proper thermal management during charging is critical because high temperatures accelerate battery degradation and stress the internal charging circuit. Where you charge your phone matters as much as how you charge it.
Avoid charging your phone in direct sunlight or in hot cars during summer. Don’t charge your phone while using it intensively, which generates heat from both the processor and the charger. Charge your phone in cool, well-ventilated areas instead. A room temperature environment is ideal.
If your phone gets hot while charging, unplug it and let it cool down before resuming charging. Excessive heat during charging indicates something is wrong. It might be a faulty charger, a failing battery, or software running in the background. Whatever the cause, heat while charging is a warning sign that deserves investigation.
In winter or cold environments, avoid charging phones that are extremely cold. Allow a very cold phone to warm up to room temperature before plugging it in. Charging while cold can temporarily damage battery cells. Cold temperatures also reduce charging efficiency, so your phone charges slower in cold conditions anyway.
Replace Cables Regularly (Before They Fail)
Charging cables wear out faster than any other part of your charging setup. The constant flexing, bending, and plugging and unplugging creates stress on the internal wires. Rather than waiting for a cable to fail completely, replace cables proactively.
A quality cable typically lasts one to two years with regular use. If you use your phone heavily and charge it multiple times daily, your cable might wear out faster. Every year or so, inspect your cable for visible damage like fraying, cracks, or exposed wires. If you see damage, replace the cable immediately.
Better yet, replace your cable before it shows damage. If your cable is over two years old and shows signs of normal wear, buy a replacement before it fails. Having a backup charger in your car or at work means you’re never stuck without a way to charge your phone.
Buy original or certified cables from reputable sources. A quality cable costs 20 to 30 dollars and lasts much longer than cheap alternatives. Cheap cables fail quickly and often send bad signals to your phone, causing charging problems even when the cable still physically works.
Enable Battery Health Monitoring
Your battery ages with every charge cycle. The more charging cycles your battery completes, the more its capacity naturally decreases. Modern phones allow you to monitor battery health so you can replace the battery before complete failure.
For iPhone users, go to Settings, find Battery, then tap Battery Health and Information. This screen shows your battery’s maximum capacity as a percentage of when the phone was new. A healthy battery shows 100 percent or near 100 percent. As the phone ages, this number gradually decreases. When battery capacity drops below 80 percent, your battery is significantly degraded and should be replaced soon.
For Samsung users, go to Settings, find Battery, then tap Diagnostics or Phone Diagnostics. Select Battery Status to see your battery’s health rating. Samsung displays a simple rating like Good, Normal, or Poor. If your battery shows Poor, replacement is due soon.
For Google Pixel phones, go to Settings, find Battery, and look for Battery Health or Similar Usage. Compare your battery’s capacity to other phones the same age. If your battery is significantly worse than average, replacement is recommended.
Check your battery health every few months. This monitoring habit gives you a clear signal about when battery replacement is needed.
Replacing a battery when capacity drops below 80 percent prevents charging problems and extends your phone’s overall lifespan by years. A new battery costs 50 to 100 dollars and dramatically improves phone performance.
By implementing these prevention habits, you’re essentially guaranteeing that charging problems won’t plague you again. You’ve learned how to fix the problem when it occurs, and now you’re learning how to prevent it from occurring in the first place. That combination of knowledge positions you perfectly for years of trouble-free phone charging.
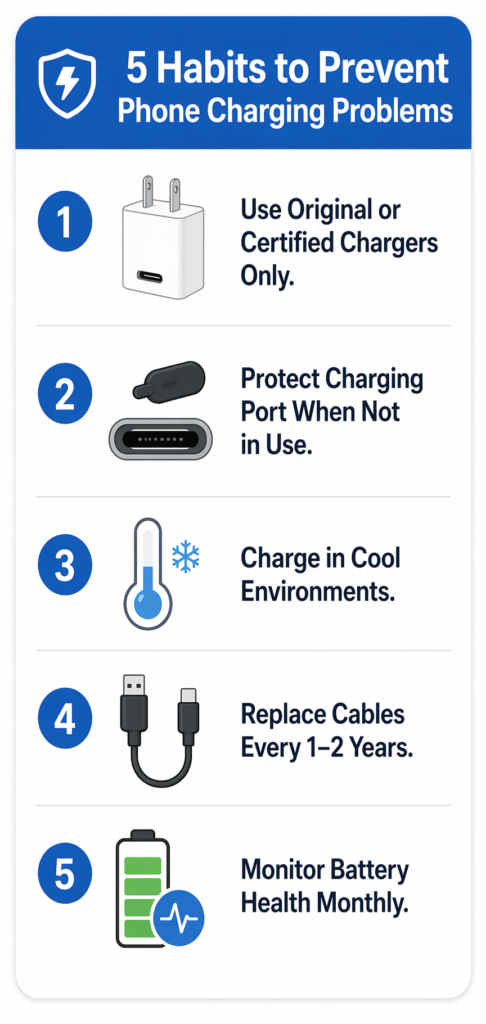
FAQ – QUESTIONS REAL PEOPLE ASK
Frequently Asked Questions About Phone Charging Problems
After reading through all the troubleshooting steps, you probably still have specific questions about your situation. These are the questions I hear most often from people dealing with charging problems. I’ve answered them directly so you get clarity on the exact scenario you’re facing.
My Phone Charges When I Hold the Cable at a Specific Angle. What’s Wrong?
This specific symptom tells me you have a loose connection inside your charging port or a worn cable connector that’s not making solid contact.
The most likely cause is that your charging port needs cleaning. When debris accumulates inside the port, the cable can partially seat but won’t connect properly at normal angles. Try holding the cable at that specific angle because you’ve intuitively found the position where it makes the best contact. This is a clear sign that port cleaning should be your first fix.
Before cleaning the port, test with a different cable to see if angle-dependent charging goes away. Borrow a working cable from someone and try charging at normal angles without tilting or adjusting. If the new cable charges normally without angle manipulation, your original cable is worn out and needs replacement.
If angle-dependent charging persists even with a new cable, your charging port is definitely damaged and needs professional replacement. At that point, avoid continuing to use the workaround of holding the cable at an angle. This workaround stresses your phone’s internal charging circuit and can cause permanent damage over time.
Why Does My Phone Charge Faster When I Turn It Off?
When your phone is powered off, it consumes zero power. All that charging capacity goes directly into your battery instead of being divided between charging and powering your phone’s system.
Your phone’s processor, screen, wireless radios, and all running apps consume significant power even while plugged in. That power consumption directly competes with the charging process. Disabling these power-hungry components means more charging capacity is available for your battery.
This is why enabling airplane mode while charging makes a noticeable difference in charging speed. You’re not turning the phone completely off, but you’re stopping background apps and wireless communications from draining power. If you need faster charging without turning your phone off entirely, airplane mode is your solution. Just remember to disable it afterward so you can receive calls and messages again.
The fastest charging happens when your phone is powered off completely, but airplane mode provides a good compromise if you need your phone accessible while charging quickly.
Is It Bad to Leave My Phone Plugged in Overnight?
Modern phones have smart charging systems that stop charging at 100 percent, so leaving your phone plugged in overnight won’t damage the battery the way it would with older phone technology.
However, constant heat from overnight charging does gradually degrade your battery capacity over months and years. Heat accelerates chemical reactions inside lithium-ion batteries, causing them to age faster. Overnight charging generates sustained heat as your phone sits plugged in for eight or more hours.
The best practice for battery longevity is to unplug your phone as soon as it reaches 100 percent. If your phone supports charge limiting, enable it to stop charging at 80 percent instead of 100 percent. This feature is available on many newer iPhones and Samsung phones. Keeping your battery between 20 and 80 percent charged extends its overall lifespan significantly.
For daily charging, overnight charging isn’t critical enough to worry about excessively. But if you consistently charge overnight and want your battery to last as long as possible, unplugging once fully charged is the better habit.
How Do I Know If My Battery Is Dead vs. My Charger Broken?
Yes, you can charge your phone from a computer’s USB port, but the charging process will be slower than wall outlet charging.
Computer USB ports deliver 500 milliamps of power at 5 volts. Wall chargers typically deliver 1000 to 2000 milliamps at 5 volts. This difference means computer charging takes roughly twice as long as wall charging. Newer computers with high-power USB ports deliver more current, so charging might be faster with those, but still slower than a dedicated wall charger.
If no wall outlet is available, a power bank charging your phone temporarily can give it enough power to run the Ampere app for diagnostics.
If your phone won’t charge from your computer at all, the USB port might not be providing adequate power or your cable might be damaged. Try a different USB port on your computer. If still nothing happens, use a wall outlet instead. Your computer’s USB port likely isn’t the problem.
Computer charging is useful as an emergency backup when no wall outlet is available. It’s also useful if you want slower charging to reduce battery heat stress while you work at your computer. Just don’t expect computer charging to be as fast as wall outlet charging.
How Do I Know If My Battery Is Dead vs. My Charger Broken?
Test your charger on another device to determine which component is actually broken.
Borrow a friend’s phone or tablet that uses the same type of charger as yours. Plug your charger into their device and see if it charges. If their device charges fine, your charger is working and the problem is with your phone’s battery or charging port. If their device won’t charge, your charger is definitely broken.
If your phone has at least some battery power remaining, download the Ampere app from your app store and use it to test charger output while plugged in. The app shows you the amperage your charger is delivering. If the reading is very low or zero, your charger isn’t delivering power properly.
If your phone is completely unresponsive and won’t show any signs of life even after trying multiple chargers, try the recovery menu charging method from Section 7. That technique allows phones with completely drained batteries to accumulate enough charge to attempt startup.
Will Cleaning My Charging Port Void My Warranty?
Gentle cleaning with safe methods won’t void your warranty. Metal tools or disassembly might, but basic cleaning is considered normal maintenance.
The safe cleaning methods I described earlier use soft toothbrushes, wooden toothpicks, and compressed air. These tools are gentle enough that they don’t constitute device disassembly or damage. Most manufacturers understand that charging port cleaning is a normal maintenance task.
If your phone is currently under manufacturer warranty and you’re uncomfortable cleaning the port yourself, contact the manufacturer first. They might clean the port for free as a warranty service. If your warranty has expired, DIY port cleaning is completely safe to attempt. The risk of damage from proper cleaning techniques is minimal, and the potential benefit of solving your charging problem is high.
Avoid aggressive cleaning methods or metal tools, which might damage the port and create warranty concerns. Stick to the gentle methods I’ve outlined and you’ll be fine.
Why Am I Getting Inconsistent Charging (Charges One Day, Won’t Charge the Next Day)?
Intermittent charging usually points to a loose connection inside your charging port caused by debris accumulation.
The solution is thorough port cleaning using the wooden toothpick and alcohol method from the cleaning section above.
When your port contains debris, the cable makes inconsistent contact. Sometimes it connects well enough to charge. Other times, the connection is too loose and charging fails. Each time you plug in the cable, you compress the debris further into the port, making the problem gradually worse.
The solution is thorough port cleaning using the wooden toothpick and alcohol method from Section 3. Don’t just do a surface cleaning. Work methodically through the entire interior of the port, focusing on areas that feel resistant to your cleaning tool. Complete port cleaning should eliminate intermittent charging.
If intermittent charging persists after thorough cleaning, your cable connector is wearing out. The connector might have bent or damaged pins that make inconsistent contact with the port. Try a new cable to see if this solves the problem. A worn cable is easier and cheaper to replace than a damaged port.
Is Wireless Charging Safer Than Wired Charging?
Both wireless and wired charging are safe with modern phones, but they have slightly different impacts on battery health.
Wireless charging generates more heat than wired charging because the energy transfer process is less efficient. That extra heat accelerates battery degradation slightly over time. Wired charging delivers power more directly, so less energy is wasted as heat, but still generates some warmth during charging.
If battery longevity is your primary concern, wired charging is marginally better due to less thermal stress. But the difference is relatively small. Choose your charging method based on convenience. If wireless charging fits your lifestyle better, use it without worrying that you’re significantly damaging your battery.
Both charging methods are engineered to be safe. Neither will cause immediate damage or create hazardous conditions. The long-term battery degradation difference between the two is measured in months of lifespan over several years of use.


