

That Bright Spot on Your iPhone Screen Is Not Nothing Here’s Why
A bright spot on your iPhone screen is almost always a sign that something real is happening inside your device not just a random cosmetic imperfection you can ignore. I know this because I’ve spent years researching iPhone display failures and working through real repair case documentation, and what’s actually causing that spot matters far more than most people realize.
You’ve probably noticed it already. You’re scrolling through your phone, open up the Notes app on a white page, and suddenly there it is a lighter area of the screen that stands out like a sore thumb. Maybe you first spotted it weeks ago when you were reading something with a white background, or perhaps it appeared just yesterday. Either way, that moment when you realize something is different about your display triggers a very specific kind of anxiety: Is this serious? Did I break something? How much is this going to cost?
Here’s what I’ve learned: that bright spot on your iPhone screen is almost always a hardware signal that something real is happening beneath the glass. Whether it’s physical pressure from the way you use your phone, a swollen battery pressing against your display, a damaged backlight layer, or leftover adhesive from a previous screen replacement, the cause is specific and identifiable. Most bright spots are not software glitches that vanish with a restart — though I’ll cover the rare cases where they are and they’re not something you should dismiss or wait out.
The good news is that knowing what’s causing your iPhone bright spot on screen means you can take the right action instead of guessing. Some bright spots respond to quick fixes you can try at home in minutes. Others need professional attention but won’t bankrupt you. A few require immediate action because they signal a genuine safety issue. The path forward depends entirely on understanding what you’re actually looking at and that’s exactly what this guide covers.
Throughout this guide, I’ll walk you through the seven real causes of iPhone screen bright spots, backed by repair technician documentation and real-world case analysis. You’ll learn how to identify what’s wrong with your specific device, which fixes are worth trying at home, and when professional repair is the only right answer. Most importantly, you’ll leave with a clear action plan not more confusion.
Why Is There a Bright Spot on My iPhone Screen? 7 Real Causes
A bright spot on your iPhone screen happens when something inside your device creates pressure or damage to the display layers beneath the glass. The cause varies depending on your specific situation — some spots appear suddenly after a drop, others develop gradually over months, and a few show up immediately after a screen replacement. Each of these iphone display issues has a distinct cause with a distinct solution. Here are the seven real causes I’ve identified through repair case documentation and technician-level analysis.
Physical Pressure From Drops, Squeezing, or Sitting on Your Phone
This is the most common cause of bright spots on iPhone screens. When your phone gets dropped, sat on, or experiences repeated pressure against the display, the impact damages the delicate layers beneath the glass. Physical pressure damages the LCD backlight diffuser layer on older iPhone models, or it damages the pixel array on newer OLED screens.
The difference between one-time pressure damage and gradual damage matters. If you dropped your phone once and noticed a spot immediately, that’s acute impact damage. But sustained pressure over weeks or months creates identical visible results. In one documented case, a professional artist used their device for hours daily, with their palm resting on the same screen area during drawing and note-taking sessions. After nine months, display pressure marks appeared in exactly that location — a clear example of cumulative contact damage rather than a single incident.
The damaged area stays visible because pressure permanently separates or fractures the display components. Common culprits include your phone sitting in a back pocket while you sit down, squeezing your device tightly in a bag, or carrying it flat under heavy objects.
A Swollen Battery Pushing Against the Display
A swollen battery is one of the most serious causes of bright spots on iPhone screens, and it’s also the most important to catch early. Inside your iPhone, the lithium-ion battery sits directly behind your display. When the battery begins to swell from age, manufacturing defect, or overcharging cycles a process often preceded by battery degradation and faster-than-normal drain it expands and presses upward against the back of your screen.
This pressure creates a localized bright spot that looks identical to pressure damage from a drop. The spot appears because the swelling battery physically pushes the display layers out of their normal alignment. In documented repair cases, technicians have opened iPhones with bright spots in the lower screen area and found an immediately visible abnormal bulge in the battery. After replacing the swollen battery iphone with a fresh unit, the screen returned to completely uniform brightness.
The urgency here is real. A swollen battery doesn’t just cause iphone display issues it’s a genuine safety concern that I cover in detail in its own dedicated section below.
Backlight Layer Damage on LCD iPhones
If you own an iPhone 8 or earlier, or an iPhone SE, your screen uses LCD technology. LCD iPhones have a specific structure that makes them vulnerable to a particular type of damage. Behind the liquid crystal display sits a physical lcd screen backlight layer that provides all the light you see on screen.
This backlight layer can separate from surrounding components, develop spots called backlight bleeding, or fail partially under pressure or heat exposure. When this happens, instead of distributing light evenly across your screen, the backlight concentrates light in specific areas, creating visible bright patches. The damaged area appears brighter or whiter than the surrounding screen because light is escaping in concentrated spots rather than spreading evenly.
LCD backlight layer damage behaves differently than damage on newer OLED screens and this distinction matters because the fix depends entirely on which type of display your iPhone has.
Leftover Adhesive or Debris After a Screen Replacement
A bright spot on iphone screen after replacement is one of the most frustrating scenarios because you just paid for a repair. But in many cases, the new screen itself isn’t the problem at all — a repair technician may have left something behind.
During screen replacement, technicians use waterproof adhesive to seal the edges of your display. Sometimes, a tiny piece of this adhesive separates and sticks to the back of the new screen panel. When the phone gets reassembled, that adhesive debris presses directly against the LCD backlight layer. The result looks exactly like hardware failure, but it’s actually a completely fixable problem caused by adhesive separation during the repair process.
In documented repair cases, technicians who re-opened iPhones with post-replacement bright spots discovered leftover adhesive on the back of the display panel, scraped it off, and reassembled the device. The bright spot disappeared entirely without any new screen required. If you see a spot right after a screen replacement, return to the repair shop before ordering another screen a quality technician should inspect for this at no extra charge.
Software Glitch or Display Calibration Error
Not every bright spot is a hardware problem. Some yellow-tinted or warm-colored spots are display calibration errors in iOS rather than physical damage to your screen and this distinction is important because it changes your entire approach to fixing the problem.
There are documented cases of yellow spots on iPhones that disappeared completely after the owner performed a settings reset, not just a standard restart. The spot looked identical to hardware damage, but it was a display calibration issue a software setting that had drifted from correct values. Resetting the calibration resolved it entirely without any repair.
This is why running the software fixes first before assuming hardware damage makes practical sense. It takes minutes, costs nothing, and will definitively tell you whether you’re dealing with a real hardware problem or a correctable display calibration error.
Heat Damage and Thermal Expansion
Extreme heat causes physical problems inside your iPhone’s display. If you leave your phone in a hot car on a summer day, place it in direct sunlight for extended periods, or expose it to any significant heat source, the components inside expand in ways they were not designed to handle.
Thermal expansion separates the adhesive bonds that hold your display layers together. On LCD iPhones, heat can also warp the backlight diffuser, creating visible bright spots or patches across the screen. The damage doesn’t always appear immediately sometimes it shows up days or weeks after the heat exposure, as the separated layers continue to shift and settle.
Once heat damage occurs, it’s permanent. Separated adhesive does not re-bond on its own, and warped components stay deformed. Unlike pressure-based bright spots, heat damage almost always requires professional iphone screen repair.
Manufacturing Defects (Rare but Real)
A small percentage of bright spots appear on completely new or nearly new iPhones with zero history of damage. These are manufacturing defects, indicating a panel quality issue that originated during production or initial assembly.
Phones with a manufacturing defect screen are sometimes rejected during Apple’s quality control process and then sold in bulk to secondhand distributors. These devices reach consumers through various resale channels and arrive with pre-existing display problems even though the hardware looks pristine from the outside.
If your bright spot appeared on a brand-new iPhone or very soon after purchase with no drops or damage, a manufacturing defect is worth investigating. The iphone screen uniformity should be flawless out of the box any deviation this early in the device’s life points directly to a panel quality issue.
LCD vs OLED iPhone Screens: How Each Reacts to a Bright Spot (Which One Do You Have?)
Your iPhone has one of two display technologies, and knowing which one you have is essential for understanding your bright spot. LCD and OLED screens have completely different physical structures, which means a bright spot on one type behaves differently than on the other — and critically, some fixes that work on LCD can cause additional damage on OLED. Most people don’t know which technology their phone uses, and that knowledge gap is exactly what this section closes before we get to specific solutions.
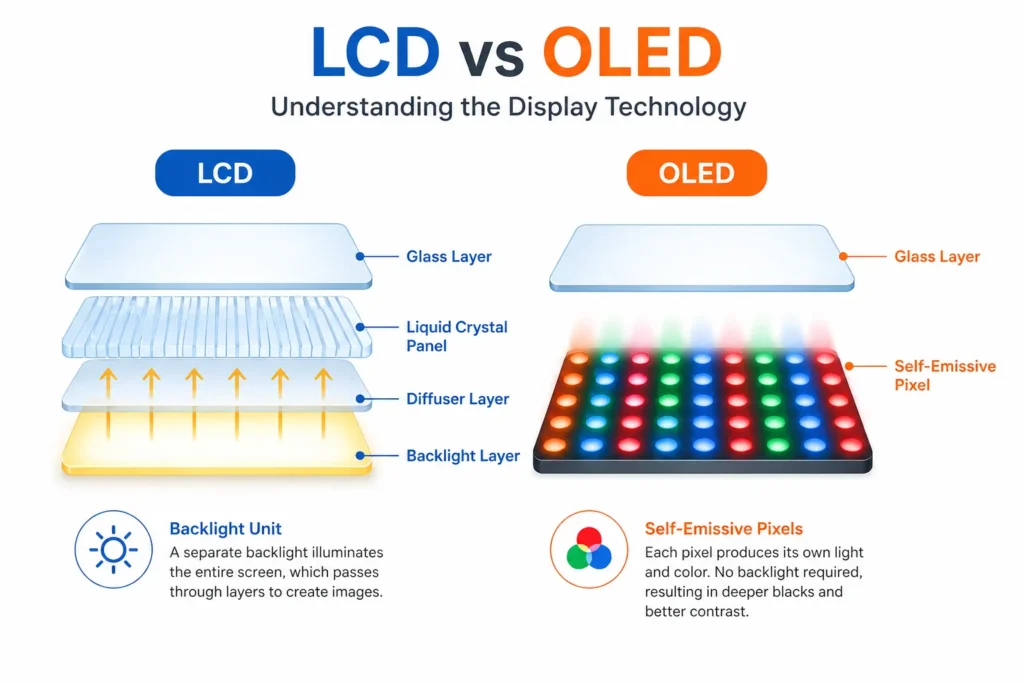
LCD iPhones: The Backlight Layer Is Usually the Problem
If you own an iPhone 6, iPhone 7, iPhone 8, or an iPhone SE (1st or 2nd generation), your screen uses LCD technology. LCD stands for liquid crystal display, and it works completely differently from modern OLED screens.
Inside an LCD iPhone, there’s a physical backlight layer sitting behind the liquid crystal panel. This layer is the source of all the light your screen produces. When you look at your display, that light passes through multiple iphone screen layers — the backlight, diffuser, liquid crystal panel, and glass — before reaching your eyes.
The structure of LCD screens makes them vulnerable to a specific type of damage. Pressure, heat, or debris can separate the backlight diffuser from surrounding components or create punctures in the layer itself. When the backlight layer gets damaged, light escapes in concentrated spots instead of spreading evenly, creating visible bright patches.
What you’ll actually see looks like a cloudy spot on the screen — soft, diffuse, and glowing rather than sharp and defined. That’s because light is leaking out through the damaged backlight area broadly, which is why the spot appears fuzzy rather than crisp.
If you have an LCD iPhone and your bright spot came from pressure or heat, backlight layer damage is almost certainly the cause. Knowing this tells you which fixes are relevant and whether you need professional help.
OLED iPhones: Burn-In, Pressure, and Pixel-Level Damage
If you own an iPhone X, iPhone 11, iPhone 12, iPhone 13, iPhone 14, or iPhone 15, your screen uses OLED technology. OLED stands for organic light-emitting diode, and it’s fundamentally different from LCD.
OLED screens don’t have a physical backlight layer. Each individual pixel in an OLED display produces its own light. This means the technology is thinner and uses less power, but it also responds differently to damage. Bright spots on OLED iPhones happen for different reasons than on LCD models.
On OLED screens, bright spots come from three primary sources. First, physical pressure damage affects individual pixels or small groups of pixels directly, creating sharper, more defined bright spots. Second, screen burn-in can occur when a static image stays on your display for extended periods, causing those pixels to degrade or retain brightness. Third, adhesive separation around the display edges can create localized bright areas as the components shift slightly out of alignment.
The bright spots on OLED iPhones tend to appear sharper and more defined than the soft glowing spots you see on LCD screens. That’s because OLED damage is happening at the pixel level, not at a backlight layer level. A damaged pixel in OLED either stays on, stays bright, or produces color incorrectly, creating a visible point or small cluster rather than a diffuse glow.
This distinction changes how you approach the problem. What works for an LCD bright spot might damage an OLED screen further. For example, applying gentle pressure to an LCD screen might reseat a separated backlight layer, but the same pressure on an OLED screen could cause additional pixel damage.
Know Your Model, Know Your Fix
Here’s a quick reference to keep you oriented. If you’re unsure which generation you own, go to Settings → General → About. Your model name appears there.
LCD iPhone models (iphone lcd models in circulation): iPhone 6, iPhone 6 Plus, iPhone 6s, iPhone 6s Plus, iPhone 7, iPhone 7 Plus, iPhone 8, iPhone 8 Plus, iPhone SE (1st and 2nd generation), iPhone XR, and iPhone 11.
OLED iPhone models (iphone oled models in circulation): iPhone X, iPhone XS, iPhone XS Max, iPhone 11 Pro, iPhone 11 Pro Max, iPhone 12, iPhone 12 mini, iPhone 12 Pro, iPhone 12 Pro Max, iPhone 13, iPhone 13 mini, iPhone 13 Pro, iPhone 13 Pro Max, iPhone 14, iPhone 14 Plus, iPhone 14 Pro, iPhone 14 Pro Max, iPhone 15, iPhone 15 Plus, iPhone 15 Pro, and iPhone 15 Pro Max.
Once you know which list your iPhone falls into, you understand the underlying structure of your screen. This knowledge will make the troubleshooting steps in the next sections much more relevant to your specific situation.
The reason I’m emphasizing this now is because the fixes I recommend later depend entirely on your screen type. Some solutions work beautifully on LCD iPhones but are genuinely risky on OLED models. Some iPhone screen layer configurations are more forgiving than others. Understanding your device’s architecture before you attempt any fixes keeps you safe and saves you money.
If Your iPhone Screen Feels Raised or Uneven, Stop Using It Immediately
A swollen battery inside your iPhone is pushing upward against your display, and this is a genuine safety concern that needs immediate attention. If you notice your screen feels slightly lifted or your phone rocks when you place it flat on a surface, a swollen lithium-ion battery is likely the culprit behind your bright spot and beyond the display problem itself.
I need to be direct about this because a swollen battery is the one cause of bright spots that carries real safety implications. This isn’t about being alarmist. It’s about understanding what’s actually happening inside your device and why acting quickly matters.
Let me walk you through how to identify this problem and what you need to do right now.
How to Tell If a Swollen Battery Is Causing Your Bright Spot (No Disassembly Needed)
You don’t need to open your iPhone to identify a swollen battery. The following screen diagnostic test uses only your hands and eyes, and takes about two minutes. Here are the four external signs to check right now.
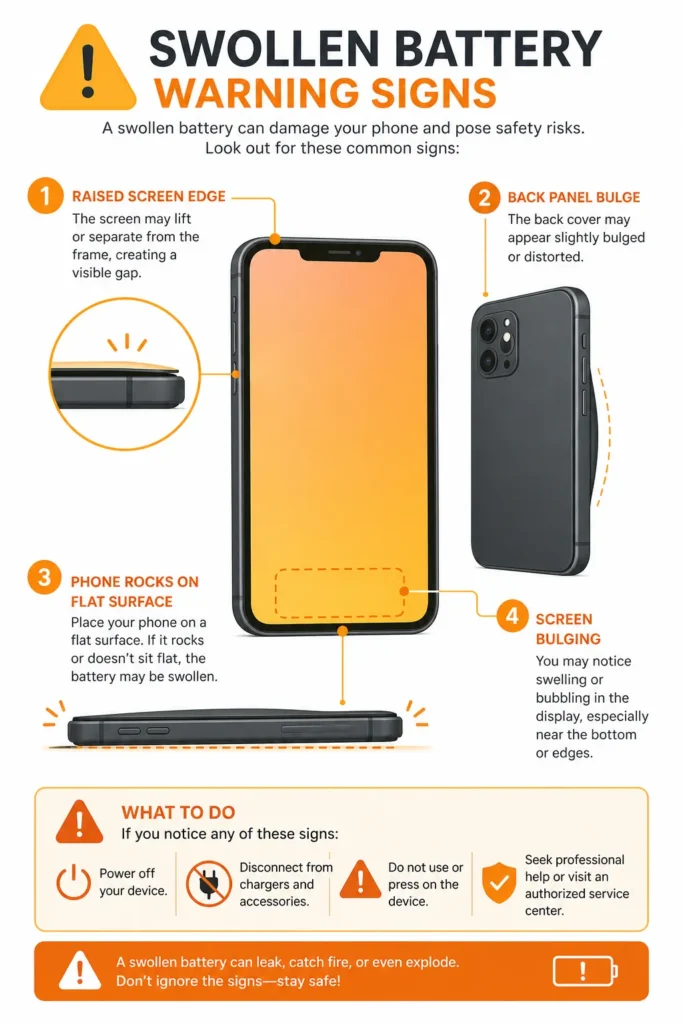
Check if your screen feels raised. Hold your iPhone flat in your hand and run your finger around the edges where the screen meets the frame. On a healthy iPhone, this seam is even all the way around. On a phone with a swollen battery, the screen bulges slightly outward, usually in the center or toward the bottom where the battery sits. You’ll feel a raised area instead of a flush edge.
Look for an uneven gap. Place your iPhone screen-side down on a flat surface and look at it from the side. A normal iPhone sits flat. A phone with a swollen battery rocks slightly because the screen is lifted up by the expanding battery pressing from behind. You might see a visible gap between the screen and the frame that’s larger than normal.
Test if the phone rocks when placed flat. Put your iPhone on a table with the screen facing up. Press gently on different corners. A healthy iPhone doesn’t rock. If the device rocks or doesn’t sit completely flat, the battery expansion is lifting the screen away from the frame. This is a clear sign of internal pressure building.
Notice difficulty with certain areas of the screen. A swollen battery often sits in the lower portion of your phone. You might notice that pressing on the lower part of the screen feels different than pressing on the upper part. The screen might feel slightly soft or give more resistance in certain areas. This happens because the swollen battery is creating uneven pressure from behind.
The reason these signs matter is straightforward. Your iPhone’s battery is designed to sit snugly inside a precise space. When the lithium-ion battery swells, it expands beyond its intended size. The battery sits directly behind your display, so it pushes upward and outward. This pressure creates the bright spot you’re seeing, but the real problem is what the swelling battery might do next.
What to Do Next (And What NOT to Do)
Here’s what I need you to understand: a swollen battery requires action today, not tomorrow or next week. The urgency here is real, and I’m going to explain why, then tell you exactly what to do.
Do not charge your iPhone. A swollen battery is a sign that the internal chemistry is already destabilized. Charging adds energy to a battery that’s already experiencing pressure buildup. This increases the risk of further expansion or rupture. Leave your phone as it is right now. If you want to understand the charging habits that stress your battery before this point is reached, that’s worth reading separately.
Do not put your phone in your pocket or in tight spaces. Any external pressure applied to a phone with a swollen battery can accelerate the problem. Keep your device in a safe place where nothing presses against it. If the battery continues to swell, external pressure could cause the battery to rupture or leak electrolyte.
Do not attempt to press the screen flat or apply pressure to fix it. You might be tempted to press the raised screen area to see if it goes back down. Don’t do this. Applying pressure to a phone with a swollen battery pushes against the battery itself, potentially causing it to fail or rupture.
Do not attempt DIY battery removal. Unless you’re a trained technician with proper tools, opening your iPhone to replace the battery yourself creates serious risks. You might damage other components, expose yourself to battery electrolyte, or cause the battery to rupture during removal.
Here’s what you actually do: Contact Apple or visit an Apple Authorized Service Provider today. Tell them you believe your iPhone has a swollen battery. They’ll inspect your device, confirm the issue, and replace the battery safely. If your iPhone is under one year old and the swelling isn’t from physical damage, your battery replacement may be covered under Apple’s standard one-year warranty at no cost. If your warranty has expired, battery replacement typically costs between 50 and 70 dollars, which is significantly less expensive than screen replacement.
When you contact Apple support or visit an authorized service provider, be clear about what you’ve observed. Say your screen feels raised, your phone rocks slightly when placed flat, and you have a bright spot on the display. This helps the technician diagnose the issue quickly. They have diagnostic tools that confirm battery health and can verify swelling visually once they open the device.
A swollen battery is the one bright spot cause where delaying action creates escalating risk which is exactly why I’m addressing it separately. The battery doesn’t unswell on its own. It only continues to expand. By getting it replaced now, you prevent the situation from worsening and protect your device from potential damage.
How to Fix an iPhone Bright Spot on Screen: Try These First
The best approach to fixing a bright spot on your iPhone screen is to start with the simplest, lowest-risk methods first and work your way toward more involved solutions. I’ve organized these steps from quickest to more complex because most people find out what’s actually wrong through this process of elimination.
Before you spend money on anything, try these fixes in order. Many bright spots respond to one of these methods, and you’ll know within minutes whether you’re dealing with something software-based or a true hardware problem.
Let’s go through each step.
Step 1 – Check If It Is Actually AssistiveTouch or Vehicle Motion Cues
Before assuming you have a hardware problem, spend two minutes checking your AssistiveTouch setting and your Vehicle Motion Cues setting. A surprising number of people mistake these iOS features for screen defects.
AssistiveTouch is a floating button that Apple designed for accessibility. If you have AssistiveTouch turned on, a circular dot appears on your screen at all times. This dot stays in a fixed position and moves with you through all your apps. The dot itself is not a hardware problem. You can turn it off immediately.
Go to Settings, then Accessibility, then Touch. Look for the option called AssistiveTouch. If it’s toggled on (the switch appears green), tap it to turn it off. The floating button disappears instantly. If this was your “bright spot,” problem solved.
There’s also a newer iOS feature called Vehicle Motion Cues that many people mistake for a screen defect. Starting with iOS 17, Apple added animated dots that appear on your screen when your iPhone detects you’re inside a moving vehicle. These dots are designed to help reduce motion sickness while you’re traveling. They only appear when the phone senses motion consistent with being in a car, bus, or train.
To check if Vehicle Motion Cues is causing your issue, go to Settings, then Accessibility, then Motion. Look for Show Vehicle Motion Cues. If this is set to On or Automatic, you might be seeing these motion-reduction dots and thinking they’re a screen problem. Change the setting to Off and see if the dots disappear. You can keep this setting off permanently if you prefer.
If disabling either of these features makes your “bright spot” disappear, you just solved your problem without any repairs needed.
Step 2 — Restart Your iPhone (Soft Reset)
A simple restart clears temporary software glitches that might be affecting your display. This is the first troubleshooting step for almost any iPhone issue because it’s risk-free and often effective.
To restart your iPhone, the method depends on which model you have. For iPhone X and later, press and hold the Side Button and either Volume button together until the power-off slider appears. Slide to power off, wait 30 seconds, then press and hold the Side Button again until the Apple logo appears.
For iPhone 8 and earlier, press and hold the Top (or Side) Button until the power-off slider appears. Slide to power off, wait 30 seconds, then press and hold the Top Button again until you see the Apple logo.
This is called a soft reset. It’s different from a force restart, which you would only use if your iPhone is completely frozen and unresponsive. A regular restart is what you want here.
After your iPhone restarts and fully boots back up, open an app with a white background like Notes or Safari. Check if your bright spot is still visible. Many software-based display glitches disappear after a restart. If the spot is gone, you’ve fixed your issue with zero cost or effort.
Step 3 — Reset All Settings (Different from a Restart and Worth Trying)
This step is specifically for yellow-tinted or warm-colored spots that appeared gradually. It’s not the same as restarting, and I’ve found it works in cases where a standard restart doesn’t help.
Reset All Settings resets your iPhone’s display calibration and color temperature settings back to their factory defaults. This can fix display discolorations caused by iOS software rather than hardware damage. Here’s the important part: this process does not delete any of your photos, messages, or apps. It only resets settings like display preferences, accessibility options, and Wi-Fi connections. You’ll need to re-enter your Wi-Fi passwords and adjust personalized settings again.
To do this, go to Settings, then General, then scroll down to Transfer or Reset. Tap Reset, then select Reset All Settings. You’ll see a warning that this removes your Wi-Fi networks and other settings. Confirm by entering your passcode when prompted.
Your iPhone will restart and apply the factory default settings. This process takes a few minutes. Once your phone reboots, open a white-background app again and check your display. I’ve found this fixes yellow spots and warm-tinted discolorations that respond to display calibration adjustments.
If the spot is still there and unchanged after this reset, you’re dealing with a hardware problem, not a software display calibration issue.
Step 4 — Check Under Your Screen Protector
If you use a screen protector, the bright spot might not be on your actual iPhone display at all. Screen protector interference whether from trapped bubbles, dust, or lifting adhesive can scatter light in ways that look exactly like a hardware bright spot.
Remove your screen protector carefully and look at your bare iPhone display underneath. Check if the bright spot is actually visible on the screen itself or only when the screen protector is installed. If the spot disappears without the screen protector, you’ve found your answer.
In this case, the screen protector is the problem, not your iPhone. Simply replace it with a new screen protector, making sure to apply it carefully without air bubbles. Clean the surface thoroughly before applying a new protector, and follow the application instructions carefully to prevent dust from getting trapped underneath.
This is a relief when you discover it because replacing a screen protector costs between 10 and 20 dollars instead of a screen replacement.
Step 5 — The Gentle Pressure Method (Do This With Caution)
This step only applies to LCD iPhones, not OLED models. If you have an iPhone X or later, skip this step entirely. This technique works because on LCD screens, sometimes the backlight diffuser layer separates slightly from surrounding components due to pressure or age.
Applying very light, even pressure with a soft cloth might reseat the separated layer temporarily. The key word here is light. You’re not trying to force anything back into place. You’re applying minimal pressure to test whether the spot is caused by a slightly separated backlight layer.
Here’s how to do it correctly. This gentle pressure technique is borrowed from LCD screen repair practice and should only be attempted on the models listed above. Get a soft microfiber cloth, the kind used for cleaning glasses or screens. Place your iPhone screen-side up on a flat surface. Position the cloth over the bright spot area. Using only your fingertip, apply gentle pressure in a very small circular motion for about 30 seconds. The pressure should be so light that you could barely feel it if you tried this on your skin.
Stop immediately if you feel any resistance or if the spot appears to worsen. Do not use your fingernails, do not use tools, and do not apply force. You’re testing, not fixing. If the spot improves slightly during this gentle pressure test, it might be a separated backlight issue. If nothing changes or worsens, stop and move on.
Never attempt this technique if you suspect a swollen battery. You’ll only make that situation worse by adding external pressure to an internal expansion problem.
Step 6 — Update iOS
Check if you’re running the latest version of iOS. Apple occasionally releases updates that include display driver patches and ios system repair fixes for software-related display anomalies you might not even know existed.
Go to Settings, then General, then Software Update. If an update is available, connect to Wi-Fi and tap Download and Install. Your iPhone will update and restart automatically.
This is a lower-priority fix because hardware bright spots won’t respond to iOS updates. But if you’re dealing with a software-related display issue, a new iOS version might include the patch that fixes it. It’s worth checking because the update takes only a few minutes and has no downside.
Not Sure If It Is a Real Defect? Here’s How to Confirm It at Home
Before you commit to any repair, you need to know for certain whether you’re looking at a real hardware defect on your iPhone screen or something that just looks like one. I’ve found that running a few simple diagnostic tests at home takes the guesswork out of the situation and gives you clarity about what you’re actually dealing with.
These tests are free, take only a few minutes, and they empower you to make informed decisions about repair. You don’t need any tools or special equipment. You just need your iPhone and a few minutes of your time.
Let me walk you through the most reliable diagnostic methods.
The White Background Test (The Most Reliable Method)
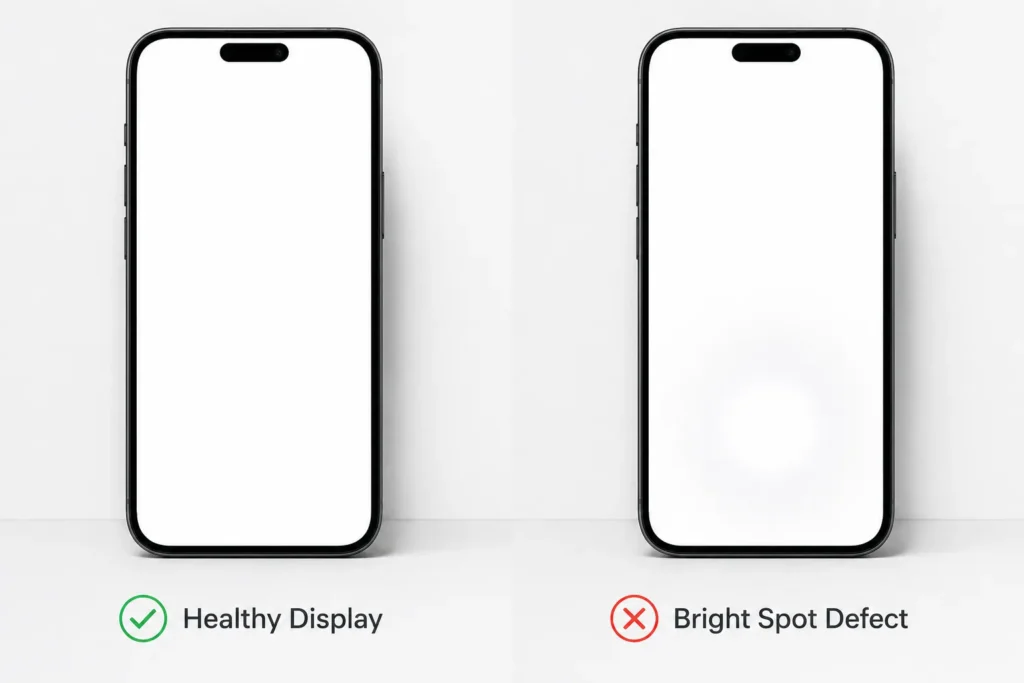
This screen uniformity test is the single most effective way to confirm whether your bright spot is a real display defect. The white background test cuts through confusion immediately because it makes real hardware problems completely obvious while ruling out other possibilities.
Open the Notes app on your iPhone and create a new blank note. Alternatively, open Safari and navigate to any website with a white background, or pull up your iPhone’s Settings app which has a white background. The key is getting a completely white screen displayed on your device.
Now look at your display carefully. If you have a real hardware bright spot, it becomes dramatically more visible on the white background. The spot appears brighter, more defined, and impossible to miss. This visibility happens because white backgrounds provide no contrast to hide the damaged area. A real display defect shows up clearly against white, every single time.
Here’s the critical next step that distinguishes a hardware problem from other issues. Take a screenshot of your white background screen using the volume buttons and power button simultaneously. Then look at the screenshot in your Photos app. If the bright spot appears in your screenshot image exactly where you see it on your screen, you might be dealing with a software rendering problem or a display setting issue rather than physical hardware damage.
But if the bright spot is clearly visible when you look at your screen in person, yet it does NOT appear in your screenshot image, this confirms the problem is a hardware display defect. The screenshot captured what your display is actually showing at the pixel level, while your eyes are seeing light scatter or diffusion caused by internal damage. This distinction matters because it tells you a technician needs to look inside your device.
The white background test gives you certainty. Real hardware damage cannot hide against a uniform white background the damaged area will appear unmistakably brighter than the surrounding display.The spot either appears unmistakably bright and visible on white, or it doesn’t. If it only appears on certain background colors or seems to move around, you’re likely not dealing with true hardware damage.
Brightness Slider and Position Stability Check
This test helps you understand whether your bright spot is a stable, fixed defect or something variable that changes based on settings. A real hardware defect should behave consistently regardless of brightness adjustments.
Open an app with a white background and locate your bright spot. Now swipe down from the top-right corner of your screen to open Control Center. Find the brightness slider and adjust it all the way down to minimum brightness. Look at your bright spot. Does it stay in exactly the same location? Does it appear dimmer, or does it disappear entirely?
Now gradually increase the brightness all the way to maximum. Observe what happens to the spot as you increase brightness. A real hardware display defect remains visible and in the same position whether your screen brightness is low or high. The spot might appear slightly less noticeable when brightness is very low simply because your entire screen is darker, but the location stays fixed.
If your bright spot moves, disappears, or changes based on brightness adjustments, you’re dealing with a display calibration issue rather than physical hardware damage. These respond to the fixes I covered in the previous section rather than requiring hardware repair.
If the bright spot stays in exactly the same position through brightness changes and remains visible at all brightness levels, this is another strong indicator of physical hardware damage. The spot is not dependent on software settings. It exists because something is actually damaged inside your screen.
Additional Diagnostic Insight
Run both tests back to back for definitive clarity. The white background test reveals whether you have real hardware damage. The brightness test confirms whether that damage is stable and fixed. Together, they tell you exactly what’s happening inside your iPhone screen and they take under five minutes total.
If both tests confirm hardware damage, professional repair is your next step. If the tests point to a software-based issue, the fixes in the previous section are specifically designed to address it. Either way, you arrive at a decision with evidence rather than guesswork.
Bright Spot, Dead Pixel, or Something Else? Clearing Up the Confusion
You might be calling your problem a “dead pixel” or a “bright dot,” but these terms describe completely different issues. I’ve found that understanding the distinction between a bright spot and other display problems is crucial because each one requires a different approach. Misdiagnosing your issue could send you down the wrong troubleshooting path or cost you unnecessary repair money.
Many people use these terms interchangeably when they search online, which creates confusion. Let me clarify what you’re actually looking at so you can describe your problem accurately to a repair technician and understand whether your issue is hardware-related or a simple iOS feature. If you’re also seeing lines across your display rather than a spot, there’s a separate guide covering other types of phone screen defects that may be more relevant to your situation.
Dead Pixel vs Bright Spot: They Are Not the Same Thing
A dead pixel is a single cell within the pixel array that has stopped working entirely. It appears as a permanently dark point, usually black or dark gray, in one fixed location. The pixel itself is not producing any light or color at all. If you have a true dead pixel, that single point stays dark no matter what content displays on your screen or what brightness level you set.
A bright spot is something completely different. A bright spot is a larger area where light is being amplified or scattered, typically from pressure or backlight damage inside your display. Instead of one pixel failing, multiple pixels or entire display layers are affected. A bright spot appears light or white, glowing brighter than the surrounding screen. The size is usually larger than a single pixel, ranging from a quarter-inch to several inches depending on the underlying cause.
The reason this distinction matters practically is that the two problems have different causes and different solutions. A true dead pixel results from a single pixel’s circuitry failing at the pixel array level. A bright spot results from pressure damage, backlight layer separation, or hardware failure inside your display’s deeper layers. A technician needs to know which you have because the repair approach differs.
If you describe your issue as a dead pixel when you actually have a bright spot, a technician might waste time troubleshooting the wrong problem. Accuracy in your description helps them diagnose and quote repair costs correctly.
Stuck Pixels: The Annoying Middle Ground (And How a Stuck Pixel Fix Works)
A stuck pixel sits between a dead pixel and a bright spot in terms of severity and appearance. A stuck pixel is one that is locked ON in a single color. Instead of being dark like a dead pixel, a stuck pixel displays red, green, blue, or white constantly, regardless of what content should appear on your screen.
Stuck pixels appear as small, colored dots rather than the soft glowing area you see with a bright spot. A red stuck pixel appears as a tiny red point. A blue stuck pixel shows blue. White stuck pixels are the most visible because they stand out against any background color.
The useful thing about stuck pixels is that they sometimes respond to pixel-refreshing apps or methods. Some people have reported success using apps that rapidly cycle colors across the entire screen, theoretically jolting the stuck pixel back into normal function. This doesn’t work reliably, and results vary. But stuck pixels are among the few display defects that have any chance of self-fixing or responding to software methods.
A bright spot, by contrast, almost never responds to pixel-refreshing attempts because the problem isn’t at the individual pixel level. The underlying cause is backlight damage, pressure separation, or battery swelling, none of which a software app can fix.
The iOS Features That Fool Everyone
Here’s where a lot of unnecessary confusion happens. Some people see what they think is a display defect, but they’re actually looking at an iOS feature. I’ve found that ruling these out immediately prevents panic and repair appointments you don’t need.
AssistiveTouch is an accessibility feature Apple designed to help people who have difficulty using the iPhone’s physical buttons. When AssistiveTouch is enabled, a circular floating button appears on your screen constantly. This button stays in a fixed position and stays visible in every app you open. Many people see this floating button and think they have a screen defect because it appears as a permanent dot on their display.
The fix is immediate. Go to Settings, then Accessibility, then Touch, then toggle off AssistiveTouch. The floating button disappears instantly. If this was your “defect,” you just solved your problem in 30 seconds without any repair.
Vehicle Motion Cues is a newer iOS feature that many people mistake for a bright spot or defect. Introduced in iOS 17, Vehicle Motion Cues displays animated dots on your screen when your iPhone detects you’re inside a moving vehicle. These dots appear only during vehicle motion and disappear when motion stops. The feature is designed to reduce motion sickness during car rides.
Many people first notice Vehicle Motion Cues while driving and think they have a new screen problem that just developed. In reality, they’re seeing an iOS feature they didn’t know existed. To disable Vehicle Motion Cues, go to Settings, then Accessibility, then Motion. Find Show Vehicle Motion Cues and set it to Off. The animated dots stop appearing immediately.
Both AssistiveTouch and Vehicle Motion Cues are legitimate iOS accessibility features, not defects. Understanding this distinction prevents unnecessary worry and repair costs. If you see a floating button or moving dots on your screen, check these settings first before assuming your display hardware has failed.
When to Take It to Apple (and What to Expect When You Do)
Professional repair is necessary when you’re dealing with a confirmed hardware problem that DIY fixes won’t resolve. Knowing exactly when to stop troubleshooting at home and when to contact Apple is crucial because every day you delay costs you money, especially if your warranty is expiring soon.
I’ve researched real cases where people waited too long and lost repair coverage because they didn’t understand the warranty timeline. Let me walk you through when professional repair is necessary, what your options actually are, and how to make financially smart decisions about your repair pathway.
Signs It Is Definitely a Hardware Problem (Stop Trying DIY)
You’ve reached the point where professional iPhone screen repair is necessary if any of these situations describe your device. At this point, software fixes won’t help. Contact Apple to understand your apple warranty coverage options or visit an authorized service provider directly.
If your bright spot has been visible for more than a week without any change, you’re looking at a hardware problem. Software-based display issues typically change or resolve within the first few restarts. A spot that stays exactly the same for a week is a sign of physical damage.
If the bright spot is growing larger or spreading, hardware damage is progressing. Don’t wait on this one. A growing spot indicates the underlying damage is worsening, whether that’s backlight separation, battery swelling, or pressure damage expanding. Early action costs less than waiting until the damage spreads further.
If your screen feels raised or uneven when you run your finger around the edges, or if your phone rocks slightly when placed flat, these are clear signs of a swollen battery. Stop trying anything at home and get to an Apple Store or authorized service provider immediately. Battery swelling is the one situation where continued use increases safety risk.
If the bright spot appeared immediately after you dropped your phone or had a screen replacement, hardware damage from the impact or repair process is the cause. Software fixes won’t help because the damage is physical.
If you’ve already tried soft reset, Reset All Settings, and removed your screen protector with no improvement, you’ve exhausted the reasonable DIY options. Further attempts waste your time and potentially risk causing additional damage to your device.
AppleCare+ Coverage Timing Is Everything
Here’s where understanding warranty timing saves you serious money. AppleCare+ coverage for screen damage is significantly cheaper than paying for a screen replacement out of pocket. But the window to add AppleCare+ to your iPhone is narrow, and missing it creates exactly the financial situation I want you to avoid.
AppleCare+ can be added to your iPhone within 60 days of purchase. If you’re reading this and your phone is within that 60-day window, I recommend strongly considering AppleCare+ if you use your device heavily or professionally. The cost is typically under 200 dollars, and it covers two incidents of accidental damage per year. A single screen replacement without AppleCare+ costs 250 to 400 dollars depending on your iPhone model.
Let me share a real-world case that illustrates why this matters. A professional concept artist purchased an iPad Pro and used it heavily every day for work. After nine months, a bright spot developed on the screen. Apple replaced the device under the standard one-year warranty, but no AppleCare+ was purchased. Seven months later, the exact same bright spot appeared on the replacement device in the same location. The artist contacted Apple for another repair, but Apple declined because the original warranty had expired and AppleCare+ was never added to either device.
Think about the financial impact of that situation. A confirmed, recurring display issue from the manufacturer, but no coverage because the warranty window closed. This person said directly that had AppleCare+ been purchased with the original device, they would have been covered for both repairs. Instead, they faced either paying full screen replacement cost or living with a recurring defect.
The lesson is blunt: if you own an iPhone and use it professionally, travel with it frequently, or have a history of device damage, AppleCare+ is worth the investment. The timing window is 60 days from purchase. Once that window closes, you cannot add AppleCare+ retroactively. Your only option becomes out-of-pocket repair costs if something goes wrong after your standard one-year warranty expires.
Apple warranty coverage on the standard one-year plan includes manufacturing defects, battery degradation, and hardware failures but typically excludes accidental damage like drops or water exposure. AppleCare+ extends coverage to accidental damage with a service fee per incident.
Apple Store vs Apple Authorized Service Provider vs Third-Party Shop
You have three options for iPhone screen repair, and each has different implications. Understanding the tradeoffs helps you make the choice that makes sense for your situation.
An Apple Store offers official Apple repairs using genuine Apple display assemblies. The technician is Apple-trained, your repair preserves any remaining AppleCare+ coverage, and the work carries an Apple warranty. However, Apple Store appointments can be hard to get quickly in busy locations, and the repair cost is highest at this option.
An Apple Authorized Service Provider is an independent repair shop that Apple has certified. These providers use genuine Apple display assemblies and follow Apple’s service standards. The repair preserves your AppleCare+ coverage and comes with Apple’s warranty just like an Apple Store repair. Authorized Service Providers often have faster appointment availability and sometimes slightly lower costs than Apple Stores. You can find Apple Authorized Service Providers through Apple’s official website.
A third-party repair shop is faster and cheaper than both Apple and Authorized Service Providers, but with important tradeoffs. TThird-party iphone repair shops often use aftermarket or refurbished screen quality assemblies instead of genuine Apple parts — and refurbished screen quality on OLED models in particular tends to vary significantly.
Non-genuine OLED screens especially can affect color accuracy, True Tone functionality, and Face ID performance. Third-party repairs void any remaining warranty you have with Apple. If something else fails after a third-party screen replacement, Apple support becomes complicated or unavailable. The short-term savings disappear if the non-genuine screen develops its own problems later.
My recommendation depends on your iPhone model and situation. For OLED iPhones (iPhone X and later), I recommend using Apple or an Authorized Service Provider. OLED displays are complex, and third-party aftermarket OLED screens have documented compatibility issues with True Tone, Face ID performance, and color accuracy that genuine Apple screens do not.
The short-term savings aren’t worth the long-term risks. For LCD iPhones (iPhone 8 and earlier), third-party repair shops are a more reasonable option because LCD aftermarket screens have better compatibility and fewer quality issues.
If you have AppleCare+ coverage remaining, always use Apple or an Authorized Service Provider because your repair is protected and covered by Apple’s warranty. Using a third-party shop voids your remaining coverage.
Got a Bright Spot Right After a Screen Replacement? This Is Why
A bright spot that appears right after you get a screen replacement is usually not a problem with the new screen itself. This situation is frustrating because you just paid for a repair, and now there’s still a problem. But the actual cause is often fixable without buying another screen, and this is exactly what you need to know before spending more money.
I’ve found that many people jump straight to ordering a second screen replacement when a spot appears after their first repair. Understanding what actually happened during that initial repair saves you time, money, and another unnecessary visit to the repair shop.
Let me walk you through the two most likely causes and what you should do next.
Cause 1 — Debris or Adhesive Residue From the Repair
During a screen replacement, technicians use waterproof adhesive to seal the edges of your new display assembly. This adhesive is essential for keeping moisture out of your device. But sometimes, small pieces of this adhesive stick to the back of your new screen instead of staying where it should be.
When a technician reassembles your iPhone, that adhesive debris sits directly against the LCD backlight layer inside. The piece of adhesive creates pressure on the backlight, producing a bright spot that looks identical to hardware screen damage. The spot appears immediately after reassembly, which makes you think the new screen is defective.
Here’s the important part: this problem is completely fixable without replacing the screen again. The technician simply needs to open your device, look at the back of the display panel, find and remove the stray adhesive piece, and reassemble. The bright spot disappears completely because the pressure source is gone.
Documented repair cases confirm exactly this scenario: a technician opens an iPhone with a post-repair bright spot, finds a piece of waterproof adhesive stuck to the back of the new display panel adhesive separation during reassembly carefully removes it, and reassembles the device. The bright spot vanished entirely. No second screen replacement necessary.
The key to handling this situation is not accepting that you need another screen. Instead, return to the repair shop where you got your original iPhone screen repair. Tell them you have a bright spot that appeared immediately after the replacement. Ask them specifically to inspect the back of the display panel for any leftover adhesive, debris, or foreign material before assuming the screen itself is faulty.
A professional technician should do this inspection at no additional cost because it’s a quality control issue from their original work. If they find adhesive residue and remove it, the problem is solved. You shouldn’t pay for a second screen replacement because the actual issue wasn’t screen damage.
Cause 2 — The Battery Problem Was Never Addressed
The second common scenario is different but equally frustrating. Sometimes a swollen battery causes the original bright spot on your iPhone screen. You go to the repair shop, they replace the screen, and the bright spot seems to disappear initially. But then it comes back days or weeks later.
This happens because the technician replaced the screen to fix the visible symptom, but never addressed the root cause, which was the swollen battery pushing against your display. Once the new screen settles into place, the battery continues swelling and pushing upward. The spot reappears in the same location because the battery is still there and still expanding.
Repair documentation confirms exactly this scenario. A technician opened an iPhone with a post-replacement bright spot, discovered an abnormal bulge in the battery sitting directly behind where the spot appeared, and replaced the battery with a fresh one. The screen immediately returned to normal uniformity. The screen replacement from the first appointment was fine. The issue was never the screen itself. It was the battery that nobody diagnosed or fixed during the initial repair.
When this happens to you, the correct next step is not another screen replacement. You need a battery replacement instead. Return to your repair shop and explain that the bright spot has reappeared in the same location. Ask them to inspect the battery for swelling. If they find a swollen battery, that battery needs replacing, not the screen again.
Some repair shops diagnose poorly and replace screens when the actual problem is battery failure. This creates exactly your situation: you pay for a screen replacement that doesn’t fix anything because the real problem is still present. Don’t accept another screen replacement quote without getting the battery inspected.
What to Do Right Now
If you have a bright spot that appeared right after a screen replacement, here’s your action plan. Contact the repair shop where you got your original screen replacement. Explain that a bright spot developed immediately or very soon after their work. Ask for one of two diagnostic steps depending on timing.
If the spot appeared within 24 hours of the repair, ask them to inspect the back of the display panel for adhesive debris or foreign material without charging you. This is a quality control issue with their repair.
If the spot appeared days or weeks after the repair, ask them to inspect the battery for swelling. A swollen battery may be visible as a slight bulge or feel unusual during inspection. If the battery is swollen, it needs replacement, not the screen.
Either way, you shouldn’t accept a second screen replacement quote until one of these diagnoses is confirmed. The repair shop should back their original work and perform these diagnostic checks without additional cost.
Why the Same Bright Spot Keeps Coming Back (And How to Stop It)
If you’ve had a bright spot repaired and it came back in the exact same location, you’re not dealing with random bad luck. The problem is that the underlying cause is your usage pattern, not a one-time incident. This situation is frustrating because you paid for a repair that didn’t prevent the real issue from recurring.
I’ve researched a documented case of someone experiencing this exact scenario twice on the same device model. The bright spot appeared after nine months of heavy use, Apple replaced the device under warranty, and seven months later the identical bright spot appeared on the replacement device in the same location. This wasn’t coincidence. It was a pattern.
Understanding why this happens changes everything about how you prevent it from happening again.
The Palm Pressure Pattern That Repeats Damage
Heavy users with predictable work habits are the most common candidates for recurring bright spots. Consider a professional writer or designer who holds their iPhone in the same grip for two to three hours daily. Their palm rests against the same lower-left corner of the display every single session. Over eight or nine months, those accumulated display pressure marks concentrate in one area, gradually separating the display layers. The spot appears. They get it repaired. They return to the same work habits. Six months later, the spot reappears in the identical location.
This is not bad luck or a defective replacement screen. It’s a pattern. The display damage is being recreated by the same behavior that caused it the first time.
Apple replaced the device under the standard warranty. But when the artist continued their work routine with identical usage patterns, the same palm pressure accumulated in the same display area on the replacement device. Seven months later, the bright spot reappeared in the exact same location because the underlying cause, the repetitive palm pressure, was never addressed.
The display pressure marks that create bright spots don’t appear from a single incident. They develop from accumulated stress. When you repeatedly apply pressure to the same spot on your iPhone screen during extended use sessions, the display layers separate gradually over time. The spot gets worse the longer you maintain that pressure pattern.
This is the critical insight: if a bright spot came back after repair, your usage habit created it the first time and will create it again. Simply replacing the screen treats the symptom, not the cause. You need to change the behavior that damaged your screen initially.
How to Prevent Recurrence
Rotating your device orientation regularly is the most practical prevention strategy for heavy users. If you’re an artist, writer, designer, or anyone who uses their iPhone intensely while holding it in one position, deliberately rotate between portrait and landscape orientation during your work sessions. This prevents the kind of phone screen bright patches that form when palm pressure concentrates in one area over months of repeated use.
The concept artist who experienced this issue twice now rotates their iPad orientation frequently while drawing and if you’re a professional iPad user experiencing iPad display issues beyond just bright spots, that’s a separate problem worth addressing directly. This simple rotation habit distributes palm pressure across different screen areas instead of concentrating it in one spot.
When you change orientation every 20 to 30 minutes during extended use, no single area experiences sustained pressure damage.
Taking breaks during long sessions reduces cumulative pressure stress on your display. If you’re working for hours with your palm on the screen, periodic breaks give your display time without sustained contact. Step away, rest your hands, and reset your work position when you resume.
Using a stylus instead of your palm when possible removes direct hand contact from the screen entirely. If your work allows it, a stylus approach eliminates palm pressure completely. Professional artists can use Apple Pencil or similar tools that reduce direct palm-to-screen contact.
Protecting Against Future Recurrence
If your bright spot came back once, it could come back again if you maintain the same usage pattern. AppleCare+ becomes genuinely important in your situation. You’ve demonstrated that your device will likely experience repeated display issues, and AppleCare+ covers multiple incidents per year with a service fee per repair.
If your bright spot has recurred once, assume it will recur again under the same usage pattern. The practical response is two-fold: change the behavior and protect yourself financially. AppleCare+ becomes genuinely important in this situation because you’ve already demonstrated your device will experience repeated display stress. It covers multiple incidents per year with a service fee per repair significantly cheaper than paying full screen replacement costs twice or three times over the life of your device.
They recognized the pattern, accepted that their professional use creates display stress, and protected themselves financially for future repairs.
This is not a failure of your device. This is a mismatch between how intensively you use your iPhone and how much stress that use applies to the display. Once you understand this pattern, you can adapt. Change your usage habits, embrace device rotation, take breaks, and ensure AppleCare+ coverage. Together, these steps prevent the frustrating cycle of repeated repairs.
The good news is that recognizing the pattern means you can now prevent it. You know what caused the problem. You know how to change it. And you can protect yourself financially if recurrence happens despite your best efforts.
How to Stop a Bright Spot From Ever Appearing on Your iPhone Screen
Preventing a bright spot from developing in the first place is far easier and cheaper than dealing with one after it appears. The good news is that most bright spots are preventable through practical habits and smart protective choices. I’ve found that small changes to how you use and protect your iPhone significantly reduce the risk of display damage.
Let me walk you through the prevention strategies that actually work.
Practical Prevention Habits
Use a rigid protective case that distributes impact evenly. A thin case or no case leaves your iPhone vulnerable to pressure damage from drops and impacts. A rigid case with cushioning absorbs shock and distributes pressure across a larger area instead of concentrating it at a single point. This prevents the localized damage that creates bright spots from impact.
Invest in a quality screen protector and apply it carefully. A quality tempered glass screen protector absorbs impact that would otherwise damage your display. The key is proper installation without air bubbles or dust underneath. Take time during application to ensure the screen protector sits flush against your iPhone screen. A well-applied protector protects your display layers without interference.
Never put your iPhone in your back pocket. Sitting on your phone applies sustained pressure directly to the center of your display. This is one of the fastest ways to create pressure-based bright spots. Keep your iPhone in a front pocket, bag, or on a table instead. This habit alone prevents a huge category of accidental display damage.
Rotate your device orientation during extended use sessions. As covered in the recurring bright spot section, switching between portrait and landscape every 20–30 minutes distributes palm pressure across different screen areas instead of concentrating it in one spot.
Avoid leaving your iPhone in hot environments. Direct sunlight, hot cars, or placing your device near heat sources causes thermal expansion inside your display layers. Heat weakens the adhesive bonds holding display components together, making them vulnerable to separation and backlight damage. Keep your iPhone in moderate temperatures and away from sustained heat exposure.
Give your iPhone breaks during intensive work sessions. If you’re a professional user who works with your device for many hours daily, periodic breaks reduce cumulative pressure stress. Step away, rest your device on a surface instead of holding it, and return with fresh positioning. This simple habit gives your display time to reset without sustained contact pressure.
Financial Protection Strategy
Purchase AppleCare+ when you buy your iPhone, especially for professional or heavy use. AppleCare+ pricing varies by iPhone model (typically $8–$14/month or a one-time fee), and it covers two accidental damage incidents per year with a service fee per repair check apple warranty coverage details on Apple’s site for your specific model.
If you use your iPhone intensely, travel with it frequently, or have a history of device damage, AppleCare+ is insurance worth the investment. The cost of a single out-of-pocket screen replacement makes AppleCare+ pay for itself in one incident.
AppleCare+ must be added within 60 days of purchase. Once that window closes, you cannot add it retroactively. If you’re on the fence about whether you need it, lean toward purchasing it. The peace of mind and financial protection for heavy users justifies the cost.
Understand your standard warranty coverage. Every iPhone comes with a one-year limited warranty covering manufacturing defects and hardware failures from normal use. This warranty does not cover accidental damage like drops, water exposure, or pressure damage. After one year, you’re entirely responsible for repair costs unless AppleCare+ is active. Knowing this timeline helps you understand why acting quickly on warranty claims matters.
Why Prevention Beats Repair
The cost of preventing a bright spot through protective cases, screen protectors, and usage awareness is negligible compared to screen replacement costs. A quality case costs 30 to 80 dollars. A screen protector costs 10 to 30 dollars. AppleCare+ costs under 200 dollars spread over two years. A screen replacement without AppleCare+ costs 250 to 400 dollars.
Prevention is always cheaper and faster than repair. The few dollars you invest upfront in protection saves you hundreds later and eliminates the frustration of display damage interrupting your work. The same habits that prevent bright spots also help you avoid touchscreen responsiveness problems another common result of display pressure damage.
Buying a Used iPhone? Here’s How to Spot Screen Problems Before You Pay
If you’re shopping for a used iPhone, screen defects are one of the most common hidden problems you’ll encounter. Many people buy a used device without properly inspecting the display, only to discover bright spots or dead pixels after they’ve already paid. I’ve researched how screen defects enter the used phone market and what buyers need to check before handing over money.
Understanding what to look for takes only a few minutes and could save you from buying a phone with a pre-existing display problem. Let me walk you through the inspection process.
The White Screen Test — Do This Before Handing Over Any Money
The white background test is your most powerful tool for identifying screen problems on a used iPhone before purchase. This test reveals defects that are completely hidden on colored screens or normal home screens. You’ll immediately see whether the display has any bright spots, dead pixels, or discoloration issues.
Ask the seller to let you test the device. Open Safari and search for “white.” Look for a completely white search result page, or open the Notes app and create a blank note. Both give you a fully white screen to work with. Now look at the display carefully.
Bright spots, dark pixels, and color discolorations become unmistakably visible against white backgrounds. A phone with a manufacturing defect screen or existing display damage will show these problems clearly. If the display is perfect, it looks uniformly white from edge to edge with no visible blemishes anywhere.
Hold the device at different angles and in different lighting conditions while looking at the white screen. Some defects are more visible when you view the screen from an angle. Tilt the device left and right, and look at it from above and below. Screen defects often show up better under certain viewing angles.
Take time with this test. Spend at least 30 to 45 seconds examining the entire display surface on white. Look at all four corners, the center, and the edges. Manufacturing defect screens commonly have spots in corners or along edges. Pressure damage shows up as a localized bright area. Dead pixels appear as sharp dark points.
If you see any spots, discoloration, or uneven areas on the white background, you’ve found a problem. The phone might still be worth buying if the price reflects the defect, but you need to know about it before purchasing. A phone with visible display defects should cost significantly less than a flawless device.
Don’t Forget to Check the Camera Too
Screen problems and camera sensor problems are separate issues that can exist independently or together on the same used iPhone. Many buyers focus only on the display and miss camera defects entirely. You need to check both before finalizing your purchase.
Open the Camera app on the used iPhone. If the device has multiple camera lenses (Wide, Main, Telephoto), you’ll see a lens selector at the bottom. Start with the Wide lens and place your fingertip completely over that lens. Look at the live camera view on your screen. Any persistent dark spots that appear in the same position every time you point the camera at different objects are sensor defects.
Switch to the Main lens and repeat the fingertip test. Cover the lens completely and look for dark spots in the camera preview. Do the same for the Telephoto lens if the device has one. Then test the front-facing camera by switching to selfie mode, covering the front lens, and looking for spots.
Camera sensor spots are different from screen bright spots, but they’re equally frustrating because they appear in every photo and video you take. A dark spot on the camera sensor means every picture from that lens will have that defect. If you’re planning to use the camera regularly, sensor defects are a significant problem.
A phone with camera defects should sell for noticeably less than one with a perfect camera. If the seller hasn’t mentioned the camera problems, that’s a red flag. Ask directly about any visible spots in photos or video.
Understanding the Secondhand Market
Screen defects on used iPhones often originate from manufacturer quality control rejects. Apple and other manufacturers reject phones with display problems during production. Instead of destroying these devices, they’re sold in bulk to secondhand distributors and resellers. These phones look perfectly normal from the outside but have pre-existing panel issues.
Some sellers are transparent about defects and price accordingly. Others try to sell phones with tiny, barely visible spots at full price for a flawless device. Doing the white background test protects you from overpaying for a defective phone.
If you discover a screen problem during your inspection, negotiate the price down significantly. A phone with a minor bright spot might be worth 50 to 100 dollars less than a flawless model. A phone with major screen damage might be worth 150 to 200 dollars less depending on severity and iPhone model.
Always complete these tests before paying. Once you’ve handed over money, returning the device becomes difficult or impossible with many sellers. Use your few minutes of inspection time to protect yourself from a costly mistake.
What to Do Next Based on Your Situation
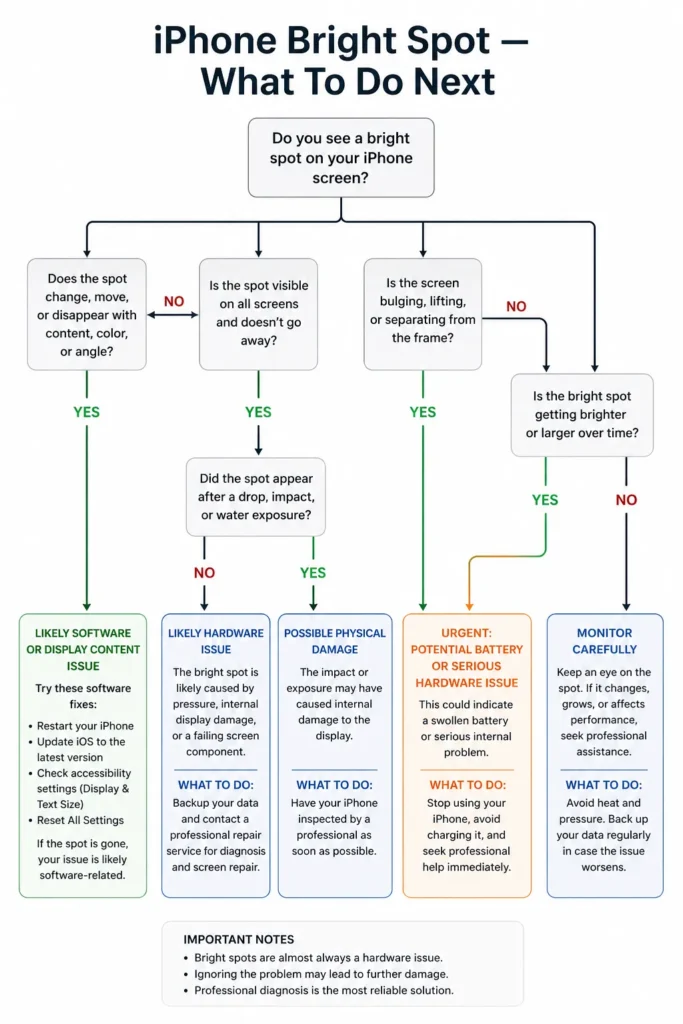
You’ve read through a lot of information, and now you need to know exactly what action to take. I’ve created a quick reference guide based on your specific situation. Find the scenario that matches yours and follow the action steps.
Your Scenario-Based Action Plan
If you just noticed the bright spot and it’s been there less than a week:
Start with the software fixes from Section 5. Try a soft restart, then Reset All Settings. Check if AssistiveTouch or Vehicle Motion Cues is enabled and disable them if needed. Remove your screen protector to rule out dust underneath. If any of these fixes work, you’re done. If nothing changes after 24 hours, move to the next scenario.
If the bright spot appeared immediately after you dropped your phone:
The damage is physical and software fixes won’t help. Check if your screen feels raised or uneven, which would indicate a swollen battery. If the screen feels normal, contact Apple support or visit an Apple Authorized Service Provider. Get a diagnostic appointment within the next few days. If your iPhone is under one year old, the damage might be covered under warranty.
If the bright spot appeared right after a screen replacement:
Do not order another screen immediately. Return to the repair shop where you got the original work done. Ask them to inspect the back of the display panel for leftover adhesive or debris. Tell them to also check the battery for swelling. One of these two issues is likely the real cause. A quality shop will do these diagnostics at no charge because it’s a quality control issue from their repair.
If your screen feels raised or the phone rocks when placed flat:
Stop everything else. Your battery is likely swollen and this is a safety concern. Do not charge your phone. Take it to Apple support or an Apple Authorized Service Provider today. Tell them you suspect a swollen battery. They’ll diagnose and replace it. If your iPhone is under one year old, this repair is likely covered by warranty at no cost.
If you’ve tried the software fixes and nothing worked:
You’re dealing with a hardware problem that requires professional repair. Contact Apple support or an Apple Authorized Service Provider and describe your situation. They’ll provide repair quotes. If you have AppleCare+, your repair is covered with a service fee.
If you don’t have AppleCare+ and your warranty has expired, expect to pay $250–$400 depending on your iPhone model you can find current screen replacement cost details on Apple’s support page before your appointment. Compare Apple and Authorized Service Provider quotes before deciding.
If the bright spot keeps coming back after repair:
Your usage pattern is recreating the damage. You need to change your habits. Rotate your device orientation regularly during extended use sessions. Take breaks from sustained palm contact. Get AppleCare+ on your next device purchase to protect yourself financially. If you absolutely must have your current phone repaired again, use Apple or an Authorized Service Provider so your remaining warranty stays intact.
If you’re buying a used iPhone and want to check it first:
Do the white background test before handing over money. Open Notes and create a blank note, or open Safari to a white page. Look for any bright spots or discoloration. Check each camera lens by covering it with your finger and looking for persistent dark spots. If you find defects, negotiate the price down or walk away from the purchase.
Moving Forward
Now you understand what’s actually happening inside your iPhone when that iphone bright spot on screen appears. You know which fixes are worth trying at home, when professional help is necessary, and how to protect yourself going forward.
An iPhone screen bright spot is not a mystery. It’s a specific problem with identifiable causes and real solutions. Use the scenario guide above to find your exact situation, take the matching action, and you’ll know exactly what comes next whether that’s a two-minute settings reset or an Apple Store appointment.
FAQ SECTION: Bright Spot on iPhone Screen
Why did a bright spot appear on my iPhone screen after I had it replaced?
This is frustrating because you just paid for a repair, so the last thing you want is another problem. The bright spot that appears after a screen replacement usually isn’t a problem with the new screen itself. Instead, it’s typically caused by one of two issues from the repair process.
The first possibility is leftover waterproof adhesive or debris stuck to the back of your new display. During screen replacement, technicians use waterproof adhesive to seal the edges of the new screen. Sometimes a small piece gets stuck to the back of the display panel instead of staying where it should be. When your iPhone gets reassembled, that adhesive sits directly against the LCD backlight layer and creates pressure, producing a bright spot that looks identical to screen damage.
The second possibility is that a swollen battery caused the original bright spot, but only your screen got replaced. If the battery problem was never addressed, it continues pushing against your new screen, and the spot reappears. The screen itself is fine. The battery is the real issue.
Here’s what you should do: return to the repair shop where you got the work done. Ask them to inspect the back of the display panel for adhesive residue before assuming the new screen is faulty. Also ask them to check if the battery is swollen. A quality repair shop should do these diagnostics at no charge because it’s a quality control issue from their original work. Don’t pay for a second screen replacement until one of these causes has been identified and ruled out.
Is a bright spot on an iPhone screen dangerous?
The answer depends entirely on what’s causing the bright spot. A bright spot from pressure damage or LCD backlight separation is purely a display cosmetic issue. It’s annoying and you’ll want to fix it, but it won’t harm you or your device beyond the visual problem.
However, if a swollen battery is causing your bright spot, the situation is genuinely dangerous and requires immediate attention. A lithium-ion battery that’s expanding poses a real safety risk. As the battery continues to swell, it can rupture, leak electrolyte, or cause heat buildup inside your device. In rare extreme cases, a severely swollen battery that ruptures can create a fire or thermal event risk.
Here’s how to tell if a swollen battery might be your problem. Check if your screen feels slightly raised or uneven compared to the normal flush fit. Place your iPhone on a flat table and see if it rocks slightly instead of sitting completely flat. Look for an uneven gap between the screen and frame that’s larger than normal. If any of these signs are present, treat your iPhone as having a potential battery problem.
If you suspect a swollen battery, stop charging your device immediately and take it to Apple support or an Apple Authorized Service Provider the same day. Don’t put the phone in your pocket or apply any pressure to it. Tell Apple specifically that you suspect a swollen battery. They’ll inspect and replace the battery if that’s the issue. If your iPhone is under one year old, the battery replacement is likely covered by your standard warranty.
Can a bright spot on an iPhone screen fix itself?
The honest answer is almost never. But the type of bright spot you have determines whether there’s even a tiny chance.
If your bright spot is yellow-tinted or has a warm color cast, it might be a software-based display calibration issue rather than hardware damage. These rare software issues sometimes resolve after you restart your iPhone or perform a Reset All Settings. I’ve found documentation of a yellow spot on an iPhone XR that completely disappeared after a settings reset. So if your spot has a color tint rather than being white or bright, trying Reset All Settings is worth a few minutes of your time.
Real hardware bright spots caused by pressure, LCD backlight layer damage, or a swollen battery will not fix themselves. These spots typically worsen over time as the underlying damage progresses. A pressure-based spot grows larger as the separation expands. A backlight bleed spot spreads as the diffuser layer deteriorates further. A battery swelling spot worsens as the battery continues to expand.
The earlier you address a hardware bright spot, the better. Acting quickly prevents the damage from growing and keeps repair costs lower. Waiting and hoping the spot goes away only makes the problem more expensive to fix.
What is the difference between a bright spot and a dead pixel on an iPhone screen?
These terms sound similar, but they describe completely different problems. Understanding the distinction helps you accurately describe your issue to a repair technician.
A dead pixel is a single pixel that has stopped working entirely. It appears as a tiny, permanently dark point, usually black or very dark gray. The pixel itself produces no light or color. Dead pixels are sharp, well-defined points, usually just one or two pixels in size.
A bright spot is much larger and works the opposite way. Instead of being dark, a bright spot is a light-emitting area where light is being scattered or concentrated by damage to the display layers beneath. Bright spots appear soft and glowing, not sharp and defined. The affected area is usually larger than a single pixel, ranging from a quarter-inch to several inches depending on the underlying cause.
Bright spots are almost always hardware-layer issues caused by pressure, backlight damage, or battery swelling. Dead pixels are pixel-level failures. They have different causes, different solutions, and different repair paths. When you describe your issue to a technician, being specific about whether you have a small sharp dark point or a larger glowing bright area helps them diagnose correctly.
Does AppleCare+ cover a bright spot on my iPhone screen?
AppleCare+ does cover accidental screen damage, but with an important detail. AppleCare+ covers damage with a service fee per incident, not for free. The service fee for screen damage on most iPhone models ranges from 30 to 100 dollars, which is significantly less than the full out-of-pocket screen replacement cost of 250 to 400 dollars.
If your bright spot is caused by a manufacturing defect rather than accidental damage, it might be covered under your standard one-year warranty at no charge. Manufacturing defects are Apple’s responsibility. But once your one-year warranty expires, you’re on your own unless AppleCare+ is active.
Here’s the critical timing issue. AppleCare+ must be purchased within 60 days of buying your iPhone. If you miss that window, you cannot add AppleCare+ later. Once the window closes, any screen damage after your warranty expires costs you the full out-of-pocket amount.
There are documented cases of users who experienced a bright spot under warranty, had it repaired, and saw the same issue recur after warranty expiration with no AppleCare+ in place. Apple declined the second repair even in cases where the defect was confirmed as recurring because apple warranty coverage had lapsed and no extended protection was active. Apple declined to repair the second occurrence even though it was a confirmed, recurring screen defect. Had AppleCare+ been purchased initially, both repairs would have been covered with only a service fee. Instead, the second repair came out of pocket.
If you’re considering AppleCare+ and you use your iPhone heavily, travel with it frequently, or have a history of accidental damage, the investment is worth it. The cost of protecting your device against accidental damage is far less than paying full price for screen replacement if something goes wrong.
Are the moving dots I see on my iPhone screen while driving a screen defect?
No, these are not a screen defect at all. What you’re seeing is a feature called Vehicle Motion Cues, which Apple introduced in iOS 17. These animated dots appear on your screen when your iPhone detects that you’re inside a moving vehicle. The feature is designed to help reduce motion sickness while you’re traveling.
Many people see these dots for the first time while driving and assume their screen is broken. The dots move and change, which makes them seem like a display problem. But they’re actually an intentional iOS accessibility feature.
If these moving dots are bothering you or distracting you, you can easily turn off Vehicle Motion Cues. Go to Settings on your iPhone, then navigate to Accessibility. From there, select Motion. You’ll find an option called Show Vehicle Motion Cues. Change the setting from Automatic or On to Off. The animated dots will stop appearing immediately.
You have three options for this setting. On keeps the dots visible all the time. Automatic shows the dots only when your phone detects motion consistent with vehicle travel. Off completely disables the feature. Choose whichever setting works best for you.
Will the bright spot spread or get bigger over time?
In most hardware cases, yes it will. Bright spots from hardware damage tend to worsen progressively if left unrepaired. This is important to understand because it affects your repair timeline and final cost.
Pressure-based bright spots grow larger as the underlying display layer damage continues to expand. The initial separation or break at the backlight layer doesn’t stay isolated. Over weeks or months, the damage spreads to adjacent areas. What starts as a small spot can become a large area of compromised display.
LCD backlight bleed spots expand similarly the backlight diffuser layer continues to deteriorate with use, and the bright area grows as more of the diffuser is affected. The diffuser layer doesn’t repair itself. The separation continues to deteriorate as you use your phone, and the spot becomes more prominent over time.
Bright spots caused by a swollen battery worsen as the battery expansion continues. The battery doesn’t stop swelling on its own. It only continues to expand, creating increasing pressure on your display. The spot grows as pressure increases.
The earlier you address a hardware bright spot, the less damage has occurred and the simpler your repair becomes. A small spot caught early might respond to a simple battery replacement or adhesive removal. A large spot that’s been growing for months might require full screen replacement even if the screen itself isn’t damaged. Acting quickly saves you money and prevents the problem from becoming worse.
Should I try the “gentle pressure” method to fix my iPhone’s bright spot?
This technique is risky and only worth attempting under very specific conditions. If you decide to try it, proceed with extreme caution.
The gentle pressure method only applies to LCD iPhones from iPhone 8 and earlier. Do not attempt this on any iPhone X or later, which use OLED displays. OLED screens are far more sensitive to pressure, and this technique is more likely to cause additional damage than fix anything.
If you have an LCD iPhone and want to try this, here’s exactly how to do it safely. Get a soft microfiber cloth, the kind used for cleaning glasses or screens. Place your iPhone screen-side up on a flat surface. Position the cloth over the bright spot. Using only your fingertip, apply extremely light pressure in a very small circular motion for about 30 seconds. The pressure should be so light that you could barely feel it if you tried it on your skin.
Stop immediately if you feel any resistance or if the spot appears to worsen during the test. Do not use your fingernails, do not use tools, and absolutely do not apply force. You’re testing whether the spot is caused by a slightly separated backlight layer that might reseat. You’re not trying to force anything back into place.
Never attempt the gentle pressure method if you suspect a swollen battery. Adding external pressure to a device with a swollen battery increases risk and makes the situation worse. If your screen feels raised or your phone rocks slightly when placed flat, skip this technique entirely and go straight to professional repair.


