

Why Is My iPad Touchscreen Not Working? (Quick Diagnosis First)
Before you start trying fix after fix, I want you to understand what’s actually broken. That’s the fastest way to get your iPad working again.
Your iPad’s touchscreen isn’t one simple component. It’s actually two separate parts working together—and knowing the difference between them can save you hours of wasted troubleshooting.
Digitizer vs LCD: What’s Actually Broken?
Your iPad screen has two layers doing completely different jobs. The digitizer is the touch sensitive glass layer on top that detects your finger. The LCD is the display underneath that shows you images and text.
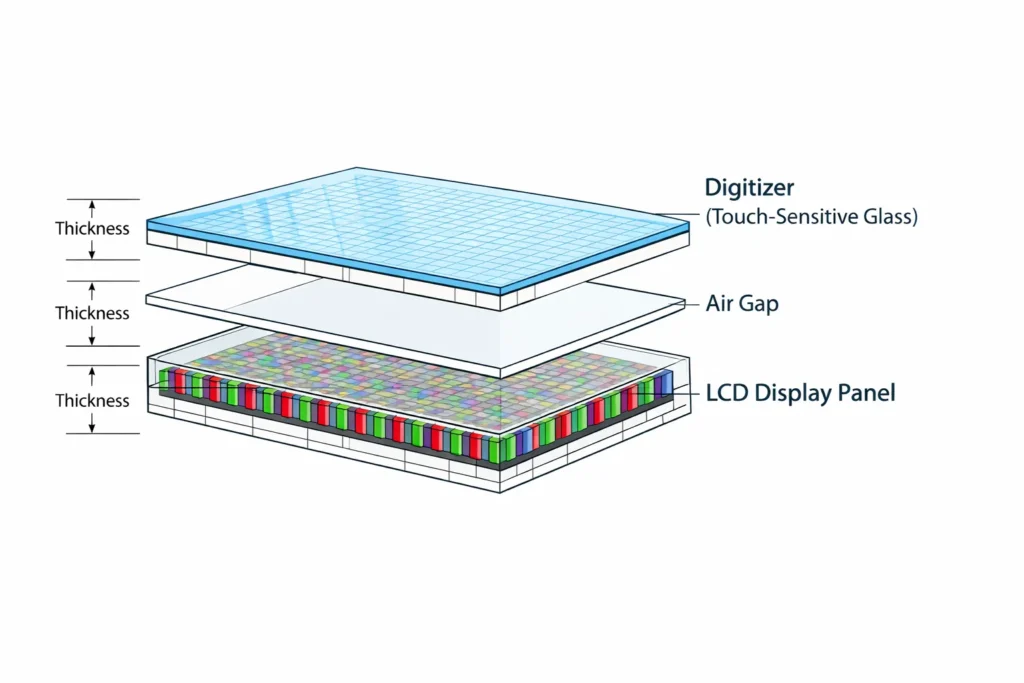
Here’s what makes this distinction critical: one component can fail while the other works perfectly fine. This separation is why understanding your device’s architecture saves you money and frustration.
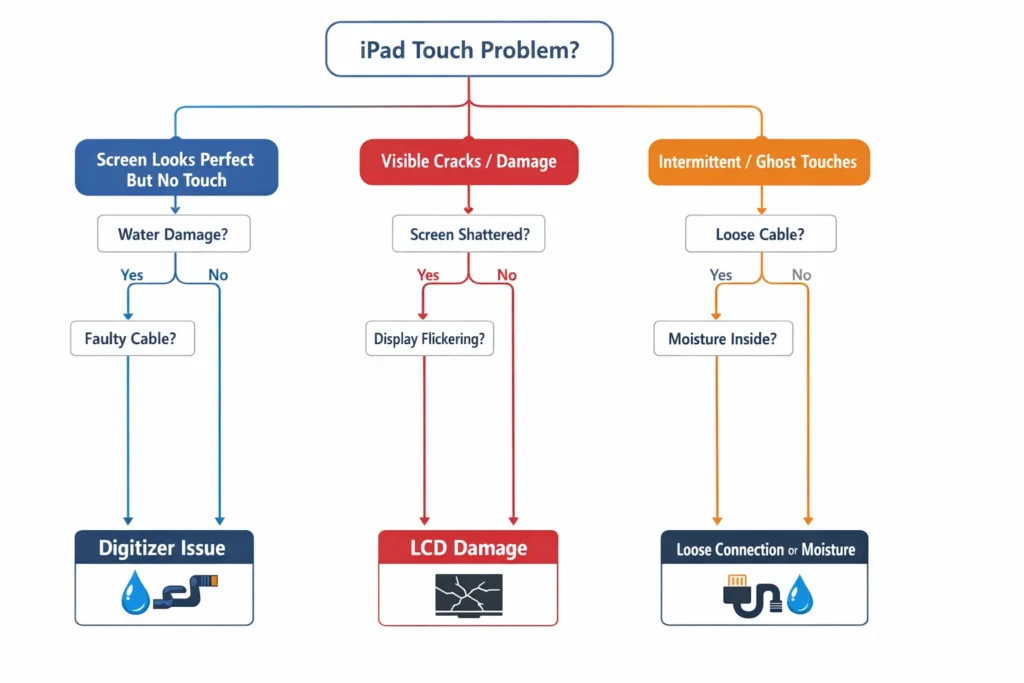
I’ve seen countless cases where someone’s iPad looks crystal clear on screen colors are bright, text is sharp, videos play without a glitch. But when they try to tap anything, nothing happens. That’s a digitizer failure or a loose digitizer cable, not a display problem.
On the flip side, you could have a cracked display with lines running across the screen or dark spots where pixels died. But if your touch still responds when you tap, your digitizer is fine and you might not need a full screen replacement.
When someone tells you their “iPad screen stopped working,” they usually mean the touch stopped working, not the display. This confusion is why people sometimes spend money on screen replacements when they actually just need the digitizer cable reseated or the digitizer cleaned.
If your display looks perfect but won’t respond to your finger, you’re likely dealing with a digitizer issue that could be fixable at home. If your screen is cracked or shows display problems but touch works fine, that’s an LCD issue that usually requires professional repair.
Ghost Touch vs Unresponsive Touch (Two Different Problems)
Touch problems come in two opposite flavors, and they need different solutions.
Unresponsive touch is what most people experience—you tap your iPad and nothing happens. The screen doesn’t respond to any of your finger movements. You can’t unlock it, can’t open apps, can’t swipe between screens. It’s completely frozen to your input.
Ghost touch is the opposite nightmare. Your iPad registers touches that you never made. Apps open by themselves. Random letters type out while you’re not touching anything. The screen scrolls without you swiping. Sometimes it’s worse when the iPad is charging. It’s like your device has a mind of its own.
Ghost touch means your iPad is registering phantom touches you didn’t make, while unresponsive touch means your real fingers don’t register at all.
The reason I’m separating these is because the fix is completely different. Unresponsive touch often comes from a software glitch, a disconnected cable inside, or actual hardware damage. Ghost touch usually means moisture or dust on the digitizer connector, or sometimes a failing digitizer creating false signals.
I mention this upfront because I’ve watched people spend weeks trying software fixes on ghost touch when they actually needed to clean internal connectors. And I’ve seen others pay for expensive screen replacements when a simple force restart would have fixed their unresponsive touch in thirty seconds.
Quick Diagnostic Questions
Let me give you a simple way to figure out which direction to go. Answer these questions honestly about your situation.
Did your touch problem start right after you dropped your iPad? If yes, you likely have a loose internal cable that can sometimes be fixed without opening the device. Drops often unseat cables without breaking the screen itself.
Does part of your screen work while other areas don’t? If only the top works, or only one corner, that’s different from complete unresponsiveness. This pattern usually indicates dead zones from a digitizer cable partially unseated or damage to a specific area of the digitizer.
Is the problem constant or does it come and go? Intermittent touch issues often point to a loose connector or a bad cable contact that only fails sometimes. Constant touch failure is more likely a digitizer failure or software problem.
Did you recently install an iPadOS update? Software glitches from updates are actually pretty common. If touch died right after an update, try updating again or checking your settings first.
Is your screen wet or was it recently exposed to water? Moisture on the digitizer connector typically causes ghost touch symptoms. Moisture inside the device can also cause unpredictable touch behavior that gets worse over time.
Does your iPad display look perfect, or is there damage? If the picture looks great but touch doesn’t work, you’re probably looking at a digitizer problem. If you see cracks, black spots, or color issues, that’s LCD damage which usually requires professional repair.
These questions aren’t random. They help separate quick software fixes from hardware problems that might need professional attention. A drop that loosens a cable is different from a device that suddenly stopped responding without any obvious cause.
The key is moving from diagnosis to the right fix as fast as possible. Once you know whether you’re dealing with a software glitch, a loose cable, or actual hardware damage, you’ll have a clear path forward through our 12 fixes instead of wasting time on solutions that won’t address your specific issue.
Fix #1: How to Force Restart Your iPad (Works 80% of the Time)
If your iPad touchscreen is frozen and unresponsive, the first thing to try is a force restart. This single step fixes most touch problems without erasing any of your data or apps.
I’ve seen this solve more frozen iPad screens than any other fix. The reason it works so well is that a force restart completely clears your device’s memory and resets how the software communicates with your hardware. When your touchscreen stops responding, there’s often a software glitch that a normal restart can’t clear because you can’t access the power button options on your frozen screen.
Here’s what you need to know before you start: this process doesn’t delete anything. You’re not erasing photos, messages, apps, or any personal data. You’re simply forcing your iPad to shut down and turn back on, which resets the system without touching your files.
The button combination changes depending on your iPad model, but the concept is the same for all of them. You’ll press a couple of buttons quickly and then hold one button down until you see the Apple logo appear on your screen. That’s it. Most people can do this in under a minute.
For iPad Pro (2018 and Later) & iPad Air (2020+)
These newer iPad models don’t have a home button, so the process is different from older ones.
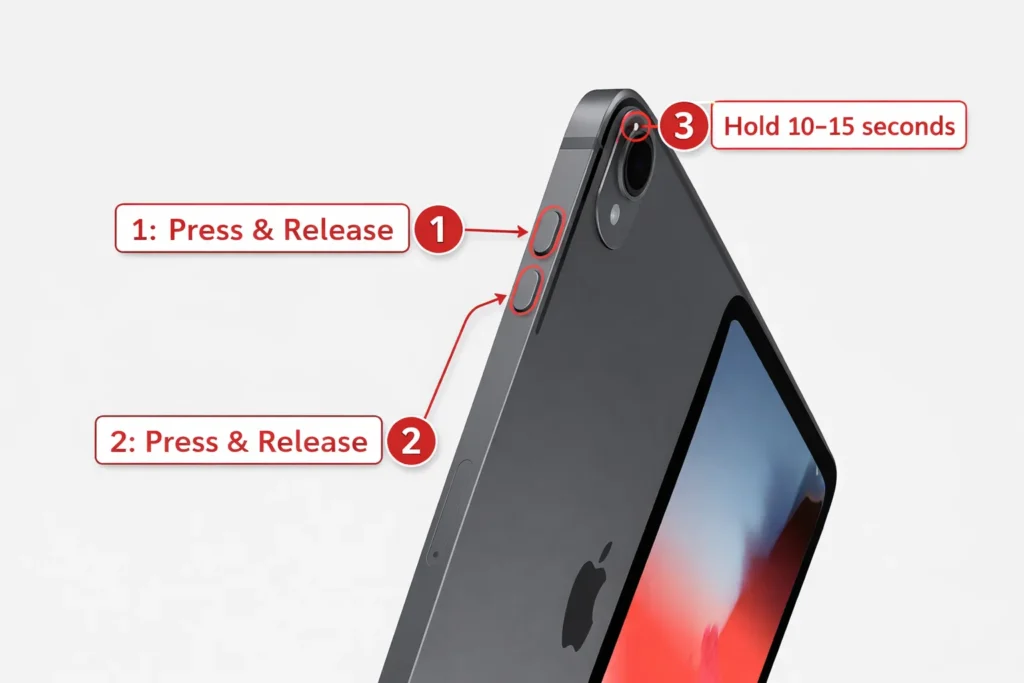
Start by locating the volume buttons on the side of your iPad. You should see them as a rocker switch with a plus sign and a minus sign. Also find the top button which is the power button.
Here’s the exact sequence: Press and quickly release the Volume Up button. Don’t hold it, just tap it once and let go immediately. Next, press and quickly release the Volume Down button the same way. You’ve now done the two quick taps. Now comes the important part.
Press and hold the top power button firmly. Keep holding it down even if your screen starts showing things. You might see an Apple logo appear. You might see the screen go black. You might see a “slide to power off” slider appear on your screen. This is completely normal. The key is to ignore all of these and keep holding that power button down.
Hold the top button for approximately 10 to 15 seconds, and you’ll notice the screen typically goes black before the Apple logo appears. This is the visual signal that your force restart is working correctly. The moment you see that Apple logo show up, you can release the power button and let your iPad restart.
Wait for your device to finish starting back up. You’ll see the lock screen appear, and then your touchscreen should be responsive again. Try tapping and swiping to make sure everything is working.
For iPad (9th Gen and Earlier), iPad Mini, iPad Air (2019 and Earlier)
These older models have a home button at the bottom of the screen, which means the force restart process is simpler.
Look for the home button at the bottom center of your iPad screen. On the top or side of your device, you’ll find the power button.
For this process, you need to hold both buttons down at the same time. Press and hold both the home button and the power button simultaneously. Don’t tap them. Hold them both down with firm pressure.
Just like with the newer models, your screen might go black or show the “slide to power off” message. Ignore all of that and keep holding both buttons. Count to about 10 to 15 seconds internally, or just watch for the Apple logo to appear.
When the Apple logo appears on your home button iPad, release both buttons at the same time. Your device will restart and your touchscreen should start responding normally again.
Common Mistake: Don’t Release When “Slide to Power Off” Appears
I need to warn you about the biggest mistake I see people make, because it prevents the force restart from working.
When you’re holding down the power button (or power plus home button), your screen might display a message that says “slide to power off” with a slider that looks like it wants you to drag it across the screen. Many people see this message and think they’re done. They let go of the button because they assume they’ve activated the shutdown process.
This is exactly wrong. If you release when you see this message, your force restart fails. Your iPad won’t complete the restart that actually clears the software glitch causing your touch problem.
You must ignore the “slide to power off” message completely and keep holding the power button down. After you keep holding it past that message, your screen will go completely black. This black screen is what you’re actually waiting for. Once the screen goes black, keep holding for another second or two until the Apple logo appears. Only then do you release.
I mention this because I’ve watched countless people try a force restart once, see that slide message, release the button, and then conclude that force restart doesn’t work for their iPad. In reality, they just released too early. The fix requires patience and trusting that you need to keep holding even when your screen is showing you a message that seems like the shutdown process has started.
What If Your iPad Is Completely Frozen and “Slide to Power Off” Never Appears?
Here’s something else that confuses people. Sometimes when your iPad is really badly frozen, the “slide to power off” message never appears at all. Your screen just stays showing whatever app or screen was open, or it might go black.
Don’t panic. This is actually normal when your device is severely frozen. The software is so locked up that it can’t even generate the shutdown slider message. This doesn’t mean force restart won’t work. It just means the frozen system can’t display that message.
If your iPad is completely frozen, keep holding the power button anyway, even without seeing the shutdown message. Your device is still processing in the background. Just keep holding for your full 10 to 15 seconds and watch for the Apple logo. It will appear.
This is why I always tell people to watch for the Apple logo rather than watching for a specific message. The Apple logo is the true indicator that your force restart is actually working, regardless of what else your screen displays or doesn’t display in between.
What If Force Restart Doesn’t Work?
Sometimes you follow every step perfectly but your iPad still won’t restart, or it restarts but the touchscreen still doesn’t respond afterward.
If the buttons won’t respond at all when you press them, your buttons might be jammed with dust or debris. This actually happens more often than you’d think. Skip ahead to Fix #2 where I’ll show you how to clean jammed buttons and free up stuck hardware.
If your force restart completes and your iPad turns back on but touch still doesn’t work, then you’re dealing with either a different software issue or a hardware problem. Move forward to the next fixes and continue through the solutions in order.
If force restart doesn’t fix your problem, you haven’t made anything worse. You’ve simply gathered diagnostic information that your iPad needs a different type of fix. That’s actually valuable because it moves you toward the actual solution faster than guessing.
Fix #2: The Button-Jamming Technique (When Buttons Are Stuck)
If you tried the force restart from Fix #1 and your buttons wouldn’t respond at all, you might have stuck buttons. Dust and lint can get trapped around the volume button and power button edges, creating a mechanical jam that prevents your buttons from pressing down fully.
This is a real problem that most people never think about. Your iPad buttons look solid and smooth from the outside, but they have tiny gaps around the edges. Over time, dust particles and lint work their way into those gaps and can jam the button mechanism. When a button gets stuck in a partially pressed position, your iPad’s system stays in a strange state that freezes your touchscreen and makes it completely unresponsive.
I’ve found that clearing jammed buttons is one of the quickest fixes you can try, and it takes almost no time at all.
Here’s what you do. Find your volume button on the side of your iPad. This is the rocker switch with a plus and minus. Press the volume up button very hard about 20 to 30 times. Don’t just tap it gently. Press it firmly and repeatedly, working it vigorously. Then press the volume down button the same way another 20 to 30 times with firm pressure.
Now find your top power button and do the same thing. Press it hard and repeatedly about 20 to 30 times. The goal here is to work any stuck dust or lint out of the button mechanism so your buttons can move freely again.
When you press each button vigorously and repeatedly, you’re creating enough mechanical movement to dislodge any debris trapped around the button edges. This technique has solved stuck button problems that people didn’t even realize they had.
After you’ve pressed each button firmly multiple times, go back and try the force restart again. Your buttons should now respond properly because they’re no longer jammed. Follow the exact force restart instructions from Fix #1 now that your buttons are working.
If your buttons still won’t respond after this technique, then you might have a deeper hardware issue with the buttons themselves. In that case, the force restart method won’t work and you’ll need to try one of the other fixes. But I’ve seen this button clearing technique solve the problem for plenty of people whose iPad touchscreen was frozen simply because their buttons were mechanically stuck.
Fix #3: The Palm-Tapping Method (Reseat Loose Connectors)
If your iPad dropped and now the touchscreen won’t respond, there’s a good chance an internal cable has come loose. The digitizer cable that connects your touch sensor to your iPad’s main board can shift out of position from impact, but you might be able to fix it without opening your device at all.
This is one of my favorite tricks because it’s completely safe and can solve problems that people assume require expensive repairs. Inside your iPad, there are thin ribbon cables connecting different components.
When your iPad experiences a drop or gets bumped hard, those internal cables can shift slightly out of their connectors. The screen itself might look perfect with no cracks, but the touch won’t work because the connection is interrupted.
A firm tapping technique using your palm can provide just enough vibration to reseat that loose cable back into place.
When to Try This Method
This technique works best in specific situations. If your iPad’s touch stopped working immediately after a drop but the screen isn’t cracked, this method has a real chance of fixing it. The cable is likely just unseated, not broken.
It also helps when your touch works intermittently. You might notice that sometimes your finger registers and sometimes it doesn’t. That inconsistency usually points to a loose connection rather than a completely broken component.
If your iPad was working fine one moment and suddenly the touch completely stopped with no obvious cause, try this method too. Sometimes an internal cable can shift from normal use or from your iPad being bumped gently.
How to Do It Safely
Use your open palm, not your fist or fingers. The flat surface of your palm distributes impact evenly and safely. You’re not trying to damage anything or apply extreme force. You’re creating gentle vibration that might shift a loose cable back into its connector.
Start at the bottom of your iPad’s back and give it a firm tap with your palm. Move up to the middle and tap there about 10 to 15 times with steady pressure. Then move to the sides of your device and tap those areas as well. The goal is to cover the entire back surface with tapping motions that create enough movement to potentially reseat the internal digitizer cable.
Apply firm but controlled taps using your palm across the back of your iPad, working from the bottom upward through the middle and sides. Think of the pressure you’d use to gently knock on a door, not the force you’d use to slap a table. You want to create vibration, not cause impact damage.
After you finish tapping all areas, try your touchscreen again. Sometimes it immediately starts working. Sometimes you’ll notice the response is better but still not perfect, which suggests the cable is partially reseated.
If there’s no improvement after this technique, try the force restart again now that you’ve worked on reseating the cable. The combination of tapping plus force restart sometimes completes the fix.
This method is completely free, takes just a few minutes, and can save you from paying for expensive professional repairs if a loose cable is your problem. The worst case scenario is that it doesn’t work and you move on to the next fix. The best case is that your iPad touchscreen comes back to life without you opening the device or spending any money.
Fix #5: Remove Your Case, Screen Protector, and All Accessories
Sometimes the problem isn’t your iPad itself. Your case, screen protector, or connected accessories might be interfering with your touchscreen. By testing your iPad completely bare, you can rule out external accessories as the culprit.
I’ve found that people often overlook this step because it seems too simple. But I’ve watched thick cases and damaged screen protectors cause touch problems that people mistakenly thought were hardware failures. A single piece of protective equipment pressing on your screen or creating a barrier between your finger and the sensor can stop touch from working properly.
The key is testing your iPad in its most basic state with nothing attached and nothing covering it. This tells you definitively whether your problem is internal or external.
Screen Protector Interference
Even high-quality screen protectors can cause touch problems. Your iPad’s capacitive touchscreen works by detecting the electrical properties of your finger through the glass. A screen protector sits between your finger and that sensor, and if the protector is thick, damaged, or poorly installed, it blocks or interferes with that signal.
Cheap screen protectors especially tend to be too thick. They’re designed to protect glass but not optimized for touch sensitivity. I’ve also seen bubbles trapped under protectors create dead zones where touch doesn’t register at all.
Remove your screen protector completely and test your touchscreen with just the bare iPad glass. Even if your protector looks fine, it might be the problem. If your touch works perfectly once you remove it, you’ve found your culprit. At that point you can decide whether to buy a thinner, higher-quality screen protector or go without one.
Sometimes touch improves dramatically once the protector is gone. Sometimes it works marginally better but you notice the responsiveness is still off. This tells you the protector was part of the problem but not the whole problem, and you should continue through the other fixes.
iPad Cases and Screen Edge Pressure
Thick protective cases can press down on the edges of your screen, creating pressure that interferes with touch sensors along the frame. This ipad case interference is especially true with bulky cases designed for extreme protection. The case material presses against the screen’s perimeter where the digitizer connects to your iPad’s frame.
Remove your case completely and test your iPad’s touchscreen without it. Hold the device carefully by the edges only, avoiding the back and avoiding pressure on the screen.
Disconnect All Peripherals
Your iPad might be connected to peripherals that are causing conflicts with touch operation. A faulty charging cable, external keyboard, Bluetooth mouse, or other accessory can send signals that interfere with your touchscreen’s normal operation.
Unplug your charging cable from the Lightning or USB-C port. If you’re using a Bluetooth keyboard or Bluetooth mouse, disconnect those devices through your iPad’s settings or by turning off Bluetooth entirely. Remove any external storage devices, headphone adapters, or other accessories plugged into your ports.
Test your iPad’s touchscreen with absolutely nothing connected to it and nothing covering the screen. Use it in this completely bare state for a few minutes. Try swiping, tapping, typing in an app, opening and closing different screens.
If your touch works perfectly when everything is disconnected, then one of your accessories is the problem. You can reconnect them one at a time to figure out which one is causing the issue. Reconnect your charger and test. Then reconnect your keyboard or mouse and test. This process of elimination tells you exactly which accessory needs to be replaced or removed permanently.
If your touch still doesn’t work even with everything disconnected and removed, then your problem is internal to your iPad itself. That’s actually good news because it means you can move forward with the next fixes knowing that external factors aren’t involved.
After you’ve tested with your iPad completely bare, put your case back on if touch was working fine. But leave the screen protector off until you can replace it with something thinner and higher-quality, or decide you don’t need one at all.
Fix #6: iPad Screen Not Responding After a Drop? Check This
Sometimes Apple releases iPadOS updates that accidentally introduce touch problems. The good news is that these software glitches usually get fixed in the next iPadOS version. Updating your iPad to the latest version often resolves touch issues that seemed like hardware problems.
I’ve seen multiple cases where someone’s touchscreen became unresponsive right after installing a new iPadOS update. The update itself caused the glitch. In those situations, updating to a more recent version fixed the problem completely.
The challenge is that updating requires you to access Settings, which is difficult when your touch isn’t working well. I’ll show you the easy way if your touch works partially, and an alternative method using your computer if touch is completely dead.
Update via Settings (If Touch Works Partially)
If your touchscreen is responding at least somewhat, you can update directly through your iPad’s Settings application.
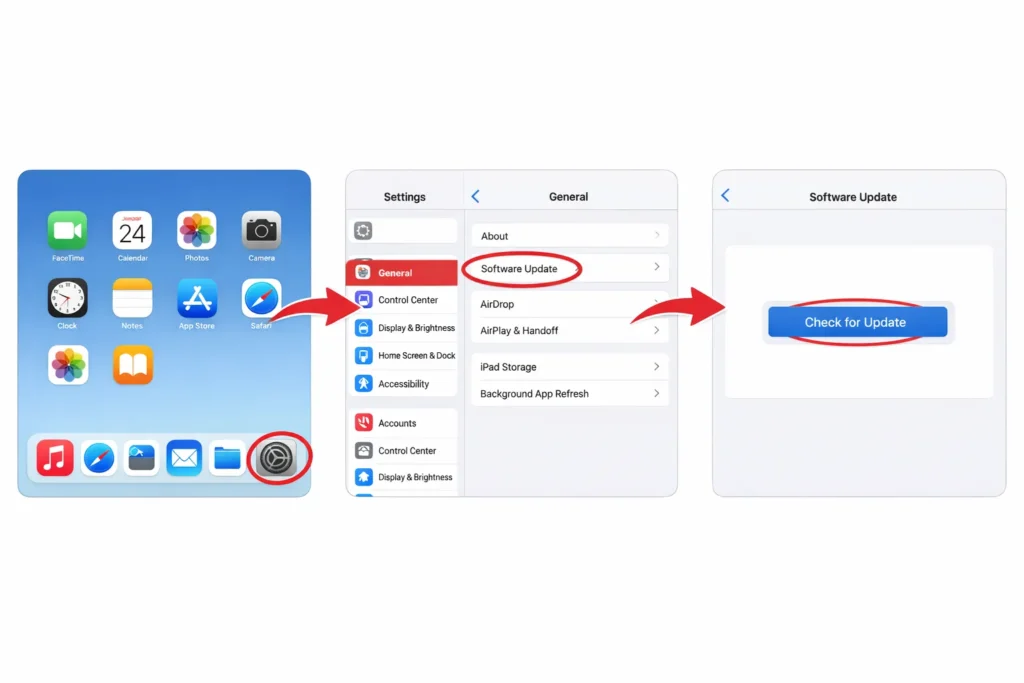
Open the Settings app on your home screen. Tap on General near the top of the left column. This opens your general device settings. Look for Software Update and tap it.
Your iPad will check whether a newer version of iPadOS is available. If an update exists, you’ll see it displayed with information about what’s included. Tap Download and Install to begin the update process.
Your iPad will download the update, which might take several minutes depending on file size and your internet speed. When the download completes, your device will ask you to install it. You can install it right away or schedule it for later when you’re not using your device.
Your iPad will restart during the installation process, which is completely normal. The restart is part of how iPadOS applies the update to your system. Let your device complete the entire process without interrupting it.
Once the update finishes and your iPad restarts, check whether your touchscreen is now responding normally. Software glitches are often cleared by the restart that happens during updates. If the update fixed your touch problem, you’re done with this fix.
If updating didn’t help, your problem is likely not a software bug but something else requiring a different approach.
Update via Computer (If Touch Is Completely Dead)
When your touchscreen is so unresponsive that you can’t navigate to Settings, you need a different method.
Connect your iPad to a computer using a USB cable. If you have a Mac running macOS Catalina or newer, open the Finder application and look for your iPad in the left sidebar. Click on your iPad’s name. You should see an option that says Check for Update. Click it.
If you have a Windows PC or an older Mac, use iTunes instead of Finder. Connect your iPad, launch iTunes, and look for your device in the application. Click on your iPad’s name and you should see a Check for Update button.
Your computer will check Apple’s servers for the latest iPadOS version. If an update is available, click the Update button to download and install it.
Here’s where things might get tricky. Your computer might ask you to tap Trust on your iPad’s screen to verify the connection. If your touchscreen is completely unresponsive, you won’t be able to tap that button. If this happens, don’t panic. You’ll need to use Recovery Mode instead, which I cover in detail in a later section. Recovery Mode lets you update without requiring any touch input.
If your computer recognizes your iPad and you can complete the update process, let the installation finish completely without unplugging or interrupting your device.
Storage Space and Touch Responsiveness
Before you assume your touchscreen is broken, check how much storage space your iPad has available. A device running low on storage experiences broader performance optimization issues that extend beyond just touch responsiveness.
Open Settings and go to General. Look for iPad Storage or Storage. If your available storage is under one gigabyte of free space, your iPad’s system is struggling. Low storage causes the entire operating system to slow down, which includes touch responsiveness. Your touchscreen might feel laggy, unresponsive, or slow to register taps.
This happens because iPadOS needs free space to function properly. When your storage is nearly full, every system operation has to work harder. Touch input processing becomes sluggish as your iPad prioritizes managing its storage.
Delete unused apps and old videos to free up space. Even clearing a few gigabytes can dramatically improve your iPad’s overall performance and touch responsiveness.
If your iPad has less than one gigabyte of free storage, the system-wide slowdown can cause touch problems that feel like hardware failure. After you delete unnecessary files and free up storage space, your touchscreen responsiveness should improve noticeably.
Fix #7: Update iPadOS (Fixes Software Touch Bugs)
Sometimes Apple releases iPadOS updates that accidentally introduce touch problems. The good news is that these software glitches usually get fixed in the next update. Updating your iPad to the latest iPadOS version often resolves touch issues that seemed like hardware problems.
I’ve seen multiple cases where someone’s touchscreen became unresponsive right after installing a new iPadOS version. The update itself caused the glitch. In those situations, waiting for the next update or manually updating to a more recent version fixed the problem completely.
The challenge is that updating requires you to access Settings, which is difficult when your touch isn’t working well. I’ll show you the easy way if your touch works partially, and an alternative method using your computer if touch is completely dead.
Update via Settings (If Touch Works Partially)
If your touchscreen is responding at least somewhat, you can update directly through your iPad’s Settings application.
Open the Settings app on your home screen. Tap on the word General near the top of the left column. This opens your general device settings. Look for an option that says Software Update and tap it.
Your iPad will check whether a newer version of iPadOS is available. If an update exists, you’ll see it displayed with information about what’s included. Tap Download and Install to begin the update process.
iPadOS updates don’t erase your data, apps, photos, or personal settings. Your iPad will download the update, which might take several minutes depending on file size and your internet speed. When the download completes, your device will ask you to install the update. You can install it right away or schedule it for later when you’re not using your device.
Your iPad will restart during the installation process. This is completely normal. The restart is part of how iPadOS applies the update to your system. Let your device complete the entire process without interrupting it.
Once the update finishes and your iPad restarts, check whether your touchscreen is now responding normally. Software glitches are often cleared by the restart that happens during updates. If the update fixed your touch problem, you’re done with this fix.
If updating didn’t help, your problem is likely not a software bug but something else requiring a different approach.
Update via Computer (If Touch Is Completely Dead)
When your touchscreen is so unresponsive that you can’t navigate to Settings, you need a different method.
Connect your iPad to a computer using a USB cable. If you have a Mac running macOS Catalina or newer, open the Finder application and look for your iPad in the left sidebar. Click on your iPad’s name. You should see an option that says Check for Update. Click it.
If you have a Windows PC or an older Mac, use iTunes instead of Finder. Connect your iPad, launch iTunes, and look for your device in the application. Click on your iPad’s name and you should see a Check for Update button.
Your computer will check Apple’s servers for the latest iPadOS version. If an update is available, click the Update button to download and install it.
Here’s where things might get tricky. Your computer might ask you to tap Trust on your iPad’s screen to verify the connection. If your touchscreen is completely unresponsive, you won’t be able to tap that button. If this happens, don’t panic. You’ll need to use Recovery Mode instead, which I cover in detail in a later section. Recovery Mode lets you update without requiring any touch input.
If your computer recognizes your iPad and you can complete the update process, let the installation finish completely without unplugging or interrupting your device.
Low Storage Can Cause Touch Lag
Before you assume your touchscreen is broken, check how much storage space your iPad has available.
Open Settings and go to General. Look for iPad Storage or Storage. If your available storage is under one gigabyte of free space, your iPad’s system is struggling. Low storage causes the entire operating system to slow down, which includes touch responsiveness. Your touchscreen might feel laggy, unresponsive, or slow to register taps.
This happens because iPadOS needs free space to function properly. When your storage is nearly full, every system operation has to work harder. Touch input processing becomes sluggish as your iPad prioritizes managing its storage.
Delete unused apps and old videos to free up space. Even clearing a few gigabytes can dramatically improve your iPad’s overall performance and touch responsiveness.
If your iPad has less than one gigabyte of free storage, the system-wide slowdown can cause touch problems that feel like hardware failure.
After you delete unnecessary files and free up storage space, your touchscreen responsiveness should improve noticeably. Try using your iPad normally and see whether touch feels faster and more reliable now that your device has breathing room.
Fix #8: Check Touch Accommodations Settings (Hidden Cause)
Your iPad has built-in accessibility features designed to help people with different needs interact with their device. Sometimes these settings get enabled accidentally or modified in ways that interfere with normal touch operation. Checking and resetting your Touch Accommodations can restore your touchscreen to normal responsiveness.
I’ve discovered this hidden cause multiple times when people thought their touchscreen was broken. They’d adjusted accessibility settings to help with something else, forgot about the change, and then couldn’t understand why their touch felt different. Resetting these settings back to defaults fixed everything immediately.
The Touch Accommodations feature in iPadOS is powerful and helpful for people who need it, but when it’s enabled or misconfigured for someone who doesn’t need it, it creates touch problems that feel like hardware failure.
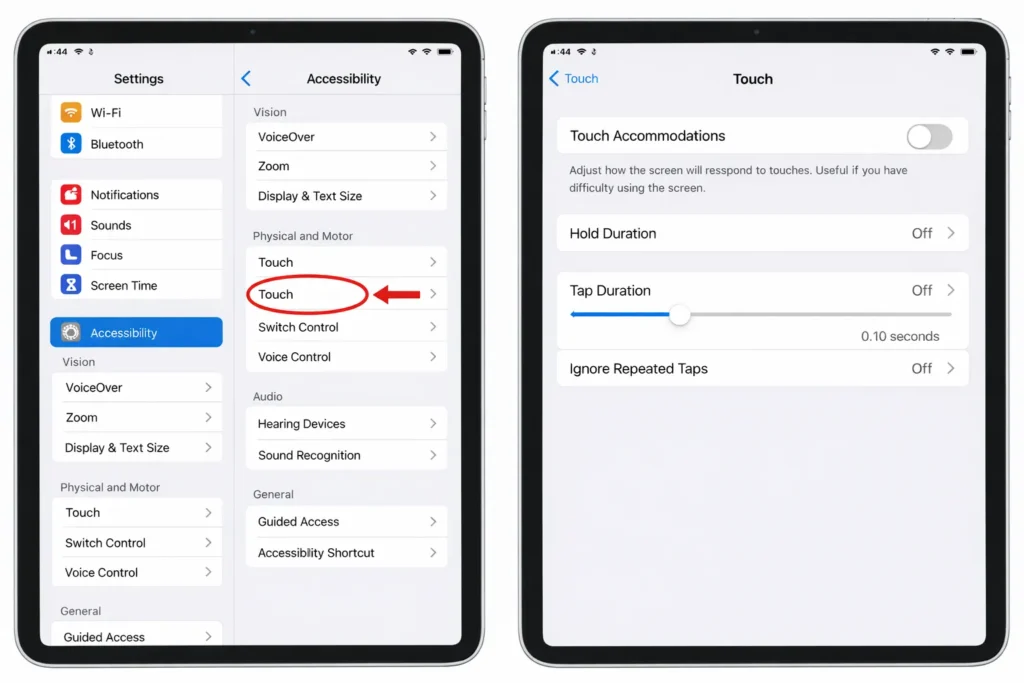
Check and Reset Touch Accommodations
Open your Settings app and navigate to Accessibility. Look for a section called Touch. Tap on it to see your touch-related accessibility options.
Inside the Touch section, look for Touch Accommodations. If this toggle is turned on, that’s potentially your problem. Turn it off and test your touchscreen immediately to see whether responsiveness improves.
If Touch Accommodations is already off, look at the other sliders and settings in this section. If you’ve previously adjusted any of these settings, reset them all back to their default positions. Apple’s default settings are optimized for standard touch interaction, so returning everything to defaults often restores normal behavior.
Pay attention to settings like Hold Duration, Tap Duration, and Ignore Repeated Taps. These control how your iPad interprets your touch input and your touch sensitivity. If these values are set outside normal ranges, your device might be ignoring legitimate taps or requiring you to hold longer than expected to register input.
After you’ve reset everything to defaults in the Touch section, exit Settings and test your touchscreen thoroughly. Try tapping, swiping, typing in a text field, scrolling through apps, and using multitouch gestures. Your touch should feel responsive and normal again.
AssistiveTouch as Temporary Workaround
If your touchscreen still isn’t working well but you need to navigate your iPad to try other fixes, AssistiveTouch provides an on-screen button that lets you control your device without relying on direct screen touches.
Go back to Settings, Accessibility, Touch, and look for AssistiveTouch. Turn this feature on. A circular button will appear on your screen that you can tap to access essential controls like home, control center, device lock, and volume adjustment.
This on-screen button can help you navigate to Settings to try other fixes, take screenshots, or access functions you normally control with gestures. You can move the button around your screen by dragging it, and you can customize which controls appear when you tap it.
AssistiveTouch doesn’t fix your underlying touch problem, but it provides temporary alternative control methods so you can continue using your iPad while you work through other solutions.
Think of AssistiveTouch as a temporary workaround rather than a permanent fix. It lets you keep using your iPad for essential tasks even when regular touch isn’t working properly. Once your touchscreen is fixed through another solution, you can turn AssistiveTouch off and return to normal operation.
The combination of resetting Touch Accommodations to defaults plus using AssistiveTouch as needed often gets people through this troubleshooting stage. If resetting accessibility settings doesn’t solve your problem, you’re gathering evidence that your issue is something else requiring a different fix.
Fix #9: Completely Unresponsive Screen? Use Recovery Mode
When your iPad touchscreen is 100 percent dead and you can’t access Settings, you need Recovery Mode. This is a special state where your iPad communicates with your computer without requiring any touch input. Recovery Mode lets you restore your device’s operating system even when the screen is completely unresponsive.\
I want to warn you upfront: a Recovery Mode restore will erase your iPad. All your apps, photos, messages, and personal data will be deleted. But if your touchscreen is completely dead and you’ve tried everything else, this is often the last software-based fix available before considering hardware repair.
The most important thing to understand is the catch-22 that people run into. Your computer needs to verify that you trust it by asking you to tap a Trust button on your iPad screen. But if your touch doesn’t work, you can’t tap that button. This creates a circular problem. The solution is entering Recovery Mode using only buttons before you ever connect to your computer.

The “Trust This Computer” Catch-22 (And How to Solve It)
Here’s the frustrating scenario that stops many people from attempting a computer-based restore.
You connect your iPad to your Mac or PC hoping to use iTunes or Finder to restore your device. Your computer recognizes the iPad and asks you to tap a Trust button on the iPad screen to allow the connection. You can’t tap anything because your touchscreen is completely dead. Your computer can’t proceed because it hasn’t received that trust confirmation.
Most people give up at this point thinking they’re stuck. But there’s a solution that works around this entire problem.
The trick is entering Recovery Mode manually using only button presses before you connect your iPad to any computer. Once your iPad is in Recovery Mode, your computer will recognize it immediately without requiring any touch confirmation. Recovery Mode communicates with your computer at a fundamental level that doesn’t need the Trust verification.
This completely bypasses the catch-22. You’re not trying to use your frozen iPad to tap a button. You’re putting your device into a special state where your computer can take control without needing any input from your iPad’s touchscreen.
How to Enter Recovery Mode (No Touch Needed)
The button combination depends on your iPad model.
If your iPad has a home button at the bottom, hold down both the Home button and the Power button simultaneously. Keep holding both buttons together until your screen goes black and you see a message asking you to connect to iTunes or a computer. This message confirms you’re in Recovery Mode. It typically takes about 10 seconds of holding before this screen appears.
If your iPad doesn’t have a home button (newer iPad Pro and iPad Air models), the process is slightly different. Press and quickly release the Volume Up button. Then press and quickly release the Volume Down button. Now press and hold the Power button on the top of your device. Keep holding the Power button even after your screen goes black. Continue holding until you see the Recovery Mode screen asking you to connect to your computer.
Recovery Mode is a special state your iPad enters that allows computer-based restoration without any touch input from your device. Don’t worry if it takes a few attempts to get the button timing right. You can always start over and try again.
Once you see the Recovery Mode message on your screen, you’re ready to connect to your computer.
Recovery Mode vs DFU Mode: Which to Use
Recovery Mode is the standard option and the place to start. Most situations are resolved through a Recovery Mode restore.
DFU (Device Firmware Update) mode is a deeper level of firmware restoration that bypasses more of your iPad’s normal startup processes. DFU mode is only necessary if Recovery Mode fails or if your computer doesn’t recognize your iPad even when it’s in Recovery Mode.
For most people dealing with an unresponsive touchscreen, Recovery Mode is sufficient. If Recovery Mode doesn’t work, you can attempt DFU mode using similar button combinations but with slightly different timing. I’d recommend starting with Recovery Mode and exploring DFU mode restore only if initial attempts fail.
Restore Your iPad via Computer
Once your iPad is in Recovery Mode and you see the recovery message on your screen, connect your device to a computer using a USB cable.
On a Mac running macOS Catalina or newer, open Finder. You should see your iPad listed in the sidebar on the left. Click your iPad’s name. You’ll see an option that says Restore iPad. Click it.
On a Windows PC or older Mac, launch iTunes. Your iPad should appear in iTunes. Click on your device and look for a Restore button. Click it.
Your computer will download the latest iPadOS version for your iPad model. This download might take several minutes depending on file size and internet speed. Let the process complete without interrupting it.
A Recovery Mode restore takes between 15 to 30 minutes depending on your internet connection and your iPad model. During this time, your computer is restoring your device’s operating system from Apple’s servers. Your iPad screen might show Apple logos or progress bars. Let the entire process finish without unplugging or interrupting anything.
When the restore completes, your iPad will restart. You’ll be taken through the initial setup process as if your device were brand new. Your touchscreen should now be responsive again.
Set up your iPad with your Apple ID and restore your data from a backup if you have one available. If you don’t have a backup, your device will start fresh with no apps or personal data, and you’ll need to reinstall everything manually.
If your touchscreen is still unresponsive even after a Recovery Mode restore completes, then you’re likely dealing with a hardware problem that requires professional repair. But a successful restore tells you that your problem was software-based and your iPad’s hardware is functioning properly.
Fix #10: Reset All Settings (Won’t Erase Your Data)
Before you attempt a full factory reset that erases everything, try resetting all your settings first. This middle ground option clears out problematic configuration issues without deleting any of your apps, photos, messages, or personal files.
I want to be completely clear about this distinction because people often confuse “Reset All Settings” with “Erase All Content.” These are two completely different operations with very different consequences. Reset All Settings is safe. Erase All Content destroys everything. Understanding the difference could save you from unnecessary data loss.
Reset All Settings acts like a fresh start for how your iPad is configured, but it leaves all your actual content completely untouched. Think of it like resetting the preferences on your device without touching the files stored inside.
What Gets Reset (And What Doesn’t)
When you perform a Reset All Settings operation, your iPad forgets certain preferences and configurations but keeps everything that matters to you.
Your WiFi network passwords disappear. You’ll need to reconnect to your WiFi and enter passwords again. Your display settings reset, Bluetooth pairings disconnect, your keyboard dictionary clears, and any privacy settings you’ve customized revert to Apple’s defaults.
Everything else stays exactly as it was. All your apps remain installed. Your photos, videos, and documents don’t go anywhere. Your messages, emails, and conversations stay in your inbox. Your app data, documents you’ve created, and any files stored on your iPad remain untouched.
Resetting all settings clears how your iPad is configured but does not delete any apps, photos, messages, or personal files. This makes it a safe intermediate step when you’re troubleshooting touch problems but want to preserve your data.
The reason this sometimes fixes touch issues is that misconfigured settings can interfere with how your iPad operates. By returning everything to Apple’s default configuration, you clear out any problematic settings that might be causing touch problems.
How to Reset All Settings
Open your Settings app and go to General. Look for Transfer or Reset. Tap on it.
Inside that menu, look for Reset. Tap on Reset and you’ll see several options. Choose Reset All Settings. Your iPad will ask you to confirm this action and will request your passcode for security.
Enter your passcode and confirm that you want to perform a hard reset of your settings. Your iPad will process the reset, which usually takes less than a minute. Your device will restart automatically.
When your iPad comes back on, go through your WiFi setup again. Connect to your network and enter your password. Reconnect any Bluetooth devices like keyboards or mice that you use regularly.
Test your touchscreen to see whether responsiveness has improved. Many configuration-related touch problems clear up after this reset because your iPad is now running with clean, default settings.
If resetting all settings doesn’t fix your touch problem, you’ve at least tried a safe option that preserved all your data. You can then move forward to a factory reset or professional repair knowing that you didn’t lose anything in the attempt.
Ghost Touch? (When iPad Touches Itself)
If your iPad is performing actions you didn’t initiate, that’s a completely different problem from an unresponsive touchscreen. Ghost touch is when your iPad registers phantom touches that you never made. Apps open by themselves, random letters type out, your screen scrolls without you swiping. It’s the opposite extreme from a frozen screen.
I’m addressing this separately because ghost touch requires different troubleshooting than unresponsive touch. People often lump these together as “touch problems,” but they have opposite causes and opposite solutions. Treating ghost touch with the same fixes you’d use for unresponsive touch won’t help and might make things worse.
Ghost touch usually indicates moisture or dust on your digitizer connectors, or a digitizer that’s starting to fail electrically. The good news is that many ghost touch problems can be fixed without replacing your screen, if you catch them early.
Signs You Have Ghost Touch (Not Unresponsive Touch)
Ghost touch has a very specific pattern of symptoms that makes it easy to recognize.
Your iPad opens apps on its own without you tapping anything. You might set your device down and come back to find several apps open that you didn’t launch. Random letters appear in text fields even when you’re not touching your screen. You’ll look at your Notes app and see gibberish typed out by your device’s phantom inputs. Your screen scrolls up, down, or sideways without you making any swiping gestures.
Sometimes these phantom touches happen constantly. Sometimes they’re intermittent and only happen occasionally. Pay attention to whether ghost touch gets worse at certain times. Many people notice that ghost touch becomes more aggressive when their iPad is charging. This pattern points toward either a power-related issue or moisture on the connectors that worsens with heat.
Ghost touch means your iPad is registering touches that you never made, which is the opposite problem from an unresponsive touchscreen that ignores your real touches.
When you set your iPad down flat on a table, does the ghost touch continue? Does it get worse? If movement makes it better or worse, that tells you something about whether the problem is a loose connector or moisture-related.
Quick Fixes to Try First
Start with the simplest option: a force restart. Sometimes temporary software glitches can create ghost touch symptoms. Do a proper force restart following the instructions from Fix #1. This won’t solve most ghost touch problems, but it’s worth ruling out.
Next, remove your screen protector if you have one installed. Low-quality screen protectors and damaged protectors can create false touch signals. Cheap protectors sometimes generate electrical noise that your digitizer interprets as touch input. Test your iPad without the screen protector for a few minutes to see whether ghost touch stops.
Disconnect your charger and power adapter. A faulty charger or a charger with electrical problems can introduce noise into your iPad’s power supply, which affects how your digitizer interprets touch signals. I’ve seen bad chargers cause ghost touch problems that disappeared the moment someone used a different charger.
Check whether your iPad is damp or has any visible moisture. Look for condensation inside the screen or water droplets around the edges. If you suspect moisture exposure, stop using your device and let it dry completely in a warm, dry place for several hours. Moisture on the digitizer connectors is one of the most common causes of ghost touch.
Advanced Fix: Clean Internal Connectors
If quick fixes don’t work, you might have dust or residue on the digitizer cable connector inside your iPad. Professional repair technicians sometimes fix ghost touch by carefully cleaning these connector contact points.
I need to be honest: this is an advanced repair that requires you to open your iPad. If you’re not comfortable working with delicate electronics, don’t attempt this. It’s easy to damage components and make the problem worse.
If you are comfortable opening your iPad, use 91 percent or higher isopropyl alcohol on a small cotton swab to gently clean the digitizer cable connector on your motherboard. The alcohol evaporates quickly and won’t leave residue. Connect the digitizer cable back firmly and ensure it’s fully seated in the connector. Test your iPad to see whether ghost touch has stopped.
Cleaning digitizer cable connectors with isopropyl alcohol can eliminate ghost touch caused by dust or moisture on the connector contacts without requiring screen replacement.
If you’re not comfortable opening your iPad yourself, ask a repair shop specifically about connector cleaning before accepting a quote for screen replacement. A professional can clean your connectors for fifty to eighty dollars. This is significantly cheaper than a two hundred to four hundred dollar screen replacement.
If cleaning doesn’t help and ghost touch continues, your digitizer might be failing electrically and replacement could be necessary. But at least you’ve tried the cost-saving option first.
When Touch Works in Some Areas But Not Others (Dead Zones)
Sometimes your iPad touchscreen works perfectly in some areas but completely fails in others. You can tap the bottom of your screen and it responds fine, but the top half is completely dead. Or maybe just one corner doesn’t work while the rest of your screen is responsive. These dead zones tell you something specific about what’s wrong.
Partial touch failure is actually more informative than complete failure because the pattern of where touch doesn’t work gives you clues about the root cause. Dead zones are different from overall unresponsiveness, and they often point to specific hardware issues rather than software glitches.
Understanding what your dead zones mean helps you decide whether you can fix this yourself or need professional help.
What Dead Zones Usually Mean
The location of the dead zone matters a lot. If the entire bottom or top edge of your screen doesn’t respond, that usually suggests the digitizer cable is partially unseated from its connector. The cable connects your touch sensor to your motherboard, and when it’s not fully seated, the areas farthest from the cable connection lose responsiveness first.
If you have a dead zone in a specific corner or a stripe running vertically or horizontally across your screen, that points toward actual damage to your digitizer. The digitizer is a layer of conductive material that covers your entire screen. Physical damage to a specific area of that layer creates dead zones in that exact location.
Dead zones in specific screen regions usually indicate either a partially unseated digitizer cable or damage to the digitizer layer itself. These two causes need different approaches to fix.
Notice whether the dead zone moves or changes position. If you rotate your iPad and the unresponsive area seems to move to a different location, that suggests the problem is related to how your device is oriented rather than a specific area of the digitizer being damaged. This pattern sometimes indicates a loose connection that shifts with gravity.
If the dead zone stays in exactly the same spot no matter how you rotate your iPad, that’s more consistent with actual digitizer damage. The unresponsive area doesn’t move because the damage is in that specific location.
Worth Trying Before Giving Up
Before you accept that you need professional repair, try a few things that might improve or eliminate the dead zones.
Start with a force restart using the instructions from Fix #1. Software issues can sometimes create localized touch problems that a restart clears up. It’s worth trying even though partial unresponsiveness often indicates hardware problems.
Try the palm-tapping method from Fix #3. If your digitizer cable is only partially unseated, firm tapping might shift it back into full connection. Taps on the back of your iPad create vibration that might reseat the cable just enough to restore touch in the dead zone area.
Clean your entire screen thoroughly following the instructions from Fix #4. Sometimes heavy residue or dried substance in a specific area can create a local dead zone. Thorough cleaning might reveal that the problem was just stubborn dirt rather than hardware damage.
Remove your screen protector if you have one. Screen protectors sometimes fail in specific areas, creating localized touch problems. Test without the protector to see whether the dead zone disappears.
Rotate your iPad into different orientations and test whether the dead zone changes position. This simple test gives you diagnostic information about whether you’re dealing with a loose connection or actual damage. Try holding your iPad in portrait mode, then landscape mode, then upside down. Watch whether the unresponsive area behaves consistently or shifts around.
If none of these steps restore touch in the dead zone area, you’re likely dealing with digitizer damage that requires professional repair. But you’ve at least tried the free options first and gathered information about what’s actually wrong with your device.
When to Seek Professional iPad Screen Repair
At some point during troubleshooting, you need to know when to stop trying DIY fixes and get professional help. Knowing that line saves you time, money, and frustration. I want you to understand the signs that indicate your iPad needs professional repair, what repair costs, and how to choose between repair options.
Professional repair becomes necessary when you’ve exhausted the troubleshooting steps available to you at home. This isn’t failure on your part. It just means your problem requires tools, expertise, or replacement parts that only repair technicians have access to.
Signs You Need Professional Repair
If you’ve worked through all the fixes in this article and your touchscreen still doesn’t respond, you’re looking at a hardware problem that needs professional attention. You’ve already tried the major software solutions and physical fixes that work without opening your device.
Visible screen damage like cracks, black spots, lines running across the display, or discoloration means your LCD or digitizer has suffered physical damage. These problems won’t improve on their own and require professional screen replacement.
If your iPad was exposed to water, liquid, or high humidity and your touchscreen stopped working shortly after, you have moisture damage that needs professional assessment. Moisture can corrode internal components and create problems that get worse over time without proper drying and repair.
Dead zones that don’t improve after trying force restarts, palm-tapping, and connector cleaning likely indicate digitizer damage that requires replacement. If the unresponsive area stays consistently in the same location, that’s a sign of damage rather than a loose connection.
If you attempted a DIY repair yourself and your touch stopped working or got worse during the process, professional help is your best next step. A technician can assess whether your repair caused additional damage and what’s needed to fix it.
When DIY troubleshooting doesn’t restore your touchscreen and you see physical damage or moisture exposure, professional repair becomes the practical choice.
Repair Cost Expectations and Options
Understanding screen replacement cost and repair options helps you decide whether repair makes sense for your specific iPad.
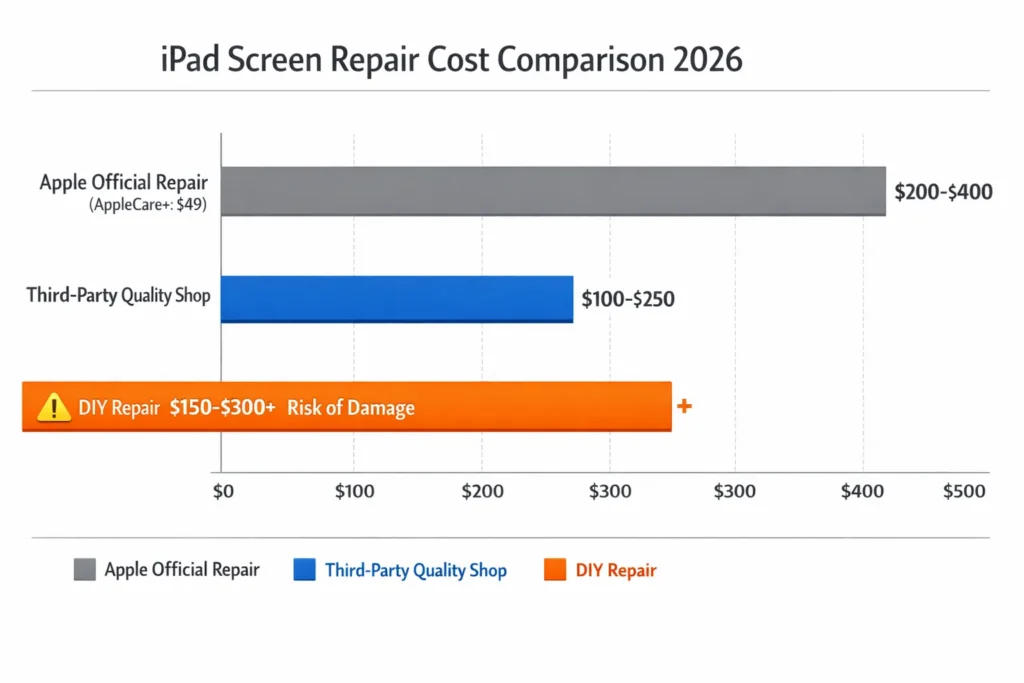
Apple’s official repair through the Genius Bar or Apple’s mail-in service typically costs between two hundred and four hundred dollars depending on your iPad model. Newer iPad Pro models cost more than standard iPad models. AppleCare+ coverage reduces your cost to a forty-nine dollar service fee if you have it.
Third-party repair shops that use quality parts usually charge between one hundred and two hundred fifty dollars. These independent shops often offer faster service than Apple and sometimes better customer service, though quality varies between shops.
If you buy DIY replacement parts online and attempt the repair yourself, screens cost fifty to one hundred fifty dollars. But this price doesn’t include the specialized tools, heat equipment, and proper adhesive you need. Most people who try this route end up spending more once they buy the necessary tools, and they risk damaging their device in the process.
Check your warranty coverage ipad status. If you have AppleCare+ coverage on your iPad, your repair cost is just forty-nine dollars regardless of the damage. This makes AppleCare+ extremely valuable if you’re facing screen replacement.
Apple vs Third-Party Repair: What to Know
Each repair option has different advantages. Choosing wisely depends on your priorities.
Apple’s Genius Bar and official repair service use genuine Apple parts and follow Apple’s exact repair procedures. Getting service through Apple preserves your warranty and ensures your device is restored to factory standards. The downside is higher cost and often longer wait times. You might need to schedule a Genius Bar appointment days or weeks in advance.
Apple Authorized Service Providers are independent businesses that Apple has certified. They use official Apple parts and follow Apple procedures, so your warranty stays intact. Prices are typically somewhere between Apple and independent shops. Service is often faster than official Apple locations.
Independent repair shops offer the most competitive pricing and sometimes faster turnaround. Quality varies significantly between shops. Some independent technicians are excellent. Others cut corners on parts or procedures. This is where asking the right questions becomes crucial.
Questions to Ask Before Paying
Before you hand over your iPad and your money, ask your repair shop these specific questions.
Ask whether they transfer your original home button to the replacement screen. Replacement screens usually don’t include Touch ID capable home buttons. If your technician doesn’t transfer your original home button, you’ll lose fingerprint unlock capability even though your screen works. This is a critical detail that many people overlook.
Ask what type of adhesive they use to seal your iPad. Quality shops use professional electronic adhesive designed for iPad repairs. Cheap or incorrect adhesive can fail quickly, causing your screen to lift. Some poor quality shops use super glue, which makes any future repairs nearly impossible.
Ask whether they test the screen before sealing your iPad back together. A good technician powers on your device, tests all areas of the touchscreen, confirms the home button clicks properly, and verifies everything works before applying final adhesive. If they don’t test before sealing, you might discover problems only after the repair is complete.
Ask what warranty coverage they provide on the repair. Quality shops offer at least thirty days or ninety days of warranty on their work. If something goes wrong immediately after repair, they’ll fix it at no additional cost.
Ask what happens if your touch still doesn’t work after the screen replacement. Some shops will troubleshoot further. Others consider the repair complete regardless of the outcome. You want to know this upfront.
What NOT to Do: DIY Logic Board Repairs
I need to give you a strong warning about logic board repairs.
If a repair shop tells you that your iPad has missing resistors or board-level component damage, do not attempt to fix this yourself. You might see YouTube videos or online guides showing people soldering jumper wires to repair broken connections. This approach almost always makes the problem worse.
Board-level repair requires micro-soldering expertise, knowledge of your iPad’s specific schematic, understanding of component values and functions, and proper equipment. If you get the resistance value wrong or create an incorrect connection, you’ll cause permanent damage that makes your device unrepairable.
Logic board component repair requires professional micro-soldering expertise and cannot be safely attempted without advanced technical knowledge and equipment. If your repair shop says you need board-level repair, either let them handle it or get a second opinion from another professional shop.
The cost of professional board-level repair is usually between one hundred fifty and four hundred dollars depending on the damage. This is expensive but significantly cheaper than replacing your entire iPad.
How to Prevent Future iPad Touchscreen Problem
Taking care of your iPad’s touchscreen now means avoiding frustrating problems down the road. I’ve learned that most touch issues are preventable when you focus on a few key areas: how you protect your device, where you use it, and how you maintain the software. Let me walk you through the practical steps I recommend to keep your iPad’s screen responsive and reliable for years to come.
Choose Cases and Screen Protectors Carefully
The right case and screen protector make a real difference in protecting your iPad’s touch sensitivity without creating new problems. I’ve seen plenty of cases that sound protective but actually interfere with how your iPad detects your fingers.
Ultra-thick cases are the main culprit here. When a case is too bulky, it can press against the edges of your screen and create pressure points that confuse the capacitive touch system. Your iPad uses electrical capacitance to detect your touch, and when a case physically presses the screen edges, it disrupts that detection. I recommend choosing cases that are protective but slim enough to let your screen work properly.
When it comes to screen protectors, tempered glass protectors outperform plastic ones significantly. Tempered glass maintains the touch sensitivity your iPad was designed with, while plastic protectors can dull the responsiveness. The key is installation: make sure there are no air bubbles trapped underneath, as bubbles create gaps that interrupt touch recognition.
Here’s what I look for in a quality iPad case and screen protector combo. The case should protect against drops without adding excessive bulk around the edges. The screen protector should sit flush against your display with perfect adhesion from corner to corner. Take your time during installation rather than rushing it.
Environmental Protection
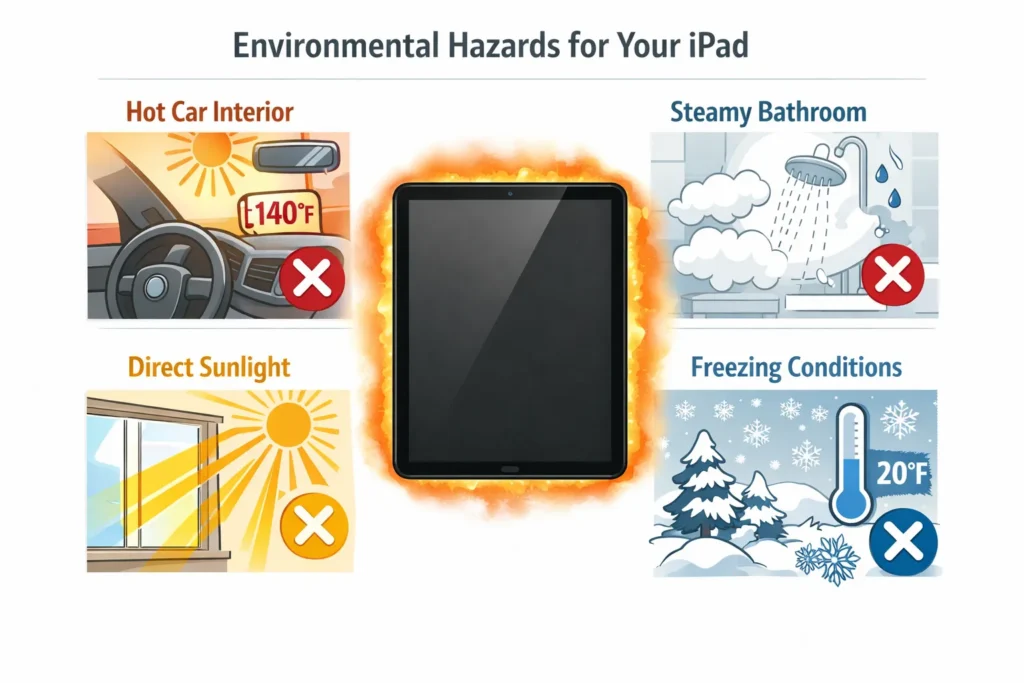
Your iPad’s touchscreen works best within a specific temperature range, and extreme conditions can either damage the hardware or make it act up temporarily. Capacitive touch technology, which your iPad uses, becomes unreliable when exposed to temperature extremes.
Keep your iPad away from extreme temperatures on both ends. Don’t expose your device to heat above 95 degrees Fahrenheit or cold below 32 degrees Fahrenheit for extended periods. I learned this the hard way when I left my iPad in a hot car and the screen started glitching until it cooled down. Similarly, pulling your iPad from a cold environment into a warm room can create internal condensation.
Humidity and moisture are just as problematic as temperature swings. High humidity environments like bathrooms during showers can allow moisture to seep into the device and affect the touch sensors. I always keep my iPad away from the kitchen when cooking and out of bathrooms where steam builds up.
Direct sunlight and hot cars are obvious culprits but easy to forget about. Never leave your iPad sitting in direct sun on a windowsill or in a parked car, even on moderately warm days. The temperature inside a car or on a sunny surface climbs much faster than the actual air temperature suggests. Store your iPad in a cool, dry place when you’re not using it, and you’ll avoid most environment-related touch problems.
Software Maintenance
Here’s something people often overlook: your iPad’s software has a direct impact on how well the touchscreen performs. Outdated software can introduce bugs that make your screen unresponsive or laggy even when the hardware is fine.
Keep your iPadOS updated to the latest version available. Apple regularly releases updates that fix touch responsiveness issues and improve overall performance. When an update is available, install it rather than putting it off. I’ve noticed a significant difference in touch accuracy after updating iPadOS.
Storage space matters more than you might think. When your iPad is running low on storage, the operating system has less room to work efficiently, which can make the screen feel slow or unresponsive. Maintain at least 10 percent free storage space on your device. If you’re consistently running low, delete old photos, videos, or apps you don’t need anymore.
Restart your iPad weekly to clear the memory cache and give the system a fresh start. Over time, apps accumulate data in the background and can slow down touch response. A simple restart clears this out and returns your iPad to peak performance. If an app freezes or stops responding, close it immediately rather than letting it continue running in the background, as frozen apps can interfere with the overall system responsiveness.
These maintenance steps take minimal effort but prevent most software-related touch issues before they even start. Think of it as keeping your iPad’s brain sharp so it can control the touchscreen properly.
Frequently Asked Questions: iPad Touchscreen Not Working
I’ve gathered the questions I hear most often from people dealing with iPad touch problems. These are the concerns that come up repeatedly, and I want to give you clear, straightforward answers so you can feel confident about what’s happening with your device.
Will force restarting my iPad erase my data?
No, a force restart will not erase any of your data. This is one of the biggest concerns people have, and I want to be absolutely clear: force restarting your iPad is completely safe for your files, photos, apps, and settings.
A force restart is essentially the same as a normal restart, except you use the buttons to trigger it instead of the Settings app. Your iPad simply shuts down and powers back on, which clears temporary memory and refreshes the system. The only way to actually erase data from your iPad is to perform a factory reset or use the Erase All Content and Settings option, which requires you to deliberately choose that action in Settings. A force restart does neither of these things, so your information stays exactly where it is.
Think of it like rebooting a computer. When you restart a computer, you don’t lose your files, and the same principle applies to your iPad.
How long should I hold the power button during force restart?
Hold the power button for 10 to 15 seconds, which typically comes to around 12 seconds for most people. You don’t need to count, though. Instead, hold the button until you see the Apple logo appear on the screen, then release.
Keep holding even if you see the “slide to power off” message pop up or if the screen goes black. Many people stop too early because they think something is wrong, but those are normal steps in the force restart process. The Apple logo appearing is your signal that the restart is working. Once you see it, you can let go and let your iPad finish restarting on its own.
The exact timing varies slightly depending on which iPad model you have, but the Apple logo is always the reliable indicator that you’ve held the button long enough.
My iPad screen works but touch doesn’t what’s broken?
Your digitizer is likely the problem, not your display. The digitizer is the touch sensor layer that sits on top of your LCD screen, and these two components are separate pieces that work together.
You can have a perfectly functional display that shows images clearly while the digitizer fails to recognize your fingers. This is actually good news because it means you may not need to replace your entire screen. A digitizer failure or a digitizer cable that has become unseated inside your iPad is often fixable without a full screen replacement.
When the digitizer fails, your iPad shows everything you’d expect to see on the display, but it simply doesn’t respond when you touch it. This distinction matters because repairing just the digitizer cable or replacing just the digitizer layer costs significantly less than replacing the entire screen assembly.
Touch stopped working after I dropped my iPad but screen isn’t cracked do I need a new screen?
You might not need a new screen at all. When you drop your iPad, the impact can unseat the internal digitizer cable without actually cracking the display. The digitizer cable is a delicate connector inside your device, and sudden jolts can shake it loose from its socket.
Before you commit to a full screen replacement, try the palm-tapping method I described earlier in this guide as Fix Number 3. This gentle technique sometimes reseats a loose cable without requiring any professional tools. If that doesn’t work, a technician can often reseat the digitizer cable for 50 to 100 dollars, compared to 200 to 400 dollars for a complete screen replacement.
A cracked display obviously needs replacement, but if your screen looks fine and only the touch function stopped working after a drop, you very likely have a cable issue rather than a display issue.
What’s the difference between ghost touch and unresponsive touch?
Ghost touch and unresponsive touch are opposite problems that require different solutions. Ghost touch means your iPad registers phantom touches you didn’t make, so apps open randomly, text types by itself, or the screen seems to tap things without your input. Unresponsive touch means your iPad ignores real touches and doesn’t register anything when you tap or swipe.
Ghost touch usually points to electrical interference, moisture, or a digitizer malfunction that’s sending false signals. Unresponsive touch typically indicates a loose digitizer cable, software glitch, or a digitizer that has failed entirely. Knowing which problem you have changes what you should try first. If your iPad is tapping things on its own, moisture or interference fixes are your starting point. If nothing responds when you touch, software troubleshooting or cable issues are more likely.
Understanding this distinction helps you avoid wasting time on fixes that won’t address your specific problem.
How do I connect to iTunes if I can’t tap “Trust This Computer”?
Enter Recovery Mode using only your buttons before you connect to your computer. Recovery Mode allows iTunes to recognize and communicate with your iPad without requiring you to tap the Trust confirmation.
To enter Recovery Mode, use the force restart technique I described earlier, but this time release the power button as soon as you see the Apple logo. Immediately hold down the volume down button while still holding the power button, then release both when you see the Recovery Mode screen. Once you’re in Recovery Mode, connect to your computer and iTunes will recognize the device. You can then perform an iTunes restore or update without ever needing to tap Trust This Computer on your iPad.
This workaround is invaluable when your touchscreen isn’t responding but you need to communicate with your device through iTunes.
Why does force restart sometimes not work?
Force restart fails for three main reasons. First, you might be releasing the power button too early, before the Apple logo actually appears. Many people stop when they see the “slide to power off” message, thinking they’ve done enough, but that’s not the finish line. You need to keep holding until the Apple logo shows up.
Second, debris like dust, lint, or dried liquid might be jamming your power button or volume button, preventing you from holding them long enough to trigger the restart. Try the button-jamming method I described in Fix Number 2, which uses gentle pressure and specific movements to clear debris from the button mechanisms.
Third, you might have a hardware problem like a digitizer cable that’s become unseated or a digitizer that has failed electrically. In these cases, force restart won’t fix the underlying issue, but the button technique should still be possible to perform even if it doesn’t solve your touch problem.
Can I fix my iPad touchscreen myself or do I need professional repair?
It depends on what’s actually wrong and how comfortable you are working with electronics. Software fixes like force restart, updating iPadOS, and performing a factory reset are completely safe for anyone to do. These carry no risk because you’re not opening the device or manipulating hardware.
The button-jamming method and palm-tapping technique are also safe DIY approaches that might work without opening your iPad. However, if you need to open your device to clean contacts, reseat cables, or inspect the digitizer, you’re moving into advanced territory. These tasks require precision, special tools, and knowledge of delicate internal components.
Screen replacement is a high-difficulty repair that requires heating the screen, carefully removing adhesive, disconnecting cables, and properly seating the new screen. Logic board repair is definitely professional-only work because it involves complex electrical components and specialized equipment. If your diagnostics point to a logic board issue, attempting this yourself will likely cause more damage than the original problem.
Be honest about your comfort level with electronics before deciding whether to try a repair yourself or visit a professional technician.


