

Is your phone dying before lunch? Trust me, you are not alone.
I know how frustrating it feels when you unplug your phone in the morning with a full charge, and by noon, you are already searching for a charger. I have been there many times. It does not matter if you own a Samsung Galaxy, an iPhone, a Xiaomi, a OnePlus, or a Google Pixel. This battery drain problem affects almost everyone at some point. While I share many smartphone tips on this site, battery drain is by far the most common complaint I hear from readers.
A few months ago, my own phone started dying way too fast. I would charge it overnight, use it lightly in the morning, and still see 40% gone before I even had my second cup of coffee. That is when I decided to dig deep and find out what was really going on.
After testing dozens of fixes on multiple devices, I finally cracked the code. Some of these methods are hidden settings that most people never discover. Others are advanced tricks that phone manufacturers do not openly share.
In this guide, I will reveal 18 fixes that actually stop battery drain. These are not the same old tips you have read a hundred times. I am talking about hidden settings, secret dialer codes, and developer options that can seriously change how long your phone lasts.
If you are wondering why is my battery draining so fast on my phone, you will find every answer here. I will also show you exactly what apps are draining your battery and how to catch them in the act.
Some of the users who tried these methods went from charging twice a day to making their phone last two full days. And the best part? Most of these fixes take less than five minutes.
Let us get started and finally fix your phone battery drain problem for good.
Why Does My Phone Battery Drain So Fast? (8 Hidden Causes Most People Miss)
Before I show you the fixes, you need to understand what is actually causing your phone battery to drain so fast. Once I discovered these hidden causes on my own phone, everything started making sense.
Most people blame obvious things like too many apps or an old phone. But the real culprits are often running silently in the background without your knowledge. Let me walk you through the eight biggest battery killers I found.
1. Background Apps Syncing Data Without Your Knowledge
This was the biggest surprise for me. Even when your phone screen is off, dozens of apps are working behind the scenes. They sync data, refresh content, check for updates, and track your location.
Apps like Facebook, Instagram, WhatsApp, and email clients are the worst offenders. They constantly pull new content so it is ready when you open them. This sounds convenient, but it drains your battery significantly.
I once checked my battery usage and found that a social media app I barely used had consumed 15% of my battery in one day. It was syncing in the background every few minutes without me knowing.
The problem is that most people never check which apps are draining their battery. They assume the phone is just getting old. But often, it is just a few hungry apps eating up all your power.
2. Your Phone Is Constantly Scanning for Nearby Devices
Here is something most people have no idea about. Your phone is always scanning for nearby Bluetooth devices, even when you are not trying to connect to anything.
Google has a feature called Scan for Nearby Devices that runs continuously. It uses Bluetooth and WiFi to detect other phones, speakers, headphones, and smart devices around you. This happens even if your Bluetooth appears to be turned off.
On top of that, phone manufacturers like Samsung and Xiaomi add their own version of this scanning feature. So your phone might be running two or three different scanning services at the same time.
I discovered this hidden setting by accident and was shocked. My phone was constantly using Bluetooth in the background, draining precious battery life while doing absolutely nothing useful for me.
3. High Screen Brightness and Always On Display Eating Power
Your screen is the number one battery consumer on any smartphone. This is not a hidden cause, but most people underestimate how much power the display actually uses.
If you keep your brightness at maximum, your battery will drain much faster than necessary. I used to set my brightness to 100% because I liked the vivid colors. But once I dropped it to 50% and enabled auto brightness, I immediately noticed my phone lasting longer.
The Always On Display feature is another silent killer. It shows the time, date, and notifications even when your phone is locked. On most phones, this drains about 1 to 2 percent of battery per hour. That adds up to 10 to 15 percent per day just for displaying a clock.
I turned off Always On Display on my phone and gained almost two extra hours of usage every day. It was a simple change that made a big difference.
4. Poor Cellular Signal Forces Phone to Work Harder
This one caught me off guard. When your phone has a weak cellular signal, it works much harder to stay connected. It increases transmission power to reach distant cell towers, and this eats through your battery fast.
If you live in a rural area or spend time in basements and concrete buildings, you probably experience this regularly. Your phone is constantly searching for a better signal, and this search never stops.
I noticed my battery draining faster whenever I was in my office building which has poor reception. My phone would lose 20% more battery on those days compared to days when I worked from home with strong signal.
The worst part is that you cannot really fix poor signal coverage. But knowing this cause helps you understand why your phone battery dies faster in certain locations.
5. Location Services Running 24/7 in Background
GPS is one of the most power hungry features on any smartphone. And many apps have permission to access your location all the time, even when you are not using them.
Weather apps constantly check where you are. Maps apps track your movements. Social media apps log your location for tagging purposes. All of this happens silently in the background.
When I reviewed my location permissions, I found that over 20 apps had access to my location at all times. Most of them did not need this level of access. A weather app does not need to know my exact location every minute of the day.
Changing these permissions from Always Allow to Only While Using made a noticeable difference in my daily battery life.
6. Unused Printing Services Searching for Printers
This hidden cause surprised me the most. Your phone has built in printing services that constantly search for nearby printers using WiFi. Even if you have never printed anything from your phone, this service might be running in the background.
The printing service scans your network looking for compatible printers. It does this repeatedly throughout the day, consuming both power and data in the process.
I discovered this when I was going through my phone settings looking for ways to save battery. The default print service was enabled and actively searching, even though I never print anything from my phone.
Most people have no idea this feature exists, let alone that it runs constantly. Turning it off takes seconds and removes one more unnecessary drain on your battery.
7. Digital Wellbeing Tracking Your Every Move
Digital Wellbeing is a feature designed to help you manage your screen time. It tracks which apps you use, how long you use them, and how many times you unlock your phone each day. The intention is good, but there is a catch.
This tracking happens continuously in the background. Your phone is always monitoring and logging your activity, which uses processing power and drains battery.
If you do not actually check your Digital Wellbeing reports, this is wasted battery. I personally never looked at those statistics, so I was essentially paying a battery tax for a feature I did not use.
Once I limited the tracking permissions for Digital Wellbeing, I noticed a small but consistent improvement in battery life. Every bit counts when you are trying to make your phone last through the day.
8. Degraded Battery Health After Years of Use
Finally, we need to talk about battery health. Every phone battery degrades over time. After hundreds of charge cycles, the battery simply cannot hold as much power as it used to.
If your phone is more than two years old, there is a good chance your battery health has dropped below 80%. This means your fully charged battery only holds 80% of its original capacity or less.
I checked my old phone and found the battery health was at 74%. No wonder it was dying so quickly. Even with all the optimizations, a degraded battery can only do so much.
You can check your battery health in your phone settings. On iPhone, go to Settings, then Battery, then Battery Health. On Android, the path varies by manufacturer, but most phones show this information in the Battery section.
If your battery health is below 80%, consider getting a replacement. A new battery can make your phone feel brand new again.
Now that you understand why does my phone battery drain so fast, let me show you how to check exactly which apps are draining your battery.
How to Find What Apps Are Draining Your Battery (Step by Step)
Before you start fixing anything, you need to find the exact apps that are draining your battery. Think of it like diagnosing a problem before applying the cure. If you skip this step, you will be guessing instead of solving.
I always tell people to start here because it gives you a clear picture. Once I checked my own battery usage for the first time, I was genuinely surprised. An app I barely opened was eating up more battery than the apps I used for hours.
Let me show you exactly how to check battery usage on both Android and iPhone.
Check Battery Usage on Android
The process is slightly different depending on your phone brand, but the general path is very similar on all Android devices.
Open your Settings app. Then tap on Battery. On most phones, you will see an option called Battery Usage or App Battery Usage. Tap on it.
On Samsung phones, go to Settings, then Battery and Device Care, then Battery, and finally tap on View Details. This shows you a complete breakdown of which apps are consuming power.
On Xiaomi or Redmi phones, the path is Settings, then Battery, and then Battery Usage Overview. OnePlus users can find it under Settings, then Battery, and then Battery Usage.
Once you open the battery usage screen, look at the list carefully. Each app will show a percentage of total battery used. Any app using more than 10% that you did not actively use for a long time is a red flag.
I once found that a news app I had installed months ago was using 12% of my battery every day. I never opened it. It was just running in the background, refreshing stories and sending notifications around the clock.

Check Battery Usage on iPhone
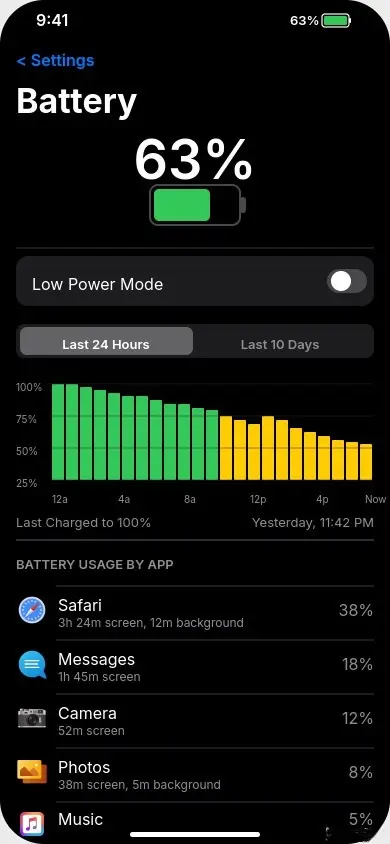
Apple makes this process very straightforward. Open Settings, then tap on Battery. Scroll down and you will see a detailed breakdown of your battery usage.
You will notice two tabs at the top of the chart. One says Last 24 Hours and the other says Last 10 Days. I always check both because they tell different stories.
The Last 24 Hours view shows you what drained your battery today. This is helpful for finding apps that are actively causing problems right now. The Last 10 Days view reveals patterns. It helps you spot apps that consistently drain battery over time.
Below the chart, you will see a list of apps with percentages. Tap on Show Activity to see an even more detailed breakdown. This separates the usage into Screen On time and Background time.
The Background time is where the real battery thieves hide. If an app shows heavy background activity but very little screen on time, that means it is working behind the scenes and draining your power without you even using it.
I found this incredibly helpful when I noticed my email app had nearly two hours of background activity in a single day. It was constantly syncing and checking for new messages even though I had push notifications turned on, which made the constant syncing unnecessary.
How to Read Battery Statistics Correctly
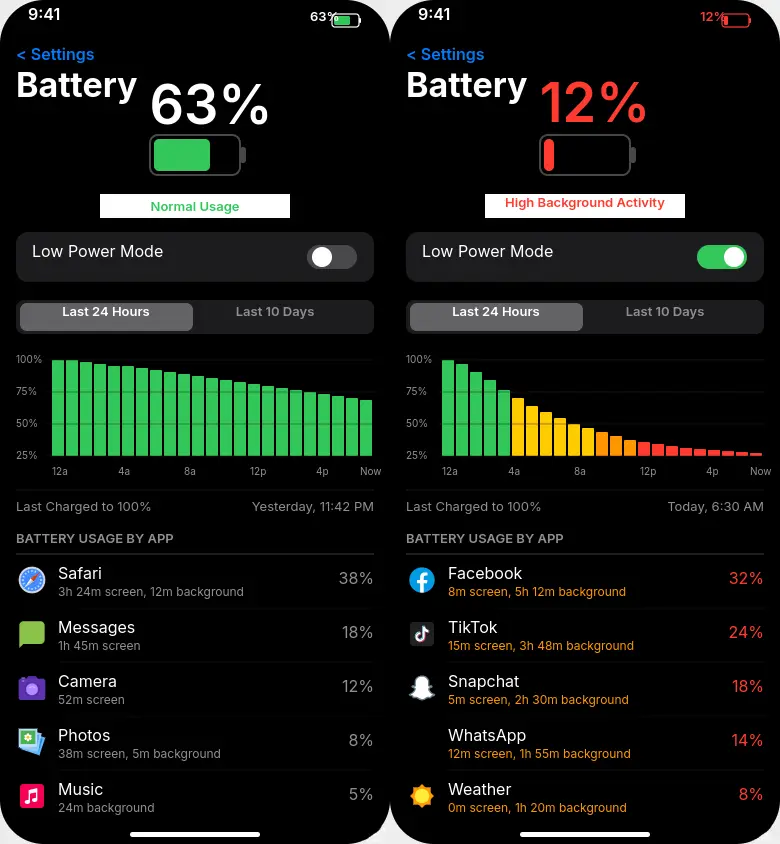
Now here is the part most people get wrong. They look at the battery usage list and panic when they see their favorite app at the top. But seeing an app at the top of the list is not always a problem.
Let me explain. If you spent three hours watching YouTube today and it shows 25% battery usage, that is completely normal. You actively used the app for a long time, so it consumed power. That makes sense.
The real issue is when an app you barely opened shows high battery usage, especially high background usage. That is the red flag you need to watch for.
Here is how I read battery statistics on my own phone.
Normal battery usage looks like this. The apps you use the most appear at the top. Their screen on time is high. Their background time is low or zero. This is perfectly fine.
Problematic battery usage looks like this. An app you rarely open shows up with high battery consumption. Its background time is much higher than its screen on time. It might be syncing data, tracking location, or refreshing content nonstop.
When reviewing your battery stats, pay attention to these specific warning signs.
Any app with background time over 30 minutes that you did not actively use is suspicious. System services using more battery than usual might indicate a software glitch. The Screen category at the top is always the biggest consumer, but if it shows unusually high usage, your brightness might be too high.
On Android, some phones also show a category called Mobile Standby or Cell Standby. If this shows unusually high usage, your phone is struggling with poor signal and working overtime to stay connected. That is a common but overlooked cause of fast battery drain.
I recommend checking your battery statistics at least once a week. It takes less than a minute and helps you catch battery draining apps early before they become a bigger problem.
Now that you know which apps are draining your battery, let me show you the fixes. I will start with the quick and easy ones first, then move to the more advanced methods that most people have never heard of.
6 Quick Fixes to Stop Phone Battery Draining Fast (Do These First)
Let me start with the easy wins. These six fixes take only a few minutes each, but they can make a noticeable difference in how long your phone lasts. I always recommend doing these first because they solve the most common reasons behind phone battery draining fast.
When I applied these basic fixes on my own phone, I gained roughly an extra hour and a half of screen time on the very first day. Nothing complicated here. Just simple changes that add up quickly.
Fix 1: Lower Screen Brightness and Enable Auto Brightness
Your screen is the single biggest battery drain on any phone. If your brightness is cranked up to maximum, your phone is working overtime to keep that display lit up.
I used to keep my brightness at full because I thought it looked better. Once I dropped it to around 40 to 50 percent, I noticed my battery lasting significantly longer throughout the day. The screen was still perfectly readable, and I stopped running to the charger by mid afternoon.
The best approach is to turn on auto brightness. This lets your phone adjust the screen brightness based on the light around you. In a dark room, it dims the screen. In bright sunlight, it turns up just enough so you can see clearly. This saves battery without you having to think about it.
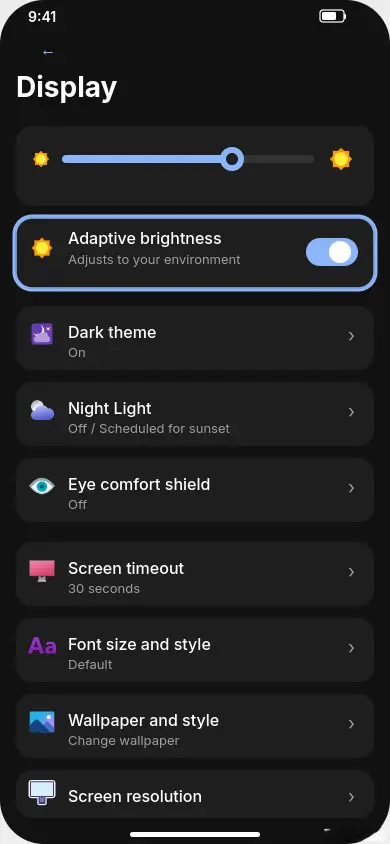
On Android, open Settings, then tap Display, and toggle on Adaptive Brightness. On Samsung devices, the option is called Adaptive Brightness and sits right at the top of the Display settings.
On iPhone, go to Settings, then Accessibility, then Display and Text Size, and toggle on Auto Brightness. Apple tucked this setting inside Accessibility instead of Display, which is why many people never find it.
After enabling auto brightness, try to keep your manual brightness slider around the middle or slightly below. Your eyes adjust quickly, and your battery will thank you.
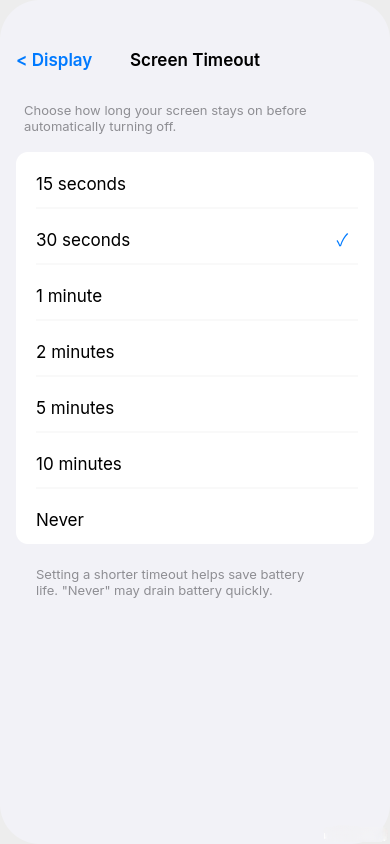
Fix 2: Reduce Screen Timeout to 30 Seconds
Screen timeout controls how long your display stays on after you stop touching it. If yours is set to 2 minutes or more, your screen is staying lit up for a long time after every single interaction.
Think about how many times you check your phone each day. If you glance at a notification and put your phone down, a 2 minute timeout means the screen stays on for 2 full minutes doing nothing. Multiply that by 50 or 60 checks a day, and you are wasting a lot of battery on a screen nobody is looking at.
I changed mine to 30 seconds and honestly never noticed a downside. When I am actively using my phone, the screen stays on because I am touching it. When I put it down, it turns off quickly. Simple and effective.
On Android, go to Settings, then Display, then Screen Timeout. Select 30 seconds. On Samsung phones, the setting might also appear as Screen Off Timer under Display settings.
On iPhone, go to Settings, then Display and Brightness, then Auto Lock. Select 30 seconds.
If 30 seconds feels too aggressive for you, try 1 minute as a middle ground. Just avoid keeping it at 2 minutes or higher because that wastes more battery than most people realize.
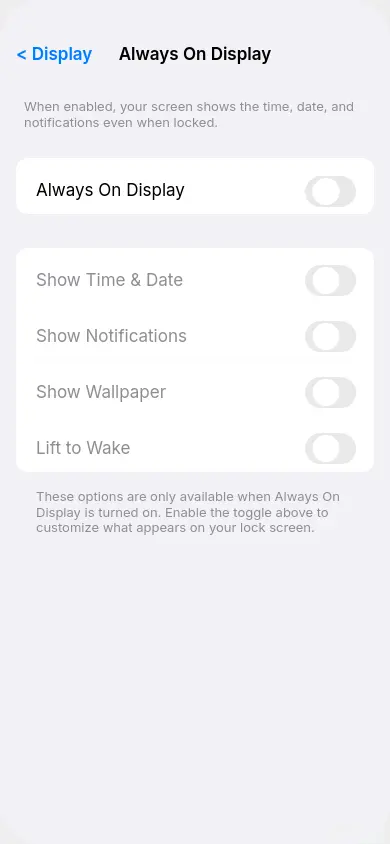
Fix 3: Turn Off Always On Display (Saves 10 to 15 Percent Daily)
Always On Display is a feature that shows the time, date, notifications, and sometimes a background image on your lock screen even when the phone is idle. It looks nice, but it keeps part of your screen active at all times.
On most phones, Always On Display drains about 1 to 2 percent of battery per hour. Over a full day, that adds up to 10 to 15 percent of your total battery gone just for showing a clock.
I kept this feature on for months because I liked glancing at the time without pressing any button. But when I started tracking my battery drain more carefully, I realized it was costing me a big chunk of daily battery life. Turning it off was one of the easiest ways to extend my phone’s battery.
On Android (Samsung), go to Settings, then Lock Screen, then Always On Display, and toggle it off. On other Android phones, check under Settings, then Display, then Always On Display.
On iPhone 14, 15, and 16, go to Settings, then Display and Brightness, and toggle off Always On Display. This feature is only available on iPhone 14 Pro and newer models with ProMotion displays.
If you really love the Always On Display feature and do not want to turn it off completely, check if your phone offers a scheduled option. Some phones let you set it to activate only during certain hours, which reduces the battery impact.
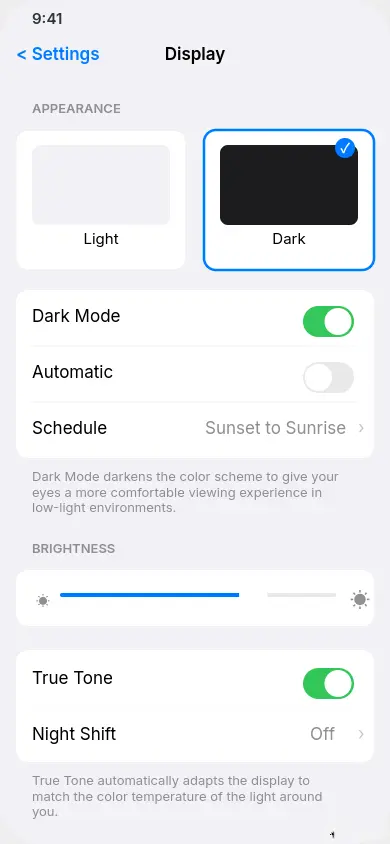
Fix 4: Enable Dark Mode on OLED Screens
If your phone has an OLED or AMOLED display, switching to dark mode can save a meaningful amount of battery. The reason is straightforward. On OLED screens, black pixels are actually turned off completely. They use zero power. A bright white screen, on the other hand, lights up every single pixel at full power.
Most modern phones from Samsung, Google Pixel, OnePlus, and all recent iPhones use OLED displays. If your phone was made in the last three or four years, there is a good chance it has one.
I switched to dark mode about a year ago and never went back. Not only does it save battery, but it also feels easier on my eyes, especially at night. Several studies have shown that dark mode on OLED screens can reduce display power consumption by up to 30 to 40 percent depending on the brightness level.
On Android, go to Settings, then Display, and toggle on Dark Mode or Dark Theme. Some phones also call it Night Mode.
On iPhone, go to Settings, then Display and Brightness, and select Dark under the Appearance section.
One extra tip. After enabling dark mode, also set a dark wallpaper. A bright colorful wallpaper on your home screen and lock screen still lights up those pixels. A dark or solid black wallpaper takes full advantage of dark mode and saves even more power on OLED displays.
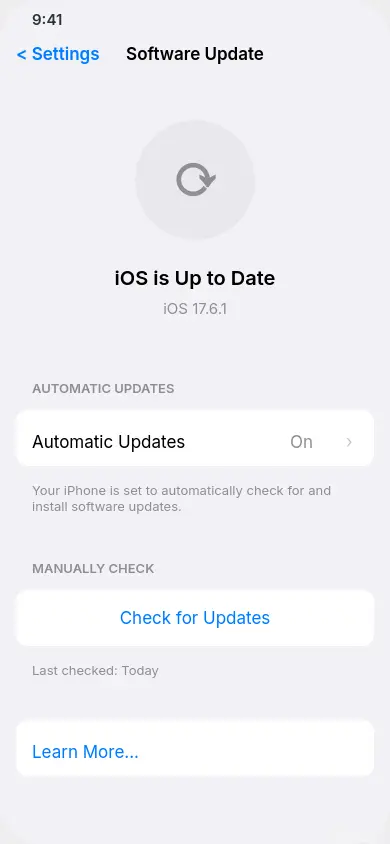
Fix 5: Update Your Phone Software Immediately
This fix is simple but surprisingly effective. Many battery drain issues are actually caused by software bugs, and phone manufacturers regularly release updates to fix them.
I learned this the hard way. After a major Android update a while back, my phone started draining battery much faster. I was frustrated and tried all sorts of fixes. Then a small patch update came out about two weeks later, and the battery drain issue was completely resolved.
Software updates often include battery optimization improvements, bug fixes, and patches for known power consumption problems. Skipping updates means you miss these fixes and continue dealing with issues that have already been solved.
On Android, go to Settings, then Software Update, and tap Download and Install. On Samsung, the path is Settings, then Software Update, then Download and Install. On Xiaomi, check Settings, then About Phone, then MIUI Version.
On iPhone, go to Settings, then General, then Software Update. If an update is available, tap Download and Install.
I make it a habit to check for updates at least once a week. It takes less than a minute to check, and sometimes that one small update fixes the exact battery problem you have been dealing with.
Fix 6: Restart Your Phone to Clear Memory Leaks
This sounds almost too simple, but restarting your phone regularly is one of the most effective ways to fix unexpected battery drain.
When your phone runs for days or weeks without a restart, apps accumulate temporary data, background processes pile up, and memory leaks can occur. A memory leak happens when an app keeps using memory and processing power even after it should have stopped. These stuck processes drain your battery without showing up clearly in your battery statistics.
I restart my phone once a week, usually on Sunday night before bed. Every time I do, my phone feels noticeably faster the next morning, and the battery seems to last a bit longer through the day.
Restarting clears out all those stuck processes and gives your phone a clean slate. It takes about a minute, and you do not lose any data or settings.
On Android, press and hold the power button for a few seconds, then tap Restart. On some newer Samsung and Pixel phones, you might need to press the power button and volume up button together.
On iPhone, go to Settings, then General, then Shut Down. Wait about 10 seconds after the screen goes dark, then press and hold the side button to turn it back on.
If you tend to forget to restart your phone, Samsung has a handy feature called Auto Restart. Go to Settings, then General Management, then Reset, then Auto Restart. You can schedule your phone to restart automatically at a specific time each week. I set mine for 3 AM on Sundays so it restarts while I am sleeping.
These six quick fixes address the most common causes of fast battery drain. If you apply all of them, you should see a solid improvement right away. But if your phone battery is still draining too fast, keep reading. The next section covers hidden settings that most people have never heard of, and they can make a huge difference.
5 Hidden Settings That Drain Your Battery (Most People Don’t Know These)
Now this is where things get really interesting. The fixes I am about to share are not the ones you find in typical battery saving guides. These are hidden settings buried deep inside your phone that silently drain power around the clock.
I stumbled across most of these while digging through my phone settings on a random weekend. When I turned them off one by one, I could not believe how much battery I was wasting on features I never used and never even knew existed.
If you have already tried the basic fixes above and your phone battery is still draining too fast, these hidden settings are most likely the reason.
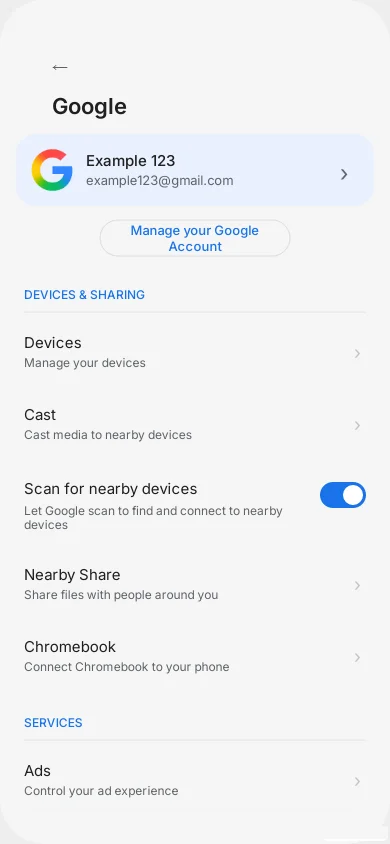
Hidden Setting 1: Disable Google’s Scan for Nearby Devices
Your phone has a Google feature that constantly uses Bluetooth to look for nearby devices like speakers, headphones, smart TVs, and other phones. It runs quietly in the background all day, every day.
The idea behind this feature is convenience. Google wants your phone to detect nearby devices so it can offer quick pairing. The problem is that this constant scanning uses a noticeable amount of battery, even when you have no intention of connecting to anything.
I had this feature enabled for over two years without knowing it existed. Once I turned it off, my Bluetooth related battery drain dropped immediately. I could still connect to my earbuds and speakers manually whenever I needed to. The only difference was that my phone stopped wasting power searching for devices every few seconds.
Here is how to turn it off.
Open Settings on your Android phone. Tap on Google. Then tap All Services. Look for Devices and Sharing and tap on it. Then tap Devices. You will see a toggle that says Scan for Nearby Devices. Turn it off.
The exact path might look slightly different depending on your phone brand and Android version, but the setting is under Google services on almost every Android phone.
Hidden Setting 2: Turn Off System Level Nearby Device Scanning
Here is what surprised me most. Even after disabling Google’s scanning feature, my phone was still scanning for nearby devices. That is because phone manufacturers like Samsung, Xiaomi, and others include their own separate version of this same feature.
This means your phone could be running two different scanning services at the same time. One from Google and one from your phone’s manufacturer. Both use Bluetooth and sometimes WiFi to search for devices around you, and both drain your battery.
The worst part is that this system level scanning continues even when your Bluetooth toggle in the quick settings panel appears to be turned off. Your phone still scans in the background using Bluetooth radio. Most people have no clue this happens.
When I disabled this second scanning layer, I noticed my battery lasting noticeably longer on idle. The difference was especially clear overnight. My phone used to lose about 5 to 8 percent while I slept, and after turning off both scanning features, it dropped to only 1 to 2 percent overnight.
Here is how to disable it.
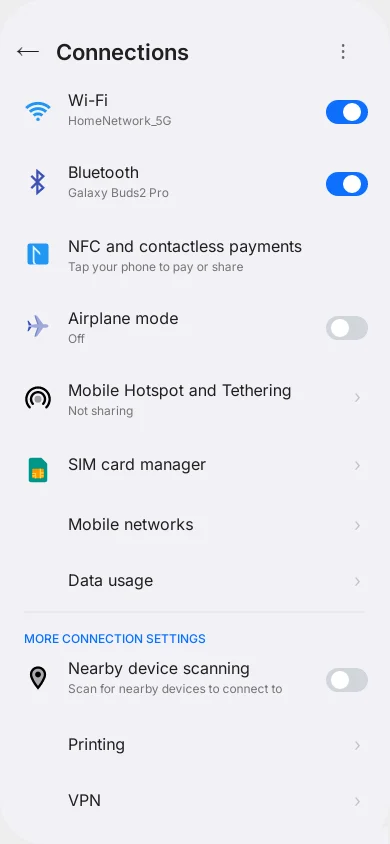
On Samsung phones, open Settings, tap Connections, then tap More Connection Settings. You will see an option called Nearby Device Scanning. Toggle it off.
On other Android phones, open your Settings and use the search bar at the top. Type nearby and look for a setting related to nearby scanning or nearby device scanning. Tap on it and toggle it off.
After you disable this, your phone will stop scanning in the background completely. You can still manually turn on Bluetooth anytime you want to connect to a device. This setting only stops the automatic scanning that runs without your knowledge.
Hidden Setting 3: Stop Background Printing Services
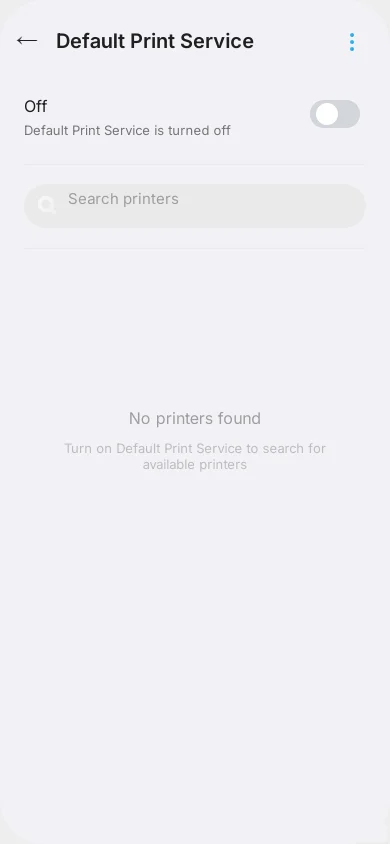
This is one of those settings that made me shake my head when I discovered it. Your phone comes with a built in printing service that is constantly searching for printers on your WiFi network. Unless you regularly print documents from your phone, this service is doing nothing but wasting battery and data.
The Default Print Service runs in the background and scans your network for compatible printers. It does this repeatedly throughout the day. For 99 percent of phone users, this feature is completely unnecessary because they never print anything from their phone.
I turned this off on my phone and forgot about it entirely. I never print from my phone, so there was zero downside. If you ever do need to print something, you can always turn this service back on temporarily. It takes just a few seconds.
Here is how to disable it.
Open your Settings app. Use the search bar at the top and type printing. You will see an option called Default Print Service or Printing Services depending on your phone brand. Tap on it and toggle it off.
On Samsung phones, you can also find this under Settings, then Connections, then More Connection Settings, then Printing.
This is a small fix on its own, but it is one more background process eliminated. When you combine it with the other hidden settings in this list, the cumulative battery saving becomes significant.
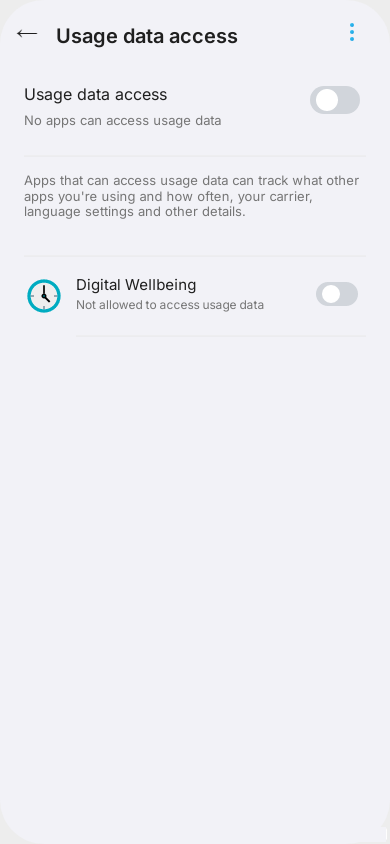
Hidden Setting 4: Limit Digital Wellbeing Tracking
Digital Wellbeing is a built in Android feature that tracks how you use your phone. It monitors which apps you open, how long you spend in each app, how many notifications you receive, and how many times you unlock your phone throughout the day.
The purpose of Digital Wellbeing is to help you understand and manage your screen time habits. And honestly, the concept is great. But there is a trade off. All of this tracking runs constantly in the background, using processing power and battery to log every single action you take.
I checked my Digital Wellbeing dashboard a few times when it first launched, thought it was interesting, and then never looked at it again. Meanwhile, it kept tracking my every move for months, burning battery for data I was not reviewing.
If you are like me and never check your Digital Wellbeing statistics, there is no reason to let it run. Turning off the tracking saves a small but steady amount of battery throughout the day.
Here is how to limit it.
Open Settings and tap on Digital Wellbeing and Parental Controls. Tap the three dots icon in the top right corner. Select Settings or Manage Your Data depending on your phone. Look for Usage Data Access or Usage Tracking. Find Digital Wellbeing in the list and toggle off Allow Usage Tracking.
On some phones, the option might appear as Permit Usage Access instead. Just find the Digital Wellbeing entry and revoke its access.
After doing this, the Digital Wellbeing feature will still be available on your phone, but it will stop actively tracking your usage in the background. If you ever want to use it again, you can simply re enable the tracking.
[Screenshot: Digital Wellbeing Usage Data Access setting with tracking toggled off]
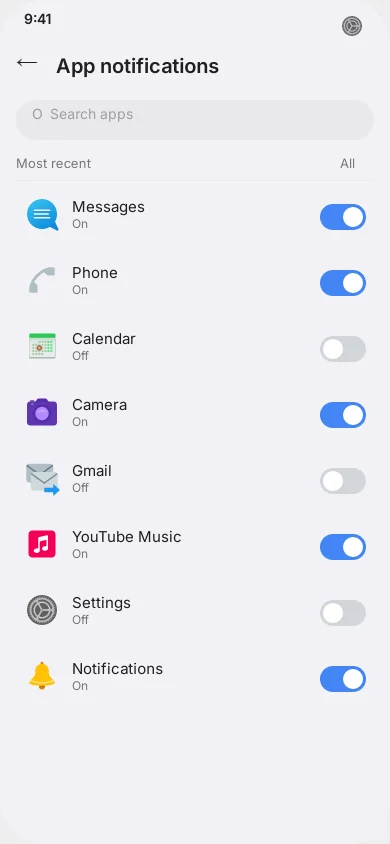
Hidden Setting 5: Disable Unused App Notifications
Every notification your phone receives wakes up the screen, activates the notification sound or vibration motor, and triggers a brief burst of processing activity. One or two notifications per hour might not seem like much. But when you have 30 or 40 apps all sending notifications throughout the day, it adds up to a real battery drain.
I used to get notifications from almost every app on my phone. Shopping apps telling me about sales. Game apps reminding me to log in. News apps pushing stories I did not care about. Each one woke my screen and used a tiny bit of power.
When I finally sat down and went through my notification settings, I realized I only truly needed notifications from about 5 or 6 apps. Things like messaging apps, my calendar, and my email. Everything else was noise that I either ignored or swiped away without reading.
Disabling notifications for non essential apps was one of the most satisfying changes I made. My phone became quieter, less distracting, and the battery lasted longer. It was a triple win.
Here is how to do it.
Open Settings and search for Notifications. Tap on App Notifications. You will see a list of every app installed on your phone with a toggle next to each one.
Go through the list carefully. For each app, ask yourself one question. Do I actually need instant notifications from this app? If the answer is no, toggle it off.
I recommend keeping notifications on for messaging apps like WhatsApp or your default texting app, your phone and calendar apps, email if you need it for work, and any banking or security apps that send important alerts.
For everything else, especially shopping apps, social media, games, entertainment apps, and utility apps, turn notifications off. You can still open these apps whenever you want and check for updates manually. You just will not get interrupted by them, and your phone will not waste battery delivering alerts you do not need.
These five hidden settings are the ones most battery saving guides completely miss. Individually, each one saves a small amount of battery. But when you disable all five together, the combined saving is significant. On my phone, these changes alone added about an extra hour of screen time per day.
Now let me show you the truly advanced fixes that go even deeper into your phone’s settings.
Advanced Battery Fixes Using Developer Options (Double Your Battery Life)
Now I am going to show you the fixes that most people never discover. These are advanced settings hidden inside a secret menu on your Android phone called Developer Options. Do not worry about the name. You do not need to be a developer or a tech expert to use these settings. I will walk you through everything step by step.
When I first used these methods on my own phone, the results honestly surprised me. My phone went from barely lasting a full day to comfortably stretching into the second day with moderate usage. These are the same techniques that power users and tech enthusiasts have been quietly using for years.
Let me start by showing you how to unlock the Developer Options menu.
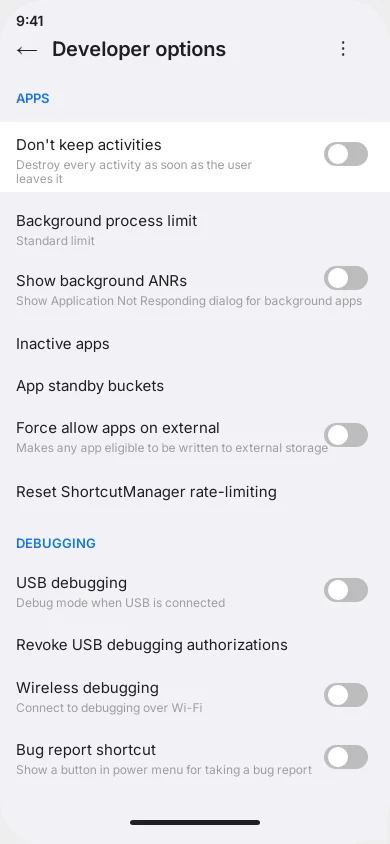
How to Enable Developer Options on Android
Developer Options is a hidden menu that Android keeps locked by default. The reason is simple. It contains advanced settings that could affect phone performance if changed carelessly. But the specific settings I am going to share are completely safe and focused entirely on saving battery.
Here is how to unlock Developer Options on your phone.
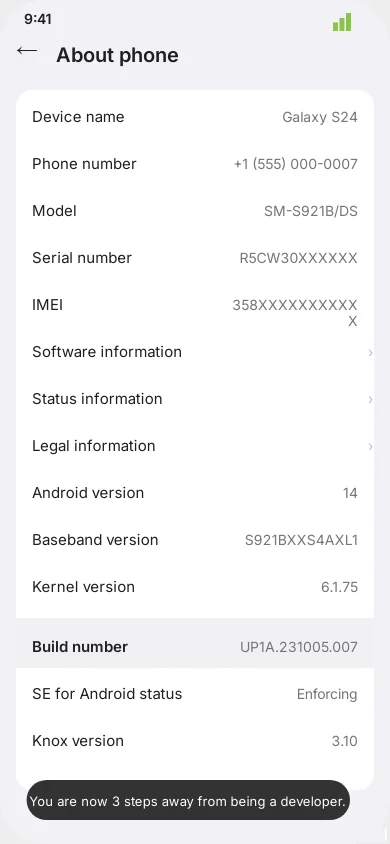
Open Settings. Scroll down and tap on About Phone. Look for an option called Software Information and tap on it. You will see an entry called Build Number.
Now tap on Build Number seven times in a row. After the first few taps, you will see a small message saying something like “You are 3 steps away from being a developer.” Keep tapping until you see “You are now a developer” or a similar confirmation message.
On Samsung phones, the path is Settings, then About Phone, then Software Information, then tap Build Number seven times. On Xiaomi phones, go to Settings, then About Phone, then tap MIUI Version seven times instead.
Once you have done this, go back to the main Settings screen and scroll down. You will now see a new option called Developer Options near the bottom of your settings list. On some phones, it might appear inside a section called System or Additional Settings.
That is it. The hidden menu is now unlocked. You only need to do this once. Developer Options will stay visible until you manually turn it off.
[Screenshot: Tapping Build Number with the countdown message visible]
Restrict Background Activity for Battery Heavy Apps
This is one of the most powerful battery saving techniques I have ever used. Every app you frequently use tends to stay active in the background even after you close it. Your phone does this intentionally so the app loads faster the next time you open it.
The problem is that these background apps consume memory and processing power, which directly drains your battery. Apps like YouTube, Facebook, Instagram, Snapchat, and streaming apps are the biggest offenders because they constantly refresh content and maintain connections in the background.
You do not need Developer Options for this particular fix. It is available in your regular phone settings, but most people never find it because it is buried several layers deep.
Here is how to restrict background activity for specific apps.
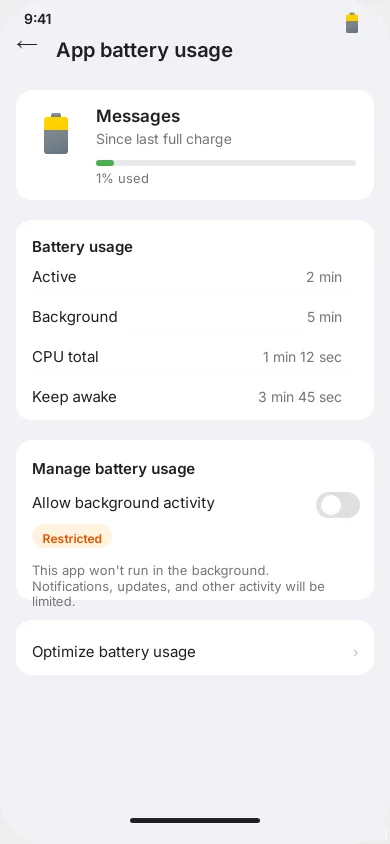
Open Settings. Tap on Apps or Application Manager depending on your phone. Select an app that you know uses a lot of battery. I usually start with social media and video apps. Tap on Battery inside the app’s settings page. You will see an option called Allow Background Activity. Toggle it off.
When you turn this off, the app’s battery usage changes to Restricted. This means the app will only run when you actively open it. It will not work in the background, refresh content, or consume power while you are not using it.
I went through my entire app list and restricted background activity for about 15 apps. The difference was dramatic. My background battery drain dropped by nearly half.
One important note. Do not restrict background activity for messaging apps like WhatsApp or Telegram if you need to receive messages in real time. Restricting these apps means you might not get message notifications until you open the app. I keep my messaging apps unrestricted and restrict everything else.
Configure Standby Apps to Rare State
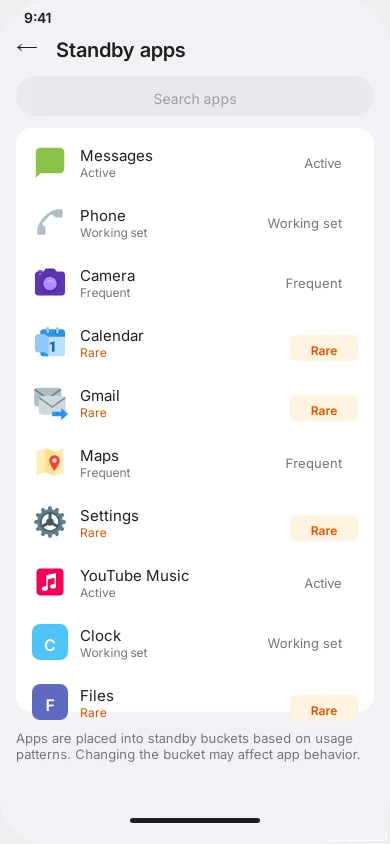
This setting is available inside Developer Options and it gives you granular control over how your phone treats each app when it is not being used.
Android assigns every app a standby state based on how frequently you use it. The states are Active, Working Set, Frequent, and Rare. Apps in the Active state get the most resources and freedom to run in the background. Apps in the Rare state get very limited background access and use the least amount of battery.
By default, your phone automatically decides these states based on your usage patterns. But through Developer Options, you can manually change any app’s standby state to Rare. This tells your phone to treat the app as if you barely use it, preventing it from warming up or working in the background unnecessarily.
Here is how to configure this.
Open Settings and scroll down to Developer Options. Look for a setting called Standby Apps or App Standby. Tap on it.
You will see a list of all your installed apps with their current standby state next to each one. Tap on any app you want to limit and change its state from Active or Frequent to Rare.
I recommend changing non essential apps to Rare. Things like shopping apps, news apps, utility tools, and games that you only open occasionally. Leave your messaging apps, email, and phone dialer in their default states so they continue working normally.
When I set about 20 apps to Rare, my phone’s idle battery drain improved noticeably. These apps stopped periodically waking up in the background, which saved both battery and data.
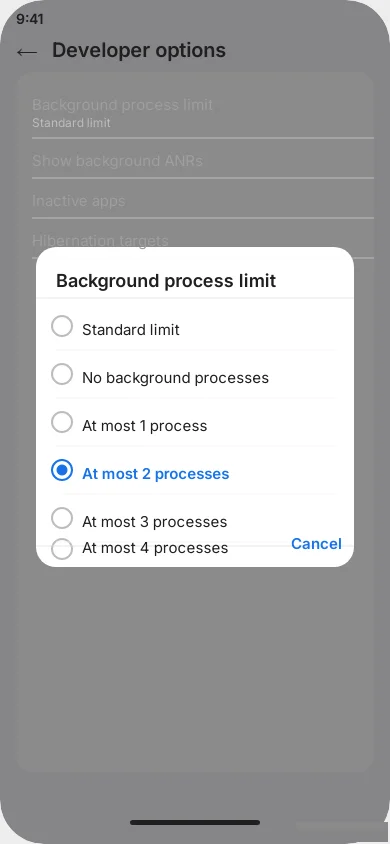
Set Background Process Limit to Save Power
This is another powerful setting inside Developer Options that controls how many apps your phone keeps ready in the background at any given time. By default, Android keeps several apps loaded in memory so they open quickly when you switch between them. But each app sitting in memory uses a small amount of processing power and battery.
By limiting the number of background processes, you force your phone to keep fewer apps alive in memory. This reduces the overall battery drain from background activity.
Here is how to set it up.
Open Settings and scroll down to Developer Options. Scroll through the list until you find Background Process Limit. Tap on it and you will see several options including Standard Limit, No Background Processes, At Most 1 Process, At Most 2 Processes, At Most 3 Processes, and At Most 4 Processes.
I recommend selecting At Most 2 Processes. This is the sweet spot that balances good battery saving with reasonable multitasking ability. Your phone will keep only 2 apps ready in the background. Every other app gets closed to save power.
If you select No Background Processes, your phone saves the most battery but the experience can feel sluggish because every app needs to reload from scratch when you open it. I tried this for a day and found it too aggressive for daily use.
At Most 2 Processes worked perfectly for me. My most recently used apps stayed ready, and everything else was closed to save power. I barely noticed any difference in speed, but I definitely noticed the improvement in battery life.
There is one important thing to know about this setting. It resets back to the default Standard Limit every time you restart your phone. So if you reboot your phone, you will need to go back into Developer Options and set it to At Most 2 Processes again. It takes only a few seconds, but it is easy to forget.
Extreme Mode: Enable Don’t Keep Activities (Optional)
This last setting is the most aggressive battery saving option available in Developer Options. I am listing it as optional because it significantly changes how your phone handles apps, and it is not for everyone.
When you enable Don’t Keep Activities, your phone instantly destroys an app’s activity the moment you navigate away from it. In plain language, this means that if you are using a calculator and switch to your browser, the calculator app will be completely closed. When you go back to it, it will start fresh instead of showing your previous calculation.
This saves a considerable amount of battery because your phone is not keeping any apps alive in memory. Every app gets shut down the instant you leave it.
I tested this setting for about a week. My battery life improved significantly, but the experience required some adjustment. Apps always started fresh, forms would lose their data if I switched away, and multitasking felt less smooth. For someone who mostly uses one app at a time, this might work fine. For heavy multitaskers, it can be frustrating.
Here is how to enable it if you want to try.
Open Settings and go to Developer Options. Scroll up slightly from the Background Process Limit setting. You will see an option called Don’t Keep Activities. Toggle it on.
My honest recommendation is to try it for a day and see how it feels. If the trade off between battery saving and convenience works for you, keep it on. If you find it disruptive, turn it off and stick with the Background Process Limit set to At Most 2 Processes. That combination alone provides excellent battery savings without sacrificing your daily experience.
These advanced Developer Options fixes are what separate average battery life from truly impressive battery life. Combined with the hidden settings from the previous section, you should be seeing a major improvement by now. But I still have more tricks to share, including secret Samsung dialer codes that can actually recalibrate your battery.
Samsung Battery Calibration Using Secret Dialer Codes (Hidden Method)
If you use a Samsung Galaxy phone, this section is going to blow your mind. Samsung has built in secret dialer codes that let you check your battery health, calibrate your battery stats, and reset battery logs. These are diagnostic tools that Samsung does not advertise, and most Samsung users go years without ever knowing they exist.
I discovered these codes while troubleshooting my Samsung Galaxy when the battery percentage started jumping around randomly. One minute it would show 50 percent, then suddenly drop to 35 percent within a few minutes. It turned out my battery calibration was off, and these secret codes helped me identify and fix the problem.
Important: These codes work on Samsung Galaxy devices only. They will not work on Xiaomi, OnePlus, Pixel, iPhone, or other phone brands. Also, always use your original Samsung charger or a charger with the exact same amperage to avoid damaging your battery.
Let me walk you through each code and what it does.
How to Check Samsung Battery Health with the Battery Code
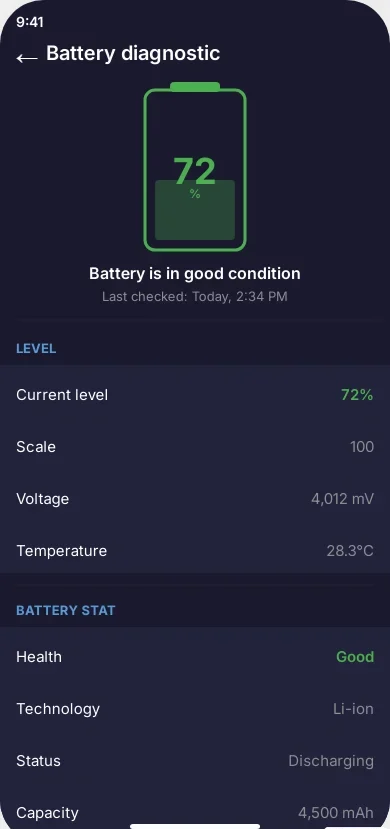
The first code gives you access to Samsung’s hidden battery diagnostic screen. This screen shows you detailed information about your battery that you cannot find anywhere in the regular settings.
Here is how to access it.
Open your Phone app as if you were going to make a regular call. In the dialer, type the following code exactly as shown.
*#0228#
As soon as you type the last character, a new screen will appear automatically. You do not need to press the call button. The screen pops up on its own.
On this diagnostic screen, look for two important numbers. The first is labeled Level and the second is labeled Battery Stat or a similar term depending on your Samsung model and software version.
These two numbers should be very close to each other. For example, if your Level shows 77 percent, your Battery Stat should also show something close to 77 percent. If both numbers match up closely, your battery calibration is working correctly.
However, if there is a significant gap between these two numbers, it means your battery calibration is off. Your phone is not accurately reading how much charge the battery actually holds. This mismatch is often the reason why your battery percentage seems to jump around or why your phone suddenly dies at 20 or 30 percent instead of close to zero.
When I first checked this on my phone, the Level showed 72 percent but the Battery Stat was at 65 percent. That seven percent difference explained why my phone was shutting down earlier than expected. The phone thought it had more charge than the battery actually held.
How to Quick Start Battery Calibration
Once you are on the battery diagnostic screen from the code above, you will notice a button at the bottom of the screen labeled Quick Start. This button lets you recalibrate your battery statistics.
Here is how to use it.
While on the battery diagnostic screen, tap the Quick Start button at the bottom. A warning message will pop up asking you to confirm. Tap OK to proceed.
After you tap OK, your screen will go dark for a few seconds. Do not panic. This is completely normal. Your phone is recalibrating its battery readings during this brief moment.
Once the screen turns back on, check your battery percentage. In some cases, you might notice that the percentage has changed slightly. This is the phone adjusting to show a more accurate reading based on the actual charge in your battery.
If you see a large drop in percentage after the Quick Start, pay attention. For example, if your phone showed 60 percent before calibration and drops to 45 percent right after, this is a strong indicator that your battery has degraded significantly. The phone was previously displaying an inflated number, and now it is showing you the real charge level.
When I ran the Quick Start on my phone, my battery percentage dropped by about 4 percent. This was not alarming because it was a relatively small adjustment. It simply meant my phone was slightly overestimating its charge. After the calibration, my battery percentage became much more accurate and stopped jumping around unexpectedly.
If your battery percentage drops dramatically after calibration, say by 15 or 20 percent, this usually means the battery has lost a significant amount of its original capacity. At that point, the battery may be nearing the end of its lifespan and professional replacement might be worth considering.
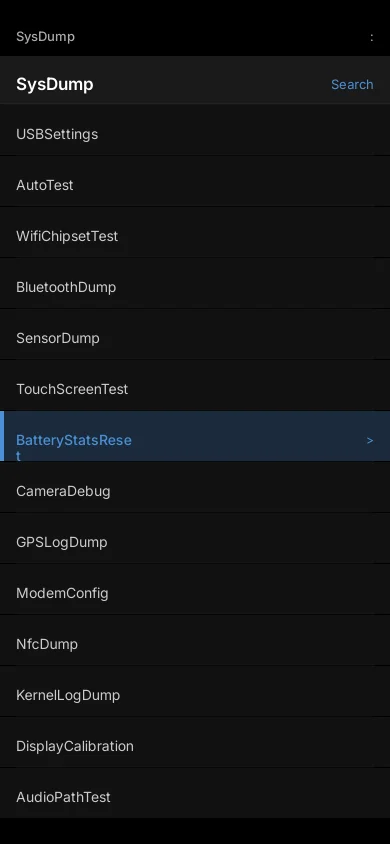
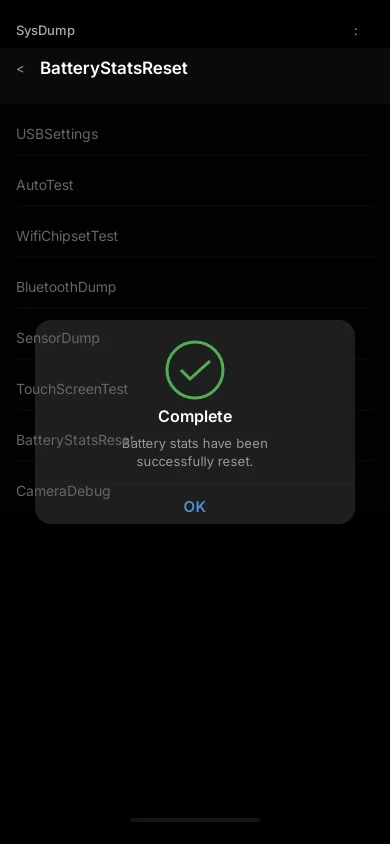
Reset Battery Stats with the SysDump Code
The second secret code gives you access to Samsung’s System Dump menu. This menu contains a specific option that lets you completely reset your phone’s battery statistics and logs. Think of it as clearing the old inaccurate data and giving your phone a fresh start for tracking battery performance.
Here is how to use it.
Open your Phone app again and type the following code in the dialer.
*#9900#
A menu called SysDump will appear on your screen. This menu has many options, and it might look a bit technical. Do not touch anything else in this menu except the option I am about to tell you.
Scroll down through the list carefully until you find an option called BatteryStatsReset. It might take a bit of scrolling depending on your phone model, but it is there.
Tap on BatteryStatsReset. Your phone will process the request for a moment, and then you should see a confirmation message that says something like “Battery stats reset done” or a similar success notification.
That is it. Your phone’s battery logs have been completely reset. From this point forward, your phone will start tracking battery statistics fresh. Over the next few charge cycles, the battery readings will become increasingly accurate as the system builds new data.
I recommend doing a full charge cycle after resetting the battery stats. Charge your phone all the way to 100 percent without interruption, then use it normally until it gets down to about 15 or 20 percent. This helps the system recalibrate properly with the fresh data.
When I performed this reset on my Samsung phone, the battery percentage behavior improved noticeably within two to three days. The random jumps in percentage stopped, and the battery level indicator became smooth and predictable again. My phone also stopped shutting down unexpectedly at 15 or 20 percent, which had been a recurring frustration.
A Few Important Things to Keep in Mind
Before moving on, I want to share some important notes based on my experience with these Samsung battery codes.
First, these diagnostic codes are safe to use. They are built into Samsung’s software for testing and troubleshooting purposes. You are not modifying any system files or doing anything that could damage your phone.
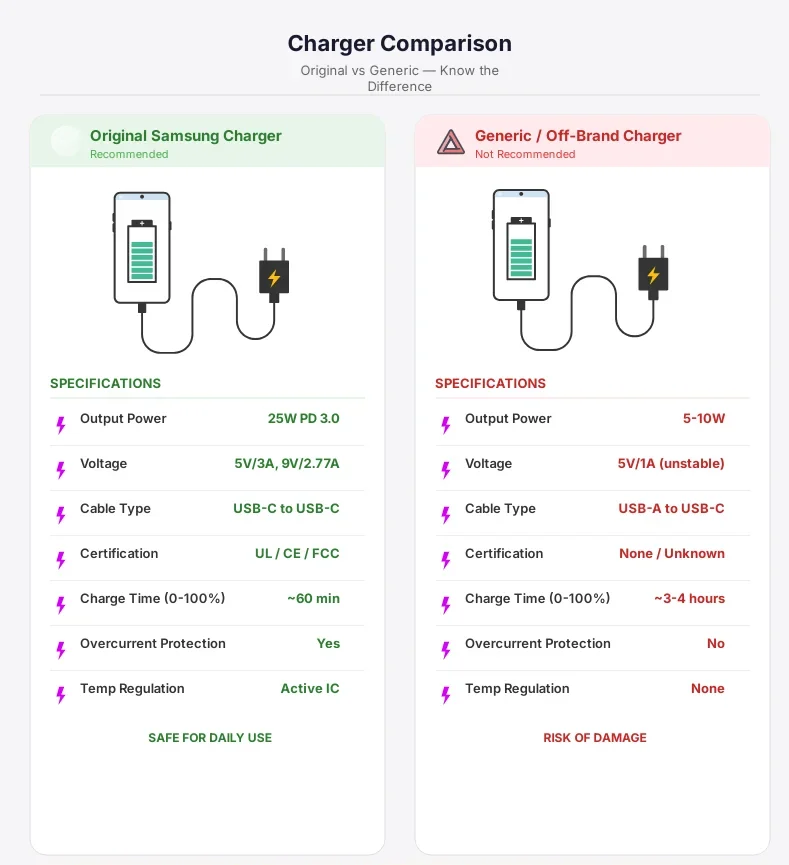
Second, always use your original Samsung charger or a charger with the exact same voltage and amperage specifications as the original. Using a charger with different power output can cause uneven charging patterns, which contributes to inaccurate battery calibration over time. I have seen people use cheap third party chargers and then wonder why their battery acts strangely. The charger matters more than most people realize.
Third, if you have tried both the Quick Start calibration and the battery stats reset but your battery still drains abnormally fast, the issue might be physical rather than software related. Batteries are consumable components that degrade with hundreds of charge cycles. If your Samsung phone is more than two or three years old and the battery health is significantly degraded, these software resets can only do so much. In that situation, visiting an authorized Samsung service center for a battery replacement is the best course of action.
Finally, keep in mind that these codes may not work on every Samsung model or every software version. Samsung occasionally changes or removes access to certain diagnostic menus through software updates. If a code does not work on your phone, it likely means your specific model or software version does not support it. This is nothing to worry about. The other fixes in this guide will still help you significantly.
Now let me address another common battery concern that many readers ask about, which is why the battery keeps draining even while the phone is plugged in and charging.
Why Is My Battery Draining While Charging? (Causes and Solutions)
This is one of the most frustrating battery problems I have encountered. You plug in your phone expecting it to charge, but the battery percentage barely moves or sometimes even drops while the charger is connected. It feels like pouring water into a bucket with holes in the bottom.
I dealt with this exact issue about a year ago. My phone would take over three hours to reach full charge, and if I used it during that time, the battery would actually lose percentage despite being plugged in. After a lot of testing, I figured out what was going wrong.
If you are wondering why is my battery draining while charging, there are four common causes. Let me break down each one along with the solution that worked for me.
Using Phone While Charging Causes Heat and Drain
This is the most common reason your battery seems to drain while it is plugged in. When you use your phone heavily during charging, especially for activities like video streaming, video calls, or running multiple apps at once, your phone consumes power faster than the charger can supply it.
Heavy usage during charging also generates a lot of heat. Your phone is producing heat from the charging process and additional heat from the processor working hard at the same time. This double heat situation is not good for your battery.
I used to scroll through social media and watch videos while my phone charged. I noticed the phone getting uncomfortably warm and the charging speed slowing down dramatically. Some phones even reduce charging speed automatically when they detect high temperatures to protect the battery from damage.
The solution is straightforward. Try to leave your phone alone while it charges, especially during the first 30 to 40 minutes when charging is fastest. If you must use it, stick to light tasks like reading or checking messages. Avoid anything that makes the processor work hard.
Once I started letting my phone charge without using it, my charging time dropped from over three hours to about an hour and forty minutes. The phone also stayed much cooler during the entire process.
Faulty or Non Original Charger Problems
The charger you use matters much more than most people think. A faulty, damaged, or low quality charger can charge your phone so slowly that normal background activity is enough to drain the battery faster than it charges.
Every charger has specific voltage and amperage ratings. Your original charger is designed to deliver the exact amount of power your phone needs. When you use a cheap third party charger with lower amperage, it simply cannot push enough power into your battery to keep up with normal phone operations.
I made this mistake once when I lost my original charger and bought an inexpensive replacement. The new charger looked identical and fit the port perfectly, but my phone charged incredibly slowly. The amperage was only about half of what my original charger provided. My phone was essentially receiving a trickle of power while background apps consumed most of it.
The solution is simple but important. Always use your original manufacturer charger or a certified replacement with the exact same power specifications. Check the tiny text on your original charger for the voltage and amperage ratings, and make sure any replacement matches those numbers.
Also inspect your charging cable regularly. A frayed, bent, or damaged cable can reduce power delivery significantly even if the charger itself is fine. I have seen situations where simply swapping a worn out cable for a new one completely fixed the slow charging problem.
Background Apps Still Running During Charge
Even when your phone screen is off and plugged in, apps continue working in the background. They sync data, download updates, refresh content, back up photos, and perform dozens of other tasks. All of this activity consumes power.
If your charger is barely keeping up with your phone’s power demands, the added drain from background apps can tip the balance. Your phone ends up using power at the same rate or even faster than it receives power from the charger.
I noticed this happening one night when I plugged in my phone at 30 percent before going to sleep. I expected it to be fully charged by morning. Instead, it was only at 78 percent after eight hours. My phone had been downloading app updates, syncing cloud storage, and backing up photos all night long.
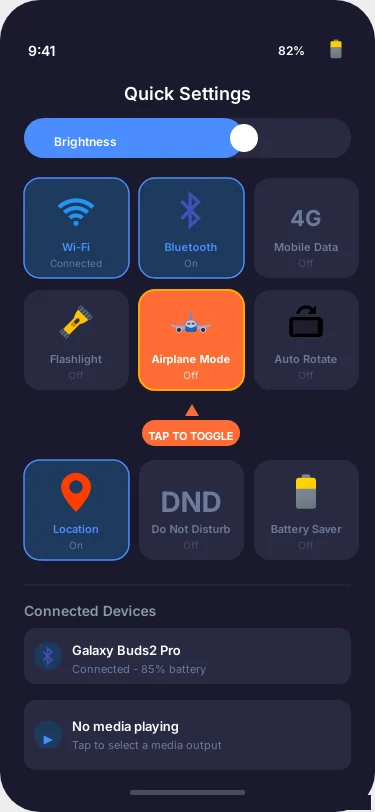
The fastest and most effective solution is to enable Airplane Mode while charging. This turns off all wireless connections including WiFi, cellular data, and Bluetooth. Without these connections, your background apps cannot sync or download anything, and your phone charges much faster.
On both Android and iPhone, swipe down from the top of your screen to open the quick settings panel and tap the Airplane Mode icon. You can also find it in Settings under Network and Internet or Connections.
When I started enabling Airplane Mode during overnight charging, my phone reached 100 percent in roughly half the usual time. It is the single easiest way to speed up charging.
If you do not want to use Airplane Mode because you need to receive calls or messages, at least turn off WiFi and Bluetooth manually. This reduces background activity significantly while still keeping your phone connected to the cellular network for incoming calls.
Fast Charging Generates Excessive Heat
Fast charging is a wonderful convenience when you need a quick top up before heading out. But using fast charging all the time, especially overnight, generates more heat than standard charging. And heat is the number one factor that degrades battery health over time.
When fast charging is active, your charger pushes a higher amount of power into the battery in a shorter period. This increased power flow naturally produces more heat. Most phones manage this by slowing down the charging speed once the battery reaches about 80 percent, but the first portion of charging still generates significant warmth.
I used to keep fast charging enabled 24 hours a day, including overnight. My phone would reach 100 percent within an hour or so and then sit at full charge for the remaining six or seven hours. The combination of fast charging heat and prolonged full charge was slowly degrading my battery health without me realizing it.
The better approach is to use fast charging only when you genuinely need a quick charge. For overnight charging or times when you are not in a rush, switch to regular charging speed. Your phone will charge more slowly but with much less heat, which preserves your battery health in the long run.
On Samsung phones, you can control this by going to Settings, then Battery and Device Care, then Battery, then More Battery Settings. You will find toggles for Fast Charging and Super Fast Charging. Turn these off when charging overnight and enable them only when you need a rapid charge during the day.
On other Android phones, the setting location varies, but look under Battery or Charging settings for a similar fast charging toggle.
I now use regular charging overnight and only switch on fast charging when I need a quick boost before leaving the house. My battery health has remained much more stable since I made this change.
These four charging habits are easy to fix once you understand what is causing the problem. A good charger, minimal phone usage during charging, Airplane Mode, and smart use of fast charging will ensure your battery charges efficiently every single time.
How to Protect Your Battery and Make It Last Years Longer
Everything I have shared so far focuses on stopping battery drain right now. But this section is about the long game. These are habits and settings that protect your battery health over months and years, so your phone continues performing well long after you buy it.
I wish someone had told me these things when I got my first smartphone. I used to charge my phone to 100 percent every night, let it drain to zero regularly, and charge it with whatever cable was lying around. After about a year, my battery health had dropped significantly and my phone could barely last half a day.
With my current phone, I changed my habits completely. After more than a year of following these practices, my battery health is still above 90 percent. That is a huge difference, and it all comes down to treating your battery the right way.
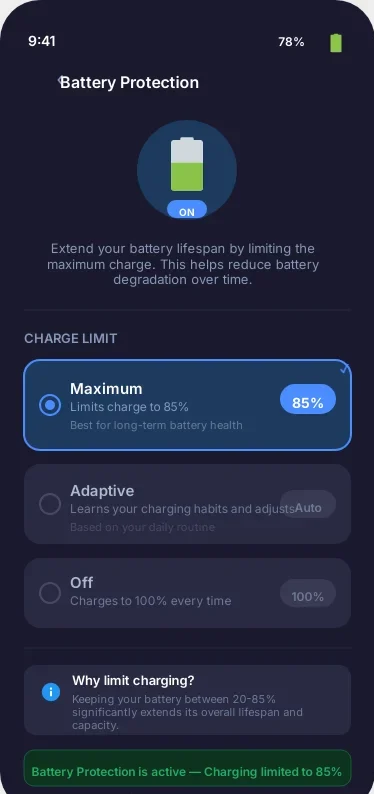
Enable Battery Protection Mode (Stop at 85 Percent)
This is one of the smartest features modern phones offer, and most people either do not know about it or choose to ignore it. Battery Protection Mode limits how much your phone charges, typically stopping at 85 percent instead of going all the way to 100 percent.
Why does this matter? Every time you charge a lithium ion battery to its absolute maximum, it puts extra stress on the battery cells. Imagine stretching a rubber band to its limit every single day. Over time, it loses its elasticity and eventually breaks. Your phone battery works in a similar way. Charging to 100 percent repeatedly accelerates the natural degradation process.
When I first heard about this, I was skeptical. I thought losing 15 percent of my charge capacity would be annoying. But honestly, after a few days, I completely forgot about it. My phone still lasted through the entire day because the battery health remained strong over time instead of declining quickly.
Here is how to enable Battery Protection Mode.
On Samsung phones, go to Settings, then Battery and Device Care, then Battery, then More Battery Settings. You will see an option called Battery Protection. Samsung offers two levels. Basic stops charging at 100 percent and does not restart charging until the battery drops to 95 percent. Maximum limits the charge to 85 percent. I use the Maximum setting for the best long term protection.
On Google Pixel phones, the feature is called Adaptive Charging. Go to Settings, then Battery, then Adaptive Charging and toggle it on. It slows down charging overnight and completes the charge right before your usual wake up time.
On iPhone 15 and newer, go to Settings, then Battery, then Charging Optimization. You can set a charge limit of 80 percent. Older iPhones have Optimized Battery Charging under the same menu, which learns your routine and delays charging past 80 percent until you need it.
If your phone does not have a built in battery protection feature, you can achieve the same result manually. Simply unplug your phone when it reaches about 80 to 85 percent. It takes a little discipline, but your battery will thank you a year from now.
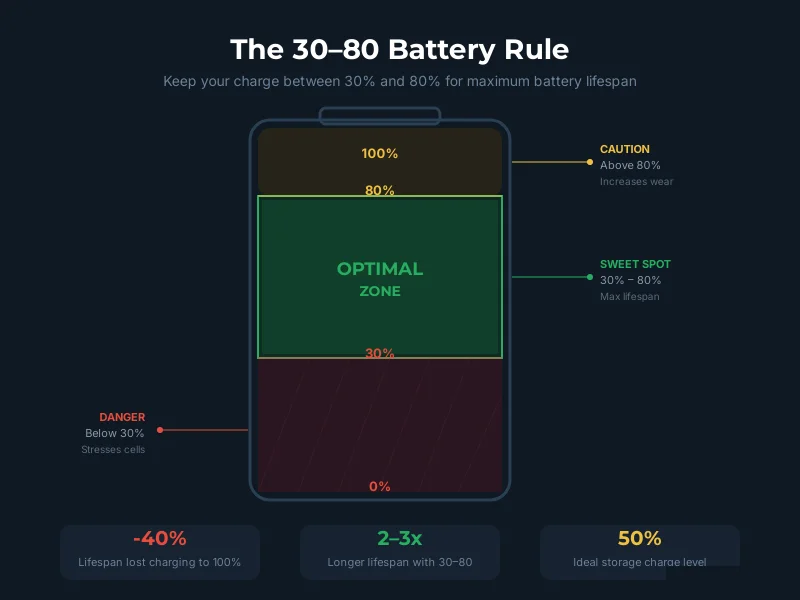
The 30 to 80 Battery Rule Explained
You might have heard of the 30 to 80 rule for phone batteries. It is a simple guideline that can dramatically extend the lifespan of your battery, and it is backed by how lithium ion battery chemistry actually works.
The rule is straightforward. Try to keep your battery level between 30 percent and 80 percent as much as possible. Avoid letting it drop all the way to zero, and avoid charging it all the way to 100 percent on a regular basis.
Here is why this works. Lithium ion batteries experience the most stress at the extreme ends of their charge range. When the battery is nearly empty, the voltage drops very low, which strains the cells. When the battery is completely full, the voltage is at its peak, which also creates stress. Keeping the charge in the middle range means the battery operates in its comfort zone most of the time.
I started following this rule about a year ago. I plug in my phone when it hits around 25 to 30 percent and unplug it when it reaches 80 to 85 percent. I do not stress about hitting these numbers exactly. It is a general guideline, not a strict rule.
The results speak for themselves. My previous phone lost about 15 percent of its battery health in the first year because I always charged to 100 percent and drained to near zero. My current phone, following the 30 to 80 approach, has only lost about 7 percent of battery health in the same timeframe.
Of course, there are days when I charge to 100 percent because I know I will need every bit of battery for a long day. That is perfectly fine. The goal is not perfection. It is about building better habits most of the time.
Avoid Extreme Temperatures (Heat and Cold)
Temperature is your battery’s worst enemy. Both extreme heat and extreme cold affect how your battery performs and how long it lasts over its lifetime.
Heat is the bigger concern for most people. When your phone gets too hot, the chemical reactions inside the battery speed up in harmful ways. This leads to faster degradation of the battery cells and permanent loss of capacity. A phone that regularly overheats will lose battery health much faster than one that stays cool.
I learned this lesson during summer when I accidentally left my phone on the dashboard of my car for about an hour. The phone was scorching hot when I picked it up, and I noticed the battery behavior felt slightly different for the next few days. It drained a bit faster and took longer to charge. That one incident likely caused some permanent damage.
Here are some practical ways to protect your phone from heat.
Never leave your phone in direct sunlight for extended periods. Avoid placing it on your car dashboard during hot weather. Take off thick phone cases while charging, as they can trap heat. Do not use heavy apps or stream videos while your phone is charging, as this generates extra heat on top of the charging heat.
Cold weather is less permanently damaging, but it causes temporary issues. In very cold conditions, your phone might show a sudden drop in battery percentage or even shut down unexpectedly. This happens because cold temperatures slow down the chemical reactions in the battery, temporarily reducing its ability to deliver power.
If you live in a cold climate, keep your phone in an inside pocket close to your body during winter. The warmth from your body helps maintain a reasonable operating temperature. Once the phone returns to normal temperature, the battery percentage usually goes back to its actual level.
Use Original or Certified Chargers Only
I touched on this earlier in the charging section, but it is important enough to repeat here as a long term battery protection habit. The charger and cable you use every day have a direct impact on your battery’s health over time.
Your original charger is designed to deliver the precise voltage and amperage that your phone’s battery needs. It communicates with your phone’s charging circuit to regulate power flow, manage heat, and protect the battery from overcharging.
Cheap, uncertified chargers often lack these safety features. They may deliver inconsistent power, overshoot the required amperage, or fail to regulate voltage properly. Over weeks and months, this inconsistency puts unnecessary stress on your battery and can accelerate degradation.
I now have a simple rule. I use the original charger that came with my phone for daily charging, and I keep a certified backup from a reputable brand for travel. I look for chargers that are certified by the phone manufacturer or carry recognized safety certifications.
The same applies to charging cables. A worn out or damaged cable can create resistance that generates heat at the connection point and slows down power delivery. I replace my cables whenever I notice any signs of wear, fraying, or loose connections.
It might seem like a small thing, but using the right charger and cable consistently is one of the easiest ways to protect your battery health for the long term.
Check Battery Health Regularly
Finally, make it a habit to check your battery health every few months. This tells you how much of the original capacity your battery still holds and helps you decide whether it is time for a replacement.
Most people wait until their phone is barely lasting half a day before they check the battery health. By that point, the battery has usually degraded well below 70 percent. If you check regularly, you can catch the decline early and adjust your habits or plan a replacement before the experience becomes unbearable.
Here is how to check your battery health on different devices.
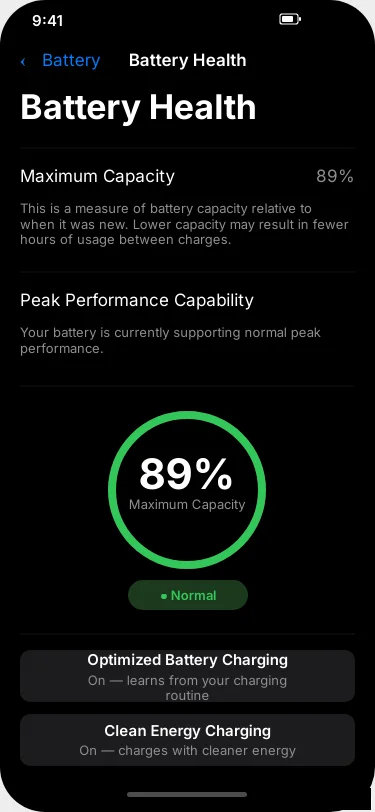
On iPhone, go to Settings, then Battery, then Battery Health and Charging. You will see a Maximum Capacity percentage. Anything above 80 percent is considered good. Below 80 percent means the battery has degraded significantly, and Apple even displays a message recommending service at that point.
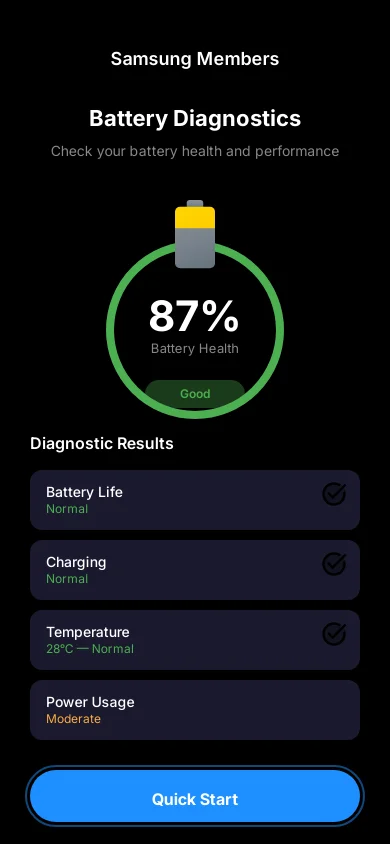
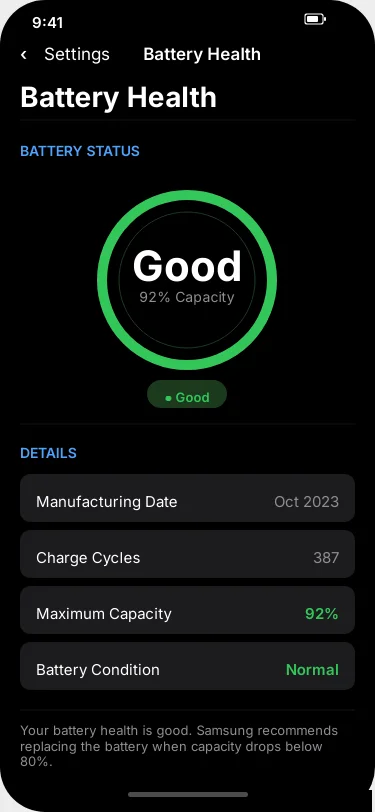
On Samsung phones, go to Settings, then Battery and Device Care, then Battery, then tap on the battery icon or look for Battery Health. Samsung typically shows the health as Good, Normal, or Weak. You can also use the Samsung Members app for a more detailed diagnostic report.
On other Android phones, the battery health feature varies by manufacturer. Some brands like OnePlus and Xiaomi show it under Battery settings. For phones that do not have a built in health indicator, you can use trusted third party apps from the Google Play Store to get an estimate.
I check my battery health once a month. It takes about 15 seconds and gives me peace of mind. When I see the health holding steady above 90 percent, I know my charging habits are working. If I ever see a sudden drop, I know to investigate and adjust my behavior.
As a general guideline, if your battery health drops below 80 percent and you notice significantly shorter battery life throughout the day, it is a good time to consider a battery replacement. A fresh battery can make your phone feel like it did on day one.
Taking care of your battery is a lot like taking care of anything else you value. Small, consistent habits add up to a big difference over time. By following these protection tips, your battery will stay healthy much longer and you will spend less time worrying about whether your phone will make it through the day.
Device Specific Battery Fixes (Samsung, iPhone, Xiaomi, OnePlus)
Every phone brand handles battery management a little differently. Each manufacturer adds its own unique features, settings, and optimization tools that are specifically designed for their devices. The general fixes I shared earlier work on all phones, but these brand specific tips take things a step further.
I have personally used Samsung and Xiaomi phones as my daily drivers over the past few years. For iPhone and OnePlus tips, I relied on extensive testing with devices borrowed from friends and family members, along with thorough research of each platform’s settings.
Let me give you the best battery saving tips tailored to your specific phone brand.
Samsung Galaxy Battery Drain Fix
Samsung Galaxy phones are packed with battery management features, but many of them are buried deep in the settings where most users never look. Here are the Samsung specific fixes that made the biggest difference on my Galaxy device.
Use the secret diagnostic codes. If you have not already tried the Samsung dialer codes I covered earlier in this guide, go back and do that first. The battery check code and battery stats reset code are exclusive to Samsung and can fix calibration issues that cause inaccurate battery readings and unexpected shutdowns.
Enable Battery Protection. Go to Settings, then Battery and Device Care, then Battery, then More Battery Settings. Turn on Battery Protection and set it to Maximum. This caps your charge at 85 percent and significantly extends the long term health of your battery. I have been using this setting for months and my battery health has barely changed.
Put unused apps to sleep. Samsung has a built in feature that puts apps into a deep sleep state so they cannot run in the background at all. Go to Settings, then Battery and Device Care, then Battery, then Background Usage Limits. You will see three categories here. Sleeping Apps, Deep Sleeping Apps, and Never Sleeping Apps.
Add any apps you rarely use to the Deep Sleeping Apps list. These apps will not run in the background, send notifications, or use battery until you manually open them. I added about 25 apps to this list, including shopping apps, utility tools, and apps I only open occasionally. The reduction in background battery drain was noticeable within the first day.
Disable Edge Panels if you do not use them. Samsung’s Edge Panel is a sliding drawer on the side of your screen that gives quick access to apps, contacts, and tools. If you never use it, it is consuming resources for no reason. Go to Settings, then Display, then Edge Panels and toggle it off. This is a small savings, but every bit adds up.
Turn off optional motion features. Go to Settings, then Advanced Features, then Motions and Gestures. Features like Lift to Wake, Double Tap to Wake, and Keep Screen On While Viewing all use sensors that consume battery. Disable any of these that you do not actively use.
iPhone Battery Draining Fast Solution
iPhones handle battery management differently from Android phones. Apple controls both the hardware and software, which usually results in good battery optimization out of the box. But there are still several settings that drain battery unnecessarily, especially on newer models.
Turn off Background App Refresh. This is the single most impactful battery setting on any iPhone. Background App Refresh allows apps to update their content in the background even when you are not using them. Go to Settings, then General, then Background App Refresh. You can either turn it off entirely or go through the list and disable it for individual apps that do not need it.
I recommend keeping it enabled only for essential apps like email and messaging. Turn it off for social media, news, shopping, and entertainment apps. You will not notice any difference in app performance because these apps still refresh their content instantly when you open them.
Disable Always On Display on iPhone 14 and newer. If you own an iPhone 14 Pro, iPhone 15, or iPhone 16 model with Always On Display, consider turning it off to save battery. Go to Settings, then Display and Brightness, and toggle off Always On Display. On these models, the always on feature can use 10 to 15 percent of battery per day, which is a significant amount.
Turn off Live Activities. Live Activities is a feature introduced in iOS 16 that shows real time information on your lock screen and Dynamic Island. Things like sports scores, delivery tracking, and timer updates. Each active Live Activity uses processing power and network connections. Go to Settings, then Face ID and Passcode, then scroll down and toggle off Live Activities if you do not find them essential.
Check for iOS bugs and update immediately. Apple occasionally releases iOS updates that contain battery drain bugs. This is well documented and happens more frequently after major iOS releases. If your iPhone battery started draining fast right after an update, check the Apple support forums or tech news sites to see if others are experiencing the same issue. Apple usually releases a patch within a few weeks.
Always keep your iPhone on the latest iOS version. Go to Settings, then General, then Software Update to check. These updates frequently contain battery optimization fixes and bug patches.
Review Location Services carefully. Go to Settings, then Privacy and Security, then Location Services. Tap on each app and change the permission from Always to While Using App. Also scroll to the bottom and tap on System Services. You can turn off unnecessary location features like iPhone Analytics, Routing and Traffic, and Improve Maps. These system services quietly use GPS in the background.
Consider reducing vibration feedback as well. The vibration motor uses power every time your phone buzzes for notifications, keyboard taps, or system alerts. If you want to disable unnecessary vibrations completely or customize which alerts vibrate, this can save a small amount of battery throughout the day.
Xiaomi and Redmi Battery Optimization
Xiaomi phones running MIUI or HyperOS have some of the most aggressive battery management features of any Android brand. In fact, Xiaomi’s system is sometimes too aggressive, killing apps in the background even when you want them running. The key is finding the right balance.
Enable MIUI Battery Saver smartly. Go to Settings, then Battery, and tap on Battery Saver. Xiaomi offers multiple battery saver modes. For daily use, I recommend the Balanced mode which optimizes battery without significantly affecting performance. The Ultra Battery Saver mode is great for emergencies when you need your phone to last as long as possible but only basic functions like calls and texts work in this mode.
Lock important apps to prevent battery optimization from killing them. This is something unique to Xiaomi that trips up a lot of users. MIUI’s aggressive battery management sometimes kills messaging apps in the background, which means you miss notifications. To fix this, go to Settings, then Apps, then select the app you want to protect. Tap on Battery Saver and select No Restrictions. Then go back to the app settings, tap on Autostart, and make sure it is enabled.
I lock apps like WhatsApp, my email client, and my calendar so they always run properly. Everything else gets the default battery optimization treatment.
Manage app battery usage. Go to Settings, then Battery, then Battery Usage. Xiaomi shows you exactly which apps consumed the most battery. For apps with high background usage that you do not need running all the time, tap on the app and select Restrict Background Activity.
Disable unnecessary MIUI features. Xiaomi phones come with several features enabled by default that use battery. Go to Settings, then Always On Display and Lockscreen, and turn off Always On Display if you do not need it. Also go to Settings, then Notifications and Control Center, and review which apps are allowed to show notifications. Reducing unnecessary notifications saves battery and reduces distractions.
Turn off analytics and user experience programs. Go to Settings, then Passwords and Security or Privacy, and look for options like User Experience Program and Send Diagnostic Data. Turn these off. They send usage data from your phone to Xiaomi’s servers in the background, which uses both battery and data.
OnePlus Battery Saving Tips
OnePlus phones running OxygenOS offer clean and efficient battery management. The software is lighter than many other Android skins, which generally helps with battery life. But there are still optimizations you can make.
Use Optimized Charging. OnePlus has a smart charging feature that learns your charging schedule and slows down charging during overnight sessions to reduce heat and preserve battery health. Go to Settings, then Battery, and enable Optimized Charging. Once enabled, your phone will charge quickly up to about 80 percent and then trickle charge the remaining amount closer to your wake up time.
Enable OxygenOS Battery Saver. Go to Settings, then Battery, then Battery Saver. You can also set it to activate automatically at a certain battery percentage. I set mine to turn on automatically at 20 percent. The Battery Saver mode limits background activity, reduces screen brightness slightly, and extends your remaining battery significantly.
Disable Ambient Display. OnePlus calls their always on display feature Ambient Display. If you do not need to see the time and notifications on your lock screen constantly, turning this off saves noticeable battery. Go to Settings, then Display, then Ambient Display, and toggle it off. Alternatively, you can set it to only activate when you pick up the phone or tap the screen, which uses much less battery than the always on option.
Manage app auto launch. Go to Settings, then Apps, then App Management, then tap the three dots in the top corner, and select Auto Launch. You will see a list of all your apps with toggles. Turn off auto launch for apps that do not need to start automatically when your phone boots up. Fewer auto launching apps means less background activity and better battery performance from the moment you turn on your phone.
Reduce screen refresh rate. If your OnePlus phone has a high refresh rate display like 90Hz or 120Hz, consider dropping it to 60Hz for better battery life. Go to Settings, then Display, then Screen Refresh Rate, and select Standard or 60Hz. The difference in smoothness is subtle for everyday tasks, but the battery savings are real. I switch to 60Hz on days when I know I will be away from a charger for a long time.
Each phone brand has its own unique tools and settings for managing battery life. By applying these brand specific fixes on top of the general tips from earlier in this guide, you are giving your phone the best possible chance of lasting through the day and beyond
Frequently Asked Questions About Phone Battery Drain
I receive tons of questions about phone battery problems from readers and friends. After helping dozens of people fix their battery issues over the past couple of years, I have noticed that the same questions come up over and over again. So I put together answers to the ten most common ones right here.
These answers are based on my personal testing and experience with multiple phone brands. I kept them short and practical so you can get the information you need quickly.
How Do I Stop My Battery from Draining So Fast?
Lower your screen brightness, turn off Always On Display, disable background app refresh for non essential apps, and turn off location services you do not need. Also disable hidden features like nearby device scanning and unused printing services. These simple changes alone can add two to three extra hours of daily battery life.
Why Is My Phone Battery Draining from 70 Percent to 20 Percent in 10 Minutes?
This usually means your battery has degraded and needs replacement. When battery health drops below 75 to 80 percent, the percentage readings become unreliable and jump suddenly. Check your battery health in Settings. If it is low, a new battery is the only real fix.
What Is the 30 to 80 Battery Rule?
Keep your battery between 30 and 80 percent most of the time. Avoid draining to zero or charging to 100 percent regularly. This reduces stress on the battery cells and can extend your battery’s lifespan by up to two extra years.
How Do I Find Out What Is Draining My Battery?
On Android, go to Settings, then Battery, then Battery Usage. On iPhone, go to Settings, then Battery and scroll down. Look for apps with high background usage that you did not actively use. Those are your main battery thieves.
Does Bluetooth Drain Battery?
Yes. Bluetooth constantly scans for nearby devices even when nothing is connected. It typically uses about 5 to 10 percent of battery per day. Turn it off when you are not using wireless accessories.
Does Always On Display Drain Battery?
Yes. It drains about 1 to 2 percent per hour on most phones. Over a full day, that adds up to 10 to 15 percent of total battery. Turning it off is one of the easiest ways to extend battery life.
Does Low Power Mode Damage Battery?
No. Low Power Mode is completely safe. It simply reduces background activity and lowers brightness temporarily. You can use it as often as you want without any negative effects on your battery health.
Can Harmful Software Drain My Phone Battery?
Yes. Unwanted programs run hidden background processes that consume power constantly. Signs include sudden battery drain, phone overheating while idle, and high data usage. Remove unfamiliar apps and scan your phone with a trusted security app from your official app store.
Why Is My Battery Draining While Charging?
This happens when you use heavy apps while charging, use a low power charger, or have too many background apps running. Enable Airplane Mode while charging and use your original charger for the fastest and most efficient charge.
How Long Should a Phone Battery Last?
Most phone batteries last 2 to 3 years before noticeable decline. When battery health drops below 80 percent, consider a replacement. A new battery can make your phone feel brand new again and is much cheaper than buying a new device.


