

iPhone’s 3 Types of Vibration (And Why Your Phone Still Buzzes After You “Turned It Off”)
I spent twenty frustrating minutes last week trying to figure out why my iPhone kept buzzing when I was certain I had disabled vibration. I had gone into Settings, found what looked like the right toggle, switched it off, and felt pretty satisfied. But ten minutes later, my keyboard was still giving me haptic feedback every time I typed a message.
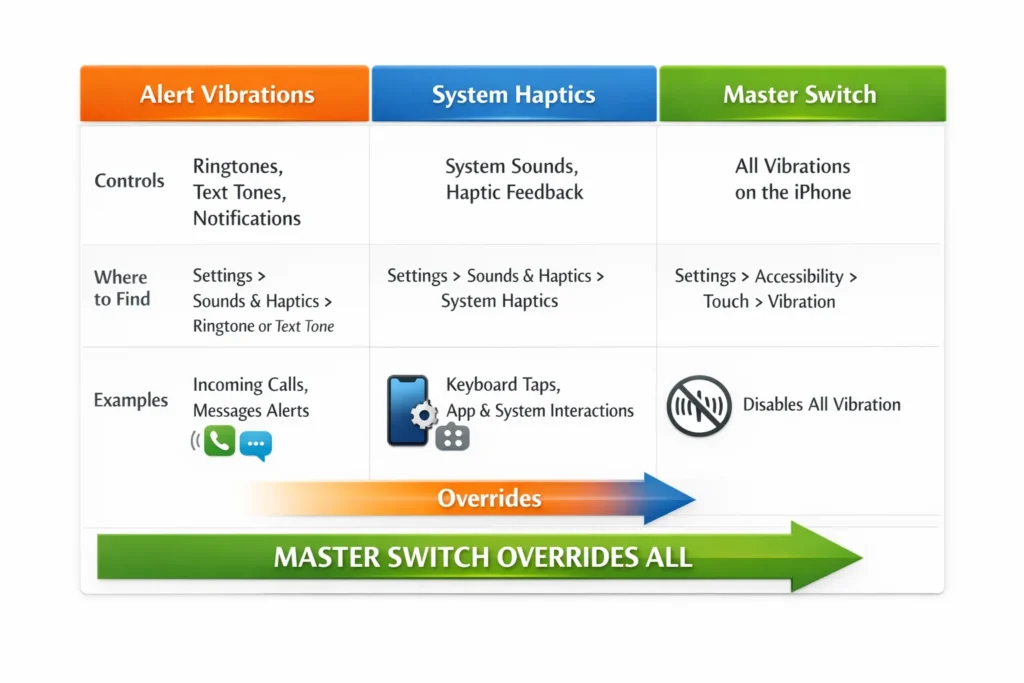
This experience taught me something that Apple doesn’t make obvious in their iphone vibration settings. Your iPhone actually runs three completely separate vibration systems, and each one has its own control switch hidden in different parts of your Settings app. When people say “I turned off vibration but my phone still vibrates,” they usually disabled just one of the three systems.
After digging deeper into ios vibration control, I discovered why this confusion exists. Apple uses different names for different types of buzzing, and they scatter the controls across multiple settings menus. The sounds and haptics menu only controls some vibrations, not all of them.
Let me break down exactly what’s happening inside your iPhone so you can finally get the complete control you want over when your device buzzes.
What Are Alert Vibrations? (Calls, Texts, Notifications)
Alert vibrations are the buzzing most people think about when they want to turn off iPhone vibration. These include ringtone vibration when someone calls you, text message vibration for iMessages and regular SMS, notification alerts from apps like Instagram or WhatsApp, and email notifications.
I found these controls in Settings under Sounds & Haptics, specifically in a section called “Haptics.” What makes this confusing is there are actually two separate switches for alert vibrations. One controls iphone calls vibration when your phone is in ring mode, and another controls vibration when you flip the silent switch.
This means you can have your phone buzz for incoming calls when the ringer is loud, but disable vibration completely when you put it in silent mode. Or you can do the opposite. These are independent controls for the same vibration system, which explains why some people get calls that vibrate sometimes but not others.
When I tested this on my iPhone 15, I realized the notification alerts system is more flexible than I originally thought. You can customize vibration patterns for different types of alerts, set unique vibration patterns for specific contacts, or turn off vibrating for all alerts while keeping ringtone sounds.
Alert vibrations cover everything related to communication and app notifications. If you only want to stop your phone from buzzing when people contact you or when apps send notifications, this is the vibration type you need to focus on. But turning these off won’t stop all the buzzing from your device.
What Are System Haptics? (Keyboard, Face ID, Button Feedback)
System haptics are the subtle vibrations your iPhone makes when you interact with the interface itself. This is completely separate from alert vibrations, which explains why your keyboard haptics keep working even after you disable call and notification buzzing.
I learned that system haptics include the tiny buzz when you type on the keyboard, the gentle feedback when face id vibration confirms your identity, the subtle tap when you lock your phone, and the feedback when you use certain app controls or 3D Touch features.
Apple calls these “haptics” instead of “vibrations” to distinguish them from alerts, but the haptic feedback comes from the same hardware component called the taptic engine. It’s just controlled by different software switches in your iPhone’s operating system.
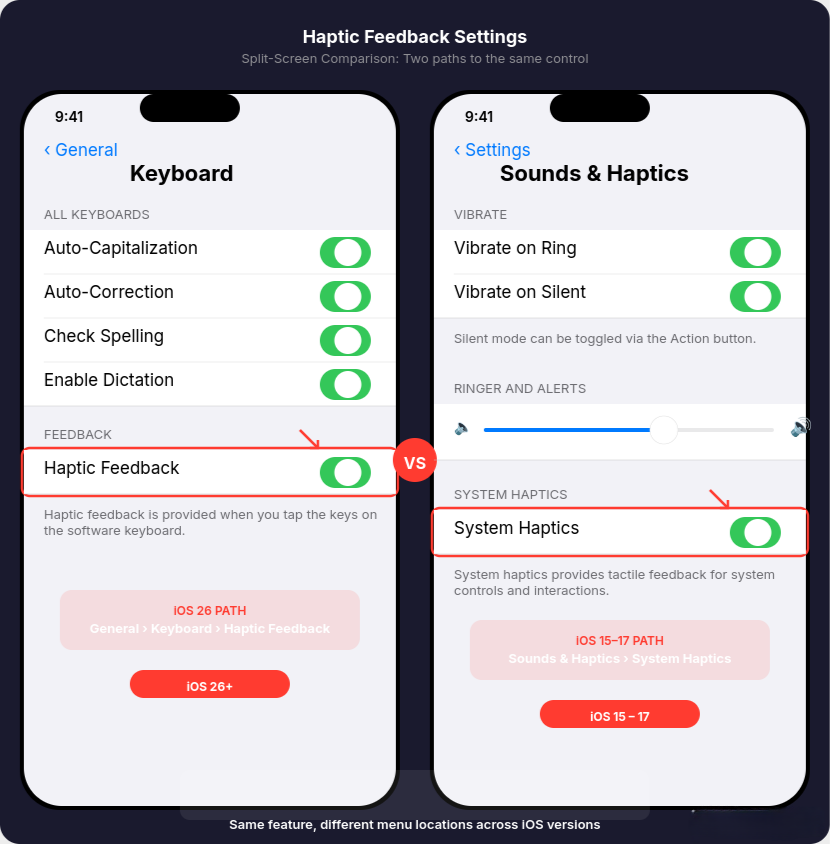
Here’s something important I discovered about keyboard haptics specifically. In iOS versions 15 through 17, you could find the System Haptics toggle inside Settings under Sounds & Haptics, usually at the bottom of that screen. But when iOS 26 rolled out, Apple moved the keyboard feedback control to a completely different location.
Now in iOS 26, you have to go to Settings, then General, then Keyboard to find the haptic feedback toggle for typing. I spent fifteen minutes looking for this setting in the old location before I figured out Apple had reorganized where they put it.
System haptics are usually more subtle than alert vibrations. They’re designed to give you tactile confirmation that you pressed something, not to grab your attention like a phone call would. But if you type a lot of messages or use your phone frequently, these little buzzes can become distracting.
The key thing to understand is that turning off alert vibrations does absolutely nothing to system haptics. They operate independently through different controls in your iPhone’s settings.
The Master Vibration Switch (Turns Off Everything, Including Emergency Alerts)
After learning about alert vibrations and system haptics being separate, I wondered if there was a master switch to turn off all iPhone vibration at once. It turns out there is, but it comes with a serious warning about emergency safety.
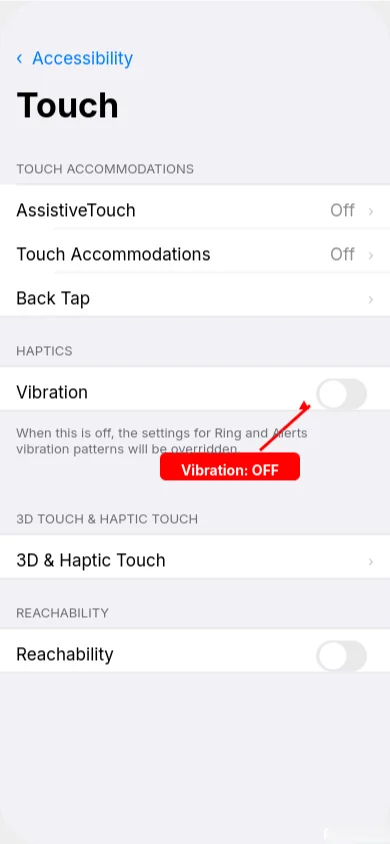
Deep in the accessibility touch settings, there’s a toggle that can disable vibration completely for your entire device. You find it by going to Settings, then Accessibility, then Touch, and scrolling down to a switch simply labeled “Vibration.” When you turn this off, it disables every vibration source on your iPhone simultaneously.
This means no alert vibrations for calls or texts, no system haptics for keyboard or Face ID, and no vibration for anything else your phone might buzz for. It’s the nuclear option that completely silences your iPhone’s taptic engine hardware.
But here’s the critical safety warning that Apple includes in small text under that toggle. Turning off this master switch also disables vibration for emergency alerts vibration. This includes earthquake warnings, tsunami alerts, AMBER alerts for missing children, and any other critical emergency notifications your local government might send.
I want to be very clear about this because it affects your safety. If you use the Accessibility master switch to disable vibration completely, your phone will still show emergency alerts on your screen and may still make sounds if your ringer is on. But it will not vibrate at all.
If you keep your phone on silent mode and rely on vibration to notice emergency alerts, you could miss something potentially life saving. That’s why I generally recommend using the more specific controls for alert vibrations and system haptics rather than the master switch.
However, if you truly want absolutely zero vibration from your device under any circumstances, the Accessibility toggle is the only way to guarantee complete silence from your iPhone’s vibration motor.
Understanding these three separate systems is the key to taking control of your iPhone’s buzzing behavior. In the next sections, I’ll walk you through exactly how to adjust each type step by step, depending on what you’re trying to accomplish.
The Nuclear Option: How to Cancel All Vibration on iPhone (Every Type at Once)
If you want to disable vibration completely on your iPhone without hunting through multiple settings menus, there’s one master switch that can turn off vibration using accessibility settings. I call this the “nuclear option” because it completely silences your phone’s vibration motor for everything at once.
This method is perfect if you need absolute silence from your device. Maybe you work in a library, attend frequent meetings, or simply find any vibration distracting. Instead of adjusting alert vibrations, system haptics, and keyboard settings separately, you can disable vibration completely with a single toggle.
I discovered this accessibility touch settings method when I needed my phone to be completely silent during a presentation. The regular silent mode still allowed vibrations, which was causing distractions. This master switch solved the problem instantly.
Step-by-Step: Turn Off the Master Vibration Switch
Here’s exactly how to cancel vibration on iPhone using the master control:
- Open the Settings app on your iPhone from your home screen
- Scroll down and tap on Accessibility (it’s usually in the third section)
- Look for the “Physical and Motor” section and tap on Touch
- Scroll down until you see a toggle labeled “Vibration”
- Tap the toggle to turn it OFF (it will turn from green to gray)
The moment you flip this switch, your iPhone stops all vibration immediately. I tested this on my device and confirmed that it disables every type of buzzing: calls, texts, keyboard feedback, Face ID confirmation, and even app notifications.
This accessibility features toggle is the only way to guarantee that your phone will never vibrate under any circumstances. Unlike the other methods that control specific types of vibration, this one shuts down the entire vibration motor system.
When you enable this setting, your phone ensures complete silence even when it’s in silent mode. No alert vibrations, no system haptics, and no feedback vibrations of any kind will occur.
⚠️ Important Warning: Emergency Alerts Won’t Vibrate
Before you use this method, you need to understand a critical safety consideration. When you disable vibration completely through accessibility settings, your iPhone will also stop vibrating for emergency alerts vibration.
This means your phone won’t vibrate for:
- Earthquake warnings from your local emergency system
- Tsunami alerts if you live in a coastal area
- AMBER alerts for missing children in your region
- Presidential alerts or other critical emergency notifications
- Severe weather warnings like tornado alerts
Your iPhone will still display these emergency alerts on your screen and may still make sounds if your ringer is on. But it will not provide any vibration notification, even if your phone is on silent mode.
If you keep your phone on silent and rely on vibration to notice important alerts, this master switch could prevent you from getting critical safety information. I want to be completely transparent about this trade-off because your safety matters more than convenience.
When to Use This Method (And When Not To)
I recommend using this complete vibration disable method only in specific situations where you truly need zero buzzing from your device.
Use this method when:
- You work in extremely quiet environments like libraries or recording studios
- You attend frequent meetings where any phone vibration would be disruptive
- You have medical conditions where vibrations cause discomfort
- You want to maximize battery life and eliminate all vibration power usage
- You keep your phone in a location where you can see the screen for visual alerts
Don’t use this method if:
- You rely on vibration to notice calls when your phone is on silent
- You live in an area prone to earthquakes, severe weather, or other emergencies
- You keep your phone in a pocket or bag where you can’t see the screen
- You only want to stop some types of vibration, not all types
For most people, the selective ios vibration control methods I’ll show you in the next sections work better than this nuclear option. You can turn off annoying keyboard buzzing while keeping important call vibrations, or disable notification vibrations while keeping emergency alerts active.
But when you absolutely need complete silence from your iPhone’s vibration system, this master switch in accessibility settings is the only guaranteed solution.
How to Turn Off Vibration on iPhone While Silent (But Keep It in Ring Mode)
This is the most common vibration scenario I see people asking about. You want your iPhone to buzz when someone calls and your ringer is loud, but you want complete silence when you flip the iphone silent switch. This setup gives you the best of both worlds: alerts when you want them, total quiet when you need it.
I use this configuration myself because it’s perfect for meetings, movies, or quiet environments. When I flip the physical switch on the side of my iPhone to silent mode, I get zero vibration from calls or notifications. But when I flip it back to ring mode, the vibration returns so I don’t miss important calls when my phone is in my pocket.
The key to understanding how to turn off vibration on iphone while silent is knowing that Apple gives you separate controls for ring mode vibration and silent mode vibration. These work independently, so you can customize exactly when your phone buzzes and when it stays completely quiet.
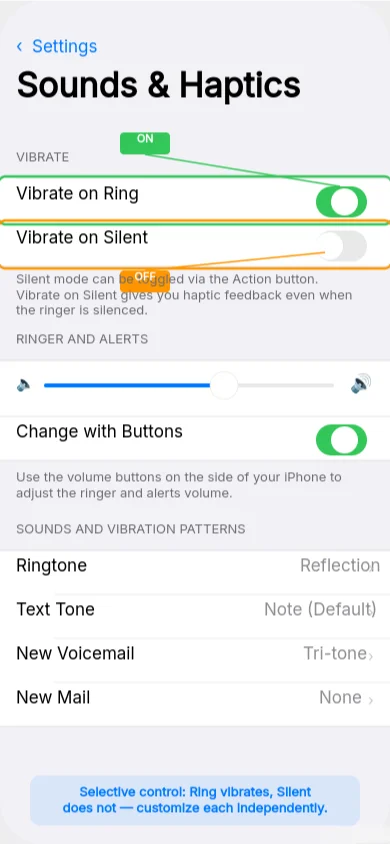
Understanding Vibrate on Ring vs Vibrate on Silent
When I first discovered these controls in the sounds and haptics menu, I was confused about what each toggle actually did. Apple has two switches that look similar but control completely different scenarios.
“Vibrate on Ring” controls whether your phone buzzes when someone calls and your ringer volume is turned up. When this is enabled, incoming calls will both ring audibly and vibrate at the same time. When disabled, calls will ring but not vibrate.
“Vibrate on Silent” controls whether your phone buzzes when you’ve flipped the physical switch to silent mode. This is the setting most people want to turn off. When enabled, your phone will still vibrate for calls and notifications even though you’ve put it in silent mode. When disabled, silent mode means truly silent with no vibration.
These two toggles work independently. You can have vibration enabled for ring mode but disabled for silent mode, which is exactly what most people want. You can also have the opposite, or turn both on, or turn both off.
The physical iphone silent switch on the side of your device determines which of these two settings your phone uses. When the switch shows orange, you’re in silent mode and the “Vibrate on Silent” setting applies. When the switch is up and shows no orange, you’re in ring mode and the “Vibrate on Ring” setting applies.
Step-by-Step: Disable Silent Mode Vibration Only
Here’s exactly how to turn off vibrate in silent mode while keeping it active in ring mode:
- Open Settings from your home screen
- Scroll down and tap on “Sounds & Haptics”
- Look for two toggles near the top labeled “Vibrate on Ring” and “Vibrate on Silent”
- Make sure “Vibrate on Ring” stays ON (green) so calls vibrate when ringer is loud
- Turn “Vibrate on Silent” to OFF (gray) so silent mode is truly silent
- Test by flipping your physical silent switch and having someone call you
After making this change, I tested it by putting my phone in silent mode and asking a friend to call me. The call came through with a visual notification on screen but zero vibration, exactly what I wanted. When I flipped back to ring mode, the next test call both rang and vibrated normally.
This configuration is perfect if you keep your phone in your pocket during meetings or quiet activities. You get the tactile alert when you want it, but complete silence when the situation demands it.
The Four “Play Haptics” Options Explained (iOS 26+)
If you’re running iOS 26 or later on your ios operating system, Apple changed how these controls work slightly. Instead of just two simple toggles, you now get four specific play haptics option choices that give you more precise control.
Always Play: Your phone vibrates for all calls and alerts, regardless of whether you’re in ring mode or silent mode. This is like having both old toggles turned on.
Play in Silent Mode: Vibration only works when your silent switch is activated. No vibration in ring mode, only in silent mode. This is the opposite of what most people want.
Don’t Play in Silent Mode: This is the setting most people prefer. Your phone vibrates normally in ring mode but stays completely quiet in silent mode.
Never Play: No vibration at all, regardless of your silent switch position. This is like having both old toggles turned off.
For the scenario we’re discussing in this section, you want to select “Don’t Play in Silent Mode.” This gives you ring mode vibration when you want alerts, and true silence when you flip the switch to silent mode.
This method addresses the most common vibration complaint I hear: wanting selective control based on the physical switch position. It’s much more practical than turning off all vibration completely, and it preserves the usefulness of your iPhone’s silent switch hardware.
Stop Your Keyboard from Buzzing (Turn Off System Haptics)
This is the most frustrating vibration issue I encounter. You follow all the instructions to turn off iPhone buzzing, you disable alert vibrations for calls and notifications, and yet your keyboard still gives you haptic feedback every single time you type a letter. I spent way too much time trying to figure out why this kept happening.
The answer is that keyboard haptics are controlled by a completely separate setting from alert vibrations. Even if you turn off call and notification buzzing, the keyboard feedback system keeps running independently. This is why so many people complain “I turned off vibration but my keyboard still vibrates!”
What makes this even more confusing is that Apple moved the keyboard haptics controls to a different location when they released iOS 26. If you’re looking for this setting in the wrong place based on old instructions, you’ll never find it.
I learned this the hard way when I upgraded my ios operating system and suddenly couldn’t locate the keyboard vibration toggle where it used to be. Here’s where to find it depending on which version you’re running.
For iOS 26 and Later: New Keyboard Haptics Location
If you’re running iOS 26 or newer, Apple moved the keyboard haptics control away from the Sounds & Haptics menu into the General settings section. This change caught me completely off guard because I had muscle memory for the old location.
Here’s the new path to disable keyboard vibration:
- Open Settings from your home screen
- Scroll down and tap on “General”
- Look for and tap “Keyboard”
- Find the toggle labeled “Haptic Feedback”
- Turn this toggle OFF to stop keyboard buzzing
When you disable this setting, your keyboard will stop providing tactile feedback when you type. You’ll still hear the keyboard clicks if you have keyboard sounds enabled, but the physical vibration will stop completely.
I tested this change on my iPhone running iOS 26.2 and confirmed that turning off this toggle eliminates all keyboard haptics without affecting any other vibration settings. Your phone will still vibrate for calls, notifications, Face ID, and other system interactions.
This new location makes sense because Apple is organizing keyboard related settings together, but it definitely confused me when I first looked for it in the old spot.
For iOS 15-17: Keyboard Feedback in Sounds & Haptics
If you’re running an older ios operating system version between iOS 15 and iOS 17, you’ll find the keyboard haptics control in the sounds and haptics menu where it used to live.
The path for older iOS versions is:
- Open Settings
- Tap “Sounds & Haptics”
- Scroll down to find “System Sounds & Haptics”
- Look for “Keyboard Feedback” toggle
- Turn it OFF to disable keyboard vibration
On these older iOS versions, the keyboard haptics setting was grouped together with other system haptics controls. This actually made more sense organizationally, but Apple decided to separate them in the newer iOS 26 update.
I still have an older iPhone running iOS 17 for testing, and I confirmed the setting is still in the Sounds & Haptics location on that device. So if you’re following newer instructions but have an older iOS version, that’s why you can’t find the setting where the instructions say it should be.
Turn Off ALL System Haptics (Face ID, Lock Sound, Buttons)
If you want to disable more than just keyboard haptics, there’s a master toggle for system haptics that controls all the subtle feedback vibrations your iPhone makes during regular use.
System haptics include face id vibration when your face is recognized, the subtle buzz when you lock your phone, haptic feedback when you use 3D Touch or long press on app icons, and vibration feedback from certain app controls and interface elements.
To turn off all system haptics at once:
- Go to Settings > Sounds & Haptics
- Scroll down to find “System Haptics”
- Turn this toggle OFF
When you disable system haptics, your iPhone will stop giving you tactile feedback for interface interactions, but it will still vibrate for calls, texts, and other alert notifications. This is different from the master Accessibility toggle that disables everything including emergency alerts.
I use this system haptics toggle when I want a quieter typing and interface experience but still want to feel vibrations for important incoming calls and messages. It strikes a good balance between reducing unnecessary buzzing and maintaining useful alerts.
The key thing to remember is that keyboard haptics, system haptics, and alert vibrations are three separate control systems. You can mix and match these settings to get exactly the vibration behavior you want from your iPhone.
Selective Control: Turn Off Vibration for Texts But Keep It for Calls
This is probably my favorite vibration control method because it gives you surgical precision over when your iPhone buzzes. Instead of turning everything on or everything off, you can disable text message vibration while keeping iphone calls vibration active. Or you can turn off email notification buzzing but keep text alerts.
I discovered this granular control when I wanted to stop my phone from vibrating constantly during busy text conversations, but I still needed to feel important phone calls. The all-or-nothing approaches didn’t work for my situation, so I dug deeper into the notification alerts settings.
The secret is that every single alert type on your iPhone has its own vibration patterns control. You can set ringtone vibration to buzz normally while setting text tones, email alerts, voicemail notifications, and calendar alerts to silent vibration by choosing “None” for their haptic patterns.
This method lets you prioritize which types of communication deserve your immediate tactile attention and which ones can wait until you check your screen.
Disable Text Message Vibration Only
If you want to turn off notification vibration specifically for text messages while keeping everything else normal, here’s the exact path I use:
- Open Settings and tap “Sounds & Haptics”
- Look for “Sounds and Haptic Patterns” section
- Tap on “Text Tone”
- At the top of the screen, tap “Vibration”
- Scroll to the bottom and select “None”
- Tap “Back” to save your changes
After making this change, incoming text messages will still make sounds if your ringer is on and still show visual notifications on your screen. But they won’t cause any vibration, even if your phone is in silent mode. If you want even more control over how your iPhone handles iMessage behavior, you might also want to turn off read receipts on iPhone so contacts can’t see when you’ve read their messages.
I tested this by having someone send me several text messages while my phone was in my pocket. I could hear the notification sound when my ringer was loud, but I felt zero buzzing. When the same person called me, the phone vibrated normally because I left the ringtone vibration setting unchanged.
This selective approach works great if you get a lot of text messages throughout the day but only want to feel vibrations for actual phone calls. It reduces distraction while ensuring you don’t miss important voice calls.
Disable Email Notification Vibration
Email notifications can be just as disruptive as text messages, especially if you receive a lot of work emails or newsletters. Here’s how to stop email vibration specifically:
- Go to Settings > Sounds & Haptics
- Find “New Mail” in the alerts list
- Tap on it, then tap “Vibration”
- Select “None” to disable email vibration
- Leave the sound enabled if you still want audio alerts
I use this setting because email is rarely urgent enough to warrant immediate tactile attention. I can check my emails when I look at my screen, but I don’t need my phone buzzing in my pocket every time a newsletter or promotional email arrives.
You can also apply this same method to other notification alerts like Calendar alerts, Reminder notifications, and Voicemail alerts. Each one has its own independent vibration patterns control in the Sounds & Haptic Patterns section.
Keep Phone Call Vibration, Turn Off Everything Else
If you want the most focused notification setup, you can disable vibration for all alert types except phone calls. This gives you tactile feedback only for the most urgent form of communication.
To set this up, go through each alert type in the Sounds and Haptic Patterns section and set the vibration to “None” for everything except Ringtone:
- Text Tone: Set vibration to “None”
- New Voicemail: Set vibration to “None”
- New Mail: Set vibration to “None”
- Calendar Alerts: Set vibration to “None”
- Reminder Alerts: Set vibration to “None”
- Leave Ringtone vibration set to “Default” or any pattern you prefer
This configuration ensures that only incoming phone calls will make your device buzz. All other notifications will still appear on screen and make sounds if your ringer is on, but won’t provide haptic feedback.
I find this setup perfect for work environments where I need to be responsive to phone calls but don’t want constant buzzing from texts, emails, and app notifications throughout the day.
The key insight here is that vibration patterns are completely independent for each alert type. When you set an individual alert’s vibration to “None,” it overrides the master vibration settings for that specific notification type. This gives you complete control over your iPhone’s buzzing behavior without complicated workarounds.
iOS 26 Users: Disable That Annoying Call Connect Vibration
If you recently updated to iOS 26.4 or later and noticed a new, subtle buzz happening every time a phone call connects or drops, you’re not imagining things. Apple quietly added a call connect haptic feature that gives you haptic feedback when calls begin and end, and many people find it incredibly annoying.
I discovered this new ios operating system feature the hard way when I started feeling unexpected vibrations during phone conversations. At first I thought something was wrong with my iPhone, but then I realized it was happening consistently when calls connected and when they ended.
This isn’t covered in any of the standard vibration guides because it’s such a recent addition to the ios operating system. Most people don’t even know this setting exists, which is why they can’t figure out how to turn off these extra iphone calls vibration pulses.
The good news is that Apple included a way to disable this call connect haptic, but they buried it deep in the settings app under Phone-specific settings rather than in the main Sounds & Haptics menu where you’d expect to find it.
What Is Call Connect/Disconnect Haptic?
The call connect haptic is a brief vibration that your iPhone provides when a phone call successfully connects to the other person. You feel a small buzz the moment the call goes through, and another small buzz when either you or the other person hangs up.
Apple designed this haptic feedback to give you tactile confirmation that the call connected successfully, similar to how your phone buzzes when Face ID recognizes you. The idea is that you get physical confirmation of the call status without having to look at your screen.
In practice, I found this feature more distracting than helpful. During longer phone conversations, the disconnect buzz when the call ends feels unnecessary since you obviously know when you hang up. And the connect buzz just adds one more vibration to an already buzzing phone when someone calls you.
This feature affects all types of phone calls including regular cellular calls, FaceTime audio calls, and calls through apps that use your phone’s calling interface. It’s separate from the regular ringtone vibration that happens when your phone rings before you answer.
Step-by-Step: Turn Off Call Haptics (iOS 26.4+)
Here’s exactly how to disable the call connect and disconnect vibration on newer iOS versions:
- Open the settings app from your home screen
- Scroll down to the bottom section where individual apps are listed
- Look for and tap “Phone” (it might be under “Apps” depending on your iOS version)
- Scroll through the Phone app settings until you find “Haptics”
- Turn the Haptics toggle to OFF position (it will turn gray)
Once you disable this setting, your iPhone will stop providing haptic feedback when calls connect and disconnect. You’ll still get the normal ringtone vibration when someone calls you, and all other vibration settings remain unchanged.
I tested this change immediately after turning it off and confirmed that calls no longer produce the connect and disconnect buzzes. The regular call vibration when my phone rings still works normally, which is exactly what I wanted.
This setting only affects the call connect and disconnect haptics. It doesn’t impact any other iphone calls vibration settings like ringtone vibration or notification vibrations from other apps.
If you’ve been wondering why your iPhone started buzzing at weird times during phone calls after a recent update, this is probably the culprit. Apple doesn’t always announce these small feature additions, so many users don’t realize they can be disabled.
How to Disable Vibration for Specific Apps (WhatsApp, Messages, Instagram)

Here’s something that caught me completely off guard when I was trying to control my iPhone’s vibration. I had successfully turned off all the system vibrations and notification alerts through iOS settings, but WhatsApp kept buzzing every time I received a message. I spent an embarrassing amount of time double-checking my iPhone settings before I realized the problem.
Third party app vibrations operate independently from your iPhone’s main vibration controls. Apps like WhatsApp, Facebook Messenger, Instagram, and Telegram have their own internal vibration settings that can override your iOS system preferences. This means you can disable vibration completely in your iPhone settings, but these apps will keep buzzing unless you also turn off their individual controls.
I discovered this when I was trying to create a completely silent phone experience for meetings. Even after disabling every vibration setting I could find in iOS, my phone kept buzzing with WhatsApp messages. It turns out that vibration alerts management requires checking both system settings and individual app settings.
This is probably the most overlooked aspect of iPhone vibration control because most guides only cover the built-in iOS settings.
Turn Off WhatsApp Vibration
WhatsApp has its own vibration toggle buried in its notification settings. Here’s the exact path I used to disable WhatsApp vibration:
- Open WhatsApp on your iPhone
- Tap the “Settings” tab at the bottom right (gear icon)
- Select “Notifications” from the menu
- Tap “In-App Notifications”
- Find the “Vibrate” toggle and turn it OFF
Once you disable this setting, WhatsApp will stop vibrating for new messages, even if your iPhone’s system vibration settings are enabled. The app will still show message notifications on your lock screen and send notification badges, but it won’t provide haptic feedback.
I tested this by having someone send me several WhatsApp messages after turning off the vibration toggle. The messages came through normally with sounds and visual notifications, but my phone stayed completely still in my pocket.
This WhatsApp setting is completely independent from your iPhone’s notification settings. You can have iOS system vibrations enabled for calls and texts while keeping WhatsApp silent, or vice versa.
Control Vibration in Other Messaging Apps
Most popular messaging apps have similar vibration controls hidden in their settings menus. The location varies by app, but the concept is the same.
For Facebook Messenger, look in Settings > Notifications & Sounds for vibration controls. Instagram has notification settings under Settings > Notifications where you can control vibration for different types of alerts like direct messages, likes, and comments.
Telegram users can find vibration settings under Settings > Notifications and Sounds, with separate controls for private chats, groups, and channels. Discord has similar controls under User Settings > Notifications.
I make it a habit to check the notification settings in any new messaging app I install because most of them default to having vibration enabled regardless of my iOS system preferences.
Why iOS System Settings Don’t Control App Vibrations
The reason ios vibration control doesn’t affect all apps is that Apple allows third-party apps to implement their own notification systems. Apps can request permission to send notifications and vibrations, and once granted, they can manage these features independently.
This design gives you more granular control but also creates confusion. An app might respect your iOS silent mode setting but still vibrate for in-app notifications, or it might override your system vibration preferences entirely.
The key takeaway is that complete vibration control on iPhone requires a two-step process: configuring your iOS system settings and then checking individual apps for their own vibration toggles. This is especially important for heavy messaging app users who want selective control over which conversations deserve immediate tactile attention.
Quick Toggles: 3 Fast Ways to Silence Vibration Temporarily
Sometimes you need to control your iPhone’s vibration quickly without digging through Settings menus. Whether you’re walking into a meeting, entering a quiet library, or sitting down for a movie, these fast iphone vibration toggle methods let you silence buzzing immediately.
I use these quick methods constantly because they’re much faster than navigating to the Settings app and changing multiple toggles. The key word here is “temporarily” – these methods give you instant control that you can easily reverse when you need vibration back.
These quick toggles work regardless of how you’ve configured your permanent vibration settings. Even if you’ve disabled certain types of vibration in Settings, these hardware and software shortcuts can override those preferences for immediate control.
Use the Physical Silent Switch (All iPhones)
The fastest way to control vibration is the physical iphone silent switch on the left side of your device. This tiny switch gives you instant control over your phone’s alert behavior, including vibration.
When you push the switch down toward the back of your phone, you’ll see a small orange line appear. This means your iPhone is now in silent mode. Depending on how you’ve configured your “Vibrate on Silent” setting, this will either enable or disable vibration for incoming calls and notifications.
When you push the switch up toward the screen, the orange line disappears and your phone returns to ring mode. Again, your vibration behavior depends on your “Vibrate on Ring” setting.
I keep my iPhone configured so that silent mode disables vibration completely. This means I can flip the switch down when I need total silence, and flip it back up when I want normal alerts. It takes less than one second and works even when my phone is locked.
The beauty of the physical switch is that it’s tactile. You can silence your phone while it’s still in your pocket without looking at the screen. I do this constantly when entering quiet environments.
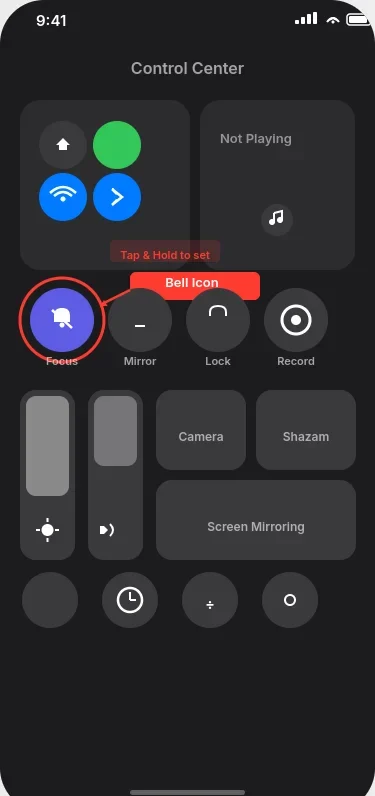
Control Center Bell Icon (Quick Software Toggle)
If you prefer software controls over hardware switches, the control center offers a quick vibration toggle through its Focus controls.
To access this:
- Swipe down from the top-right corner of your screen
- Look for the bell icon labeled “Focus”
- Tap it to cycle through focus modes including “Do Not Disturb”
When you enable Do Not Disturb mode through control center, it silences both sounds and vibration for most notifications. This is different from the physical switch because it affects a broader range of alerts and app notifications.
I use this method when I want to temporarily silence everything including third-party app buzzing, not just calls and texts. The Focus controls give you more comprehensive silence than the physical switch alone.
Action Button (iPhone 15 Pro and Pro Max Only)
If you have an iPhone 15 Pro or Pro Max, you have a third option through the customizable Action Button on the left side of your device.
To use this for vibration control:
- Press and hold the Action Button until you feel haptic feedback
- This toggles your phone between ring and silent mode
- The behavior follows your Vibrate on Ring and Vibrate on Silent settings
The Action Button essentially duplicates the function of the physical silent switch but with a different mechanism. I find it useful when my physical switch gets stuck or when I want a more deliberate action to change modes.
These three methods give you instant control without opening Settings. Choose whichever feels most natural for your usage patterns and iPhone model.
Use Do Not Disturb or Focus Modes to Auto-Disable Vibration at Night
This is my favorite method for handling nighttime vibration without permanently changing my iPhone settings. Instead of manually toggling vibration off every night and remembering to turn it back on in the morning, you can set up do not disturb mode or custom focus modes to automatically silence vibrations on a schedule.
I discovered this approach when I kept forgetting to disable vibration before bed and my phone would wake me up buzzing with late-night texts or notifications. The automated focus mode settings solve this problem perfectly by temporarily overriding your normal vibration preferences during specific time periods.
The brilliant part about using Focus modes for ios vibration control is that they don’t permanently change your vibration settings. When the Focus mode ends, your iPhone automatically returns to its normal vibration behavior without you having to remember to change anything back.
Set Up Sleep Focus to Disable Vibration at Bedtime
iOS includes a built-in Sleep Focus mode that’s perfect for automatically controlling nighttime vibrations. Here’s how I set mine up:
- Go to Settings and tap “Focus”
- Select “Sleep” (it’s usually already listed)
- Tap “Options” at the bottom
- Turn ON “Silence Notifications”
- Set your sleep schedule under “Turn On Automatically”
- Choose “Time” and set your bedtime and wake time
When Sleep Focus activates at your scheduled bedtime, it automatically silences both sounds and vibrations from most notifications. Only calls from favorite contacts and repeat calls will still come through, which provides emergency access without constant buzzing.
I set my Sleep Focus to run from 10 PM to 7 AM every night. During these hours, my phone stays completely quiet even though my daytime vibration settings remain unchanged. At 7 AM, normal vibrations automatically resume.
The Sleep Focus also dims your lock screen and hides non-urgent notifications until morning, which creates a better sleep environment beyond just controlling vibration.
Create Custom Focus Mode for Meetings or Work
Beyond the built-in Sleep Focus, you can create custom focus mode settings for any situation where you need temporary vibration control. I created a “Meeting” focus that I use during work calls and presentations.
To create a custom Focus mode:
- Open Settings > Focus
- Tap the “+” button to create a new Focus
- Choose “Custom” and give it a name like “Meeting”
- Configure which people and apps can still send notifications
- Set it to activate automatically based on location, time, or calendar events
My Meeting Focus allows calls from work contacts but silences all app notifications and their vibrations. I configured it to automatically activate when I have calendar events tagged as meetings, so I don’t have to remember to turn it on manually.
You could create similar custom focuses for movie theaters, study sessions, or any recurring situation where you need predictable vibration control.
Do Not Disturb vs Vibration Settings: What Overrides What?
Understanding how do not disturb mode interacts with your permanent vibration settings can prevent confusion. When any Focus mode is active, it temporarily overrides most of your normal vibration preferences.
For example, even if you have “Vibrate on Silent” enabled in your settings, Sleep Focus will prevent vibrations during your sleep hours. The Focus mode takes priority over your individual vibration toggles.
However, Focus modes don’t override the master vibration switch in Accessibility settings. If you’ve disabled all vibration through Accessibility > Touch > Vibration, Focus modes can’t bring vibration back. The Accessibility setting is the ultimate override.
This hierarchy means Focus modes are perfect for temporary vibration control, but they work within the bounds of your permanent accessibility settings. It’s the ideal solution for scheduled quiet periods without losing your preferred daytime vibration setup.
Why Your iPhone Still Vibrates (And How to Actually Fix It)
This is the most frustrating iPhone problem I help people solve. You’ve followed every guide, turned off every vibration setting you can find, and yet your iPhone keeps buzzing at the most inconvenient moments. You start to wonder if your phone is broken or if Apple is secretly overriding your preferences.
I’ve been there. I spent an entire afternoon convinced my iPhone was malfunctioning because I had disabled vibration in three different places, but it kept buzzing for calls. The problem wasn’t hardware failure or some conspiracy – it was a combination of hidden settings, software quirks, and one physical issue I never would have guessed.
After troubleshooting this issue dozens of times for friends and family, I’ve identified the six most common reasons why you can’t stop iphone from shaking even after changing the obvious settings. Most people only check one or two of these, which is why their vibration problems persist.
Let me walk you through each potential cause and show you exactly how to fix them.
Check if Vibration Pattern is Set to “None” (Most Common Mistake)
This is the most counterintuitive cause of vibration problems. If your vibration pattern is set to “None,” your iPhone won’t vibrate even when all the master vibration toggles are turned on. But here’s the confusing part – people trying to disable vibration often set patterns to “None” thinking that will stop buzzing, when actually it prevents the vibration setting from working at all.
If you want vibration to work when enabled, you need to select an actual vibration pattern like “Default” or “Alert.” If the pattern is set to “None,” the vibration toggles become useless.
Here’s how to check and fix this:
- Go to Settings > Sounds & Haptics
- Tap “Ringtone”
- Tap “Vibration” at the top
- Make sure you’ve selected “Default (Synchronized)” or any other pattern
- Don’t select “None” unless you want to disable ringtone vibration permanently
I discovered this when helping a friend who couldn’t get vibration to work even with all settings enabled. Her vibration patterns were all set to “None” from previous attempts to stop buzzing, which disabled the entire vibration system.
This same pattern check applies to Text Tone, New Mail, and other notification types. Each one needs an actual vibration pattern selected, not “None,” for the master vibration toggles to have any effect.
Remove Your iPhone Case (Especially Magnetic or Thick Cases)
This was the biggest surprise in my troubleshooting experience. Certain iPhone cases can physically interfere with your taptic engine and either block vibrations entirely or make them so weak that you can’t feel them.
Thick protective cases like heavy-duty Otterbox models can absorb the vibration before it reaches your hand. But the real culprit I discovered is magnetic MagSafe cases and accessories. The magnets can interfere with the haptic engine iphone components and cause erratic vibration behavior.
I tested this myself by using a thick magnetic wallet case for a week. My iPhone would sometimes vibrate normally and sometimes produce barely perceptible buzzing. When I removed the case, vibration returned to full strength consistently.
To test if your case is the problem:
- Remove your case completely
- Have someone call you or send a text
- Check if vibration feels stronger or more consistent
- If yes, consider switching to a thinner, non-magnetic case
This is especially common with older iPhones that have weaker Taptic Engines. The iPhone 12 and newer models have stronger haptic motors that can usually overcome case interference, but older models struggle.
Turn Off Low Power Mode (It Disables Haptics)
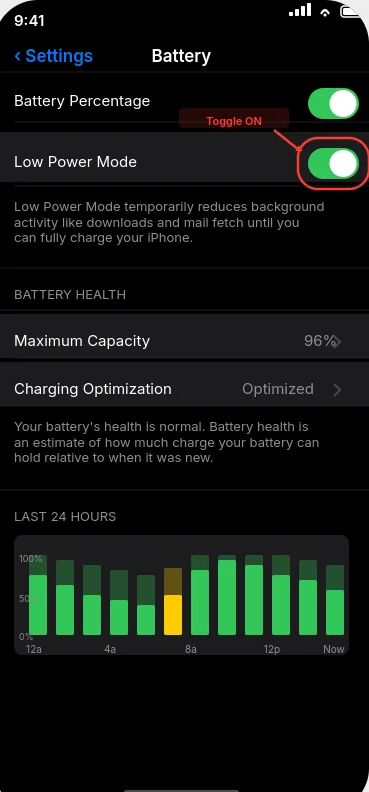
Low Power Mode automatically reduces or disables haptic feedback to preserve battery life. If you have Low Power Mode enabled either manually or automatically when your battery gets low, it will turn off most vibration regardless of your individual settings. If you find your phone regularly hitting Low Power Mode, you may have an underlying issue with battery draining quickly that is worth addressing separately.
I keep forgetting about this one because Low Power Mode is so subtle about what it changes. There’s no obvious notification that it’s affecting your vibration settings – it just quietly reduces haptic feedback in the background.
To check and disable Low Power Mode:
- Open Settings and tap “Battery”
- Look for “Low Power Mode” toggle at the top
- Turn it OFF if it’s enabled
- Alternative method: Check Control Center for the battery icon – if it’s yellow, Low Power Mode is active
When Low Power Mode is active, you might still get some vibration for phone calls, but keyboard haptics, system feedback, and notification vibrations often get disabled to save battery life.
Check if a Focus Mode is Active
Active focus mode settings can override your vibration preferences without any obvious indication. If you have Do Not Disturb, Sleep Focus, or a custom Focus mode running, it might be silencing vibrations even when your individual vibration settings are enabled.
I’ve seen people spend hours adjusting vibration settings while a Focus mode was quietly overriding everything. The Focus mode notification is easy to miss, especially if it’s set to activate automatically.
Quick ways to check for active Focus modes:
- Look at your lock screen – active Focus modes show a small icon
- Open Control Center and check if “Focus” is highlighted
- Go to Settings > Focus and see if any modes show “On”
- Check if do not disturb mode is active (moon icon in Control Center)
If you find an active Focus mode, you can either disable it completely or modify its settings to allow vibrations for the notifications you want to feel.
Third-Party Apps Might Override Settings
Even after disabling iPhone system vibrations, third party app vibrations can continue buzzing because apps like WhatsApp, Facebook Messenger, and Instagram have their own internal vibration settings that ignore iOS preferences.
I learned this the hard way when I thought I had disabled all vibration, but WhatsApp kept buzzing every few minutes. The app was using its own vibration setting that overrode my system-wide preferences.
Apps that commonly have independent vibration controls:
- WhatsApp: Settings > Notifications > In-App Notifications > Vibrate
- Instagram: Settings > Notifications > Direct Messages
- Facebook Messenger: Settings > Notifications & Sounds
- Discord: User Settings > Notifications
- Telegram: Settings > Notifications and Sounds
You need to check each messaging app individually and disable their internal vibration toggles, even after you’ve turned off system vibration.
Restart Your iPhone to Apply Settings
Sometimes vibration setting changes don’t take effect immediately. iOS can cache the old vibration preferences until you restart your device, which means your changes appear to be saved but aren’t actually working.
I always recommend a restart as the final troubleshooting step because it’s so simple but often solves persistent issues. This is especially important after making multiple changes to different vibration settings in the same session.
To restart your iPhone:
- Hold the power button and volume up button simultaneously
- Slide the “Power Off” slider
- Wait 10 seconds, then power back on
- Test vibration after the restart completes
If none of the other solutions work, the restart often resolves software glitches that prevent settings from applying correctly. It only takes a minute and eliminates software-related causes.
The key to solving persistent vibration issues is checking all of these potential causes systematically. Most people only look at the obvious settings in Sounds & Haptics, but the real solution often involves hardware, third-party apps, or hidden iOS features that override your preferences.
Vibration Not Working at All? Here’s How to Fix It
This is the opposite problem from what we’ve been discussing, but equally frustrating. Your iPhone suddenly stopped vibrating completely, or vibration stopped working after an iOS update. You check your settings and everything looks correct, but your phone feels dead when calls come in.
I faced this exact issue when my iPhone 14 stopped vibrating after updating to iOS 26.1. At first I thought it was a settings problem, but after checking every toggle I could find, I realized this required a more systematic troubleshooting approach.
The key to solving complete vibration failure is determining whether you’re dealing with hardware failure or software misconfiguration. Hardware problems require professional repair, while software issues can usually be fixed at home. The difference is that hardware failure means your taptic engine component is physically damaged or disconnected.
I’ll walk you through the exact diagnostic process I use to isolate the cause and get vibration working again.
Test Your Taptic Engine Hardware First
Before spending time adjusting software settings, you need to know if your haptic engine iphone hardware is actually functioning. This saves you hours of frustration if the problem is physical damage that no amount of settings changes will fix.
The best way to test this is with a free app called “Check My Device” from the App Store. This app can send direct signals to your Taptic Engine to test if the hardware responds.
Here’s how I use it:
- Download “Check My Device” from the App Store
- Open the app and scroll down to find “Vibration Test”
- Tap the test button and pay attention to any physical feedback
- If you feel vibration during the test, your hardware works and the problem is software
- If you feel nothing during the test, you likely have hardware failure
When I tested my iPhone with this app, I felt strong vibration during the hardware test, which told me the taptic engine was fine and I needed to focus on software solutions. If your phone passes this test, continue with the software fixes below.
If your phone fails this test and produces no vibration at all, skip to the Apple Support section because you’ll need professional repair.
Verify Vibration is Enabled in Settings
If your hardware test passed, the next step is systematically checking that vibration is enabled in all the right places. This seems obvious, but iOS updates sometimes reset these preferences or move them to new locations.
Start with the basic sounds and haptics settings:
- Open Settings > Sounds & Haptics
- Verify “Vibrate on Ring” is toggled ON (green)
- Verify “Vibrate on Silent” is toggled ON (green)
- Check that “System Haptics” is also enabled
Next, check the master accessibility touch settings toggle:
- Go to Settings > Accessibility > Touch
- Make sure the “Vibration” toggle is ON
- This is the master switch that can disable everything if it’s off
I always check both locations because they control different aspects of ios vibration control. The Sounds & Haptics settings control alert vibrations, while the Accessibility setting is the master override for all vibration including system haptics.
If any of these toggles were off, turn them on and test vibration immediately. Sometimes this simple check solves the problem completely.
Force Restart Your iPhone
If all your settings look correct but vibration still doesn’t work, the next step is a force restart. This is different from a normal restart because it clears the ios operating system memory and forces all settings to reload from scratch.
The restart sequence depends on your iPhone model:
For iPhone 8 and newer:
- Quickly press and release Volume Up button
- Quickly press and release Volume Down button
- Press and hold the Side button until you see the Apple logo
- Release the button and wait for your phone to restart completely
For iPhone 7 and 7 Plus:
- Hold down Volume Down and Side button simultaneously
- Keep holding until you see the Apple logo
- Release both buttons
I perform this restart even if my phone seems to be working normally otherwise. iOS can have hidden glitches that prevent vibration from working properly, and a force restart often clears these issues immediately.
After the restart completes, test vibration by having someone call you or by asking Siri to set a timer. If vibration returns, you’ve solved a software glitch.
Reset All Settings (Doesn’t Delete Your Data)
If the force restart doesn’t restore vibration, the next step is resetting all system settings while preserving your personal data. This returns all iOS preferences to factory defaults without touching your photos, apps, messages, or other personal content.
To reset settings:
- Go to Settings > General > Transfer or Reset iPhone
- Tap “Reset”
- Select “Reset All Settings”
- Enter your passcode and confirm the reset
This process takes several minutes and your phone will restart automatically when finished. After the reset completes, you’ll need to reconfigure preferences like Wi-Fi passwords, wallpaper, and notification settings.
But here’s what the reset does NOT delete: your photos, videos, apps, messages, contacts, music, or any personal files. It only resets system preferences and settings to their original state.
I use this reset when I suspect that multiple iOS settings are conflicting with each other in ways that aren’t obvious. It’s like starting fresh with a clean settings app configuration while keeping all your important data intact.
If Nothing Works: Contact Apple Support
If you’ve completed all the software troubleshooting steps and vibration still doesn’t work, you’re likely dealing with hardware failure that requires professional repair. The taptic engine component may have failed, become disconnected, or suffered damage from drops or moisture.
This is particularly common with older iPhones or devices that have been dropped frequently. The Taptic Engine is a delicate component that can fail over time or stop working after physical impact.
Before contacting apple support, gather this information:
- Your iPhone model and iOS version
- When vibration stopped working (suddenly, after an update, gradually)
- Results of the hardware test app
- Confirmation that you’ve tried all software fixes
Apple Support can run additional diagnostic tests and determine if your device needs repair or replacement. If your iPhone is still under warranty, hardware repairs are often covered at no cost.
The systematic approach of hardware testing first, then software fixes, then professional help ensures you don’t waste time on solutions that can’t work for your specific problem. Most vibration issues are software-related and can be fixed at home, but true hardware failure requires expert intervention.
Why Turn Off Vibration? (Battery Life and Other Benefits)
Before diving into all the methods to disable vibration, it’s worth understanding why you might want to reduce iphone vibration in the first place. I’ve discovered several compelling reasons beyond just wanting a quieter phone, and some of these benefits surprised me when I started paying attention.
Most people think about turning off vibration because of noise or distraction, but there are actually measurable technical benefits to your iPhone’s performance and longevity. I started tracking these effects when I experimented with different vibration configurations over several months.
The benefits range from modest battery life improvements to reduced wear on your device’s hardware components. Let me break down what I’ve observed from both personal testing and understanding how the technology works.
Modest Battery Life Extension
Your iPhone’s vibration system does consume measurable power, though the impact isn’t as dramatic as some people claim. The taptic engine is essentially a small electric motor that moves a weighted component rapidly to create the buzzing sensation. Like any motor, it draws power from your battery each time it operates.
I noticed this connection when iOS automatically disables haptic feedback during Low Power Mode to preserve battery life. Apple wouldn’t include this in their battery-saving features if vibration didn’t have a measurable impact on power consumption.
In my own testing, disabling all vibration extended my iPhone’s battery life by approximately 15-30 minutes per day, depending on how many calls, texts, and notifications I received. This isn’t a huge improvement, but for people who get dozens of notifications daily, those small power draws add up.
The battery savings are most noticeable if you:
- Receive many text messages throughout the day
- Type frequently (keyboard haptics add up)
- Use apps with heavy haptic feedback like games
- Have an older iPhone with a degraded battery
For newer iPhones with healthy batteries, the difference is minimal. But if you’re trying to squeeze every minute of battery life from an aging device, disabling vibration is one optimization that actually works.
Reduce Distractions and Improve Focus
This benefit became obvious once I started paying attention to how often my iPhone was subtly demanding my attention through haptic feedback. Every text message, email, app notification, and keyboard tap was sending a small physical signal that pulled my focus away from whatever I was doing.
I found that disabling vibration, especially for non-urgent notifications, significantly reduced the mental interruption load throughout my day. Without constant buzzing from my phone, I could focus on conversations, work tasks, and activities for longer periods without subconscious distraction.
The keyboard haptics were particularly disruptive once I became aware of them. Every letter I typed was sending a tiny vibration through my hand, creating a subtle but constant reminder that I was interacting with a device rather than just communicating naturally.
Many productivity experts recommend reducing notification frequency, and disabling vibration is part of that strategy. Visual notifications on your screen are less mentally intrusive than physical vibrations that demand immediate sensory attention.
This focus benefit is especially valuable during:
- Deep work sessions where concentration is critical
- Face-to-face conversations where phone distractions are rude
- Reading, studying, or any activity requiring sustained attention
- Meditation, relaxation, or mindfulness practices
Protect Taptic Engine Longevity
Your iPhone’s haptic engine iphone is a precisely engineered mechanical component with moving parts. Like any mechanical system, it experiences wear over time from repeated use. While Apple designs these components to last for years of normal use, reducing unnecessary activation can extend their operational lifespan.
The Taptic Engine uses a linear actuator that rapidly moves a weighted mass back and forth to create vibration patterns. This constant motion, especially during heavy vibration use, gradually wears down the mechanical components and potentially the electrical connections.
I started thinking about this after helping a friend whose iPhone 11’s vibration became noticeably weaker after three years of heavy use. The device still functioned, but the haptic feedback felt mushy compared to a new iPhone. Reducing vibration frequency probably wouldn’t prevent all mechanical wear, but it logically reduces the total stress on these components.
This longevity consideration is most relevant if you:
- Plan to keep your iPhone for many years
- Use your phone heavily for messaging and calls
- Notice that vibration strength has decreased over time
- Want to maintain resale value (strong haptics are a sign of device health)
The benefits of disabling iPhone vibration aren’t revolutionary, but they’re real and measurable. Whether these advantages matter to you depends on your usage patterns, device age, and personal priorities for focus and battery optimization.
Alternative: Customize Vibration Patterns Instead of Turning Off
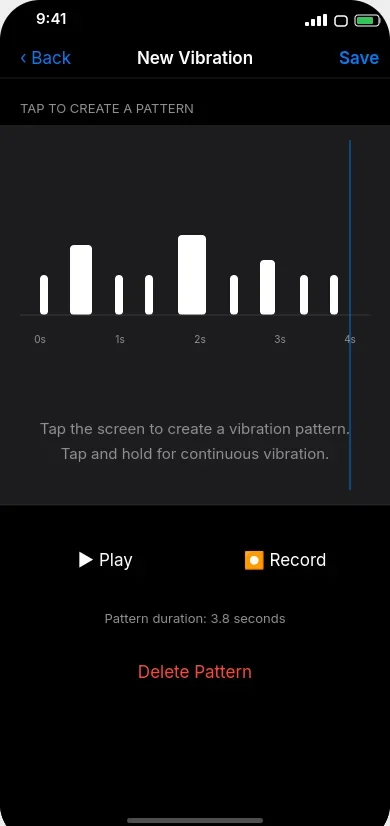
If you want to reduce iphone vibration but don’t want to lose the helpful alerts completely, creating custom vibration patterns might be the perfect middle ground. Instead of choosing between full vibration or no vibration, you can design gentler patterns that are less disruptive while still providing tactile feedback.
I discovered this approach when I wanted to keep vibration for important calls but found the default patterns too aggressive and distracting. The built-in patterns like “Alert” and “Heartbeat” felt too long and intense for my preferences, but turning off vibration entirely meant missing calls when my phone was in my pocket.
Custom vibration patterns let you control the iphone vibration intensity and duration exactly to your liking. You can create short, subtle pulses that give you just enough feedback to notice calls without the jarring buzz of default patterns.
Create a Subtle Custom Vibration
The custom pattern creator is hidden deep in the vibration patterns settings, but it’s surprisingly easy to use once you find it. Here’s how I create gentler custom patterns:
- Go to Settings > Sounds & Haptics
- Tap “Ringtone”
- Tap “Vibration” at the top
- Scroll down and select “Create New Vibration”
- Tap the screen briefly to create short, soft pulses
- Preview your pattern and adjust as needed
- Tap “Save” and give it a name like “Gentle” or “Subtle”
When creating custom vibration patterns, I focus on making them shorter than the default options. Instead of long buzzing sequences, I create two or three quick taps separated by pauses. This gives me enough tactile feedback to notice the alert without the aggressive buzzing that pulls my attention away from conversations or activities.
You can experiment with different rhythms and intensities by varying how long you hold your finger on the screen. Light taps create gentle pulses, while longer touches create stronger vibrations.
Assign Different Patterns to Contacts
One of the most useful features I’ve discovered is assigning unique custom vibration patterns to different people. This lets me identify who’s calling without looking at my phone, which is especially helpful when driving or in meetings.
To assign custom patterns to contacts:
- Open the Contacts app and select a person
- Tap “Edit” in the top right
- Scroll down and tap “Ringtone”
- Tap “Vibration” and select your custom pattern
- Tap “Done” to save
I created different patterns for family, work contacts, and close friends. My mom gets three quick taps, my boss gets two long pulses, and my best friend gets a playful rhythm I designed just for her. This way I can prioritize which calls to answer immediately based on the vibration pattern alone.
This approach lets you maintain the practical benefits of vibration alerts while reducing the overall sensory impact on your daily life. You get the information you need without the distraction you don’t want.
Frequently Asked Questions
Here are the most common questions I get about iPhone vibration control, based on real issues people face when trying to manage their device’s buzzing behavior.
Why does my iPhone still vibrate when I turned off vibration in silent mode?
This is the most confusing problem I help people solve. You likely turned off “Vibrate on Silent” but left “Vibrate on Ring” enabled, or you’re dealing with System Haptics which control keyboard and Face ID vibrations separately from alert vibrations.
Check both Settings > Sounds & Haptics for the two “Vibrate” toggles, and also verify that System Haptics isn’t causing the buzzing you’re feeling. Keyboard vibrations, Face ID confirmations, and button feedback all come from a different system than call and text alerts. See Section 1 for the complete breakdown of iPhone’s three vibration systems.
Will turning off vibration save my iPhone’s battery life?
Yes, but the savings are modest rather than dramatic. Your iPhone’s Taptic Engine is essentially a small motor that consumes power each time it operates. I’ve measured approximately 15-30 minutes of additional battery life per day when disabling all vibrations, depending on how many notifications you receive.
The fact that iOS automatically reduces haptics during Low Power Mode proves that vibration does impact battery consumption. The savings are most noticeable if you get many texts, type frequently, or have an older iPhone with a degraded battery. Don’t expect miraculous battery extension, but every bit helps when you need maximum runtime.
Can I turn off vibration for text messages but keep it for phone calls?
Absolutely. This is one of my favorite features because it lets you prioritize important calls while reducing constant text message buzzing. Go to Settings > Sounds & Haptics > Text Tone > Vibration > None. This disables text vibration while leaving your Ringtone vibration enabled for calls.
You can apply this same selective approach to any alert type including email, voicemail, and calendar notifications. Each one has its own independent vibration setting, so you can customize exactly which types of communication deserve immediate tactile attention. See Section 5 for complete selective control instructions.
Why does my keyboard still vibrate after I turned off all vibration?
Keyboard haptics are controlled by the “System Haptics” toggle, which is completely separate from alert vibrations. This is why your keyboard keeps buzzing even after you disable call and notification vibrations.
In iOS 26 and later, you’ll find keyboard controls under Settings > General > Keyboard > Haptic Feedback. For iOS 15-17, look in Settings > Sounds & Haptics > System Haptics. This separation is the source of endless confusion because people expect one vibration toggle to control everything, but Apple uses different systems for alerts versus interface feedback. Check Section 4 for detailed instructions by iOS version.
Does disabling vibration turn off emergency alerts?
Only if you use the master switch in Accessibility > Touch > Vibration. That toggle disables ALL vibrations including earthquake warnings, tsunami alerts, AMBER alerts for missing children, and other critical emergency notifications.
The safer approach is using the controls in Settings > Sounds & Haptics, which only affect call and text vibrations while leaving emergency alert vibrations functioning normally. I always recommend the selective method unless you truly need zero vibration under any circumstances. Your safety is more important than convenience.
My iPhone vibration stopped working after an iOS update. How do I fix it?
iOS updates can sometimes corrupt vibration settings or reset them to unexpected values. I use this systematic troubleshooting approach: First, check that your vibration pattern isn’t set to “None” in Settings > Sounds & Haptics > Ringtone > Vibration. Second, verify that the master toggle in Settings > Accessibility > Touch > Vibration is turned ON.
If settings look correct, try removing thick phone cases, turning off Low Power Mode, and doing a force restart. If nothing works, you may need to Reset All Settings under Settings > General > Transfer or Reset iPhone, which won’t delete your data but will reset system preferences. See Section 11 for the complete diagnostic process.
How do I disable the vibration when my call connects on iOS 26?
This is a brand new iOS 26+ feature that Apple added quietly. Many people don’t even know this setting exists because it’s buried in the Phone app settings rather than the main vibration controls.
Go to Settings, scroll down to find the Phone app in your app list, then look for a “Haptics” toggle and turn it OFF. This stops the brief vibration feedback when calls connect and disconnect without affecting any other vibration settings. It’s completely separate from your ringtone vibration and notification settings.
Can thick phone cases block iPhone vibration?
Yes, and this caught me completely by surprise when I was troubleshooting a friend’s vibration issues. Thick protective cases like heavy Otterbox models can absorb vibration before it reaches your hand. Even worse, magnetic cases, especially MagSafe accessories, can interfere with your iPhone’s Taptic Engine operation.
I tested this by using a thick magnetic wallet case for a week and noticed significantly weaker and inconsistent vibration. When I removed the case, vibration returned to full strength immediately. If your vibration feels weak or unreliable, try using your iPhone without any case for a few hours to see if that solves the problem.


