

What Are Read Receipts and Why Turn Them Off?

I remember the first time I realized my iPhone was telling everyone exactly when I read their messages. I was lying in bed at 11 PM, scrolling through texts, when a friend immediately replied with “I know you’re awake, I saw you read my message!” That moment made me understand what read receipts actually do, and honestly, it felt like losing a little piece of privacy I didn’t even know I had.
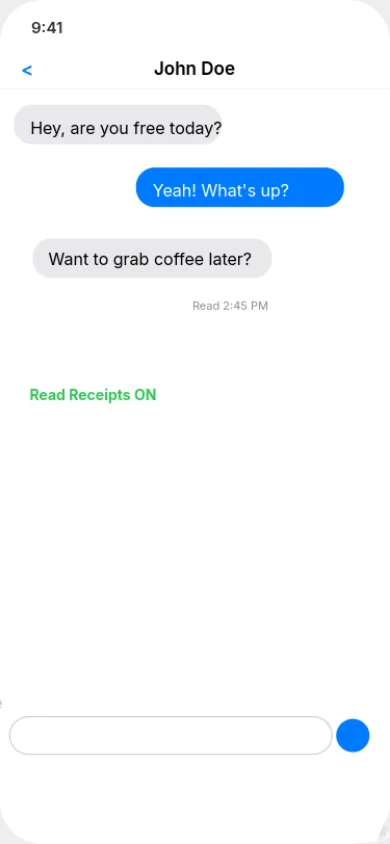
Read receipts are a feature built into iMessage that shows other people when you’ve opened their messages. When this feature is active, it displays a “Read” status along with a timestamp under messages you’ve viewed, letting the sender know exactly when you saw their text. So instead of just showing “Delivered” when a message reaches your phone, it updates to “Read” the moment you tap on that conversation.
Here’s what makes this particularly important to understand: read receipts are specific to iMessages, which are messages sent between iPhone and Apple users. You’ll recognize these as the blue message bubbles. Regular text messages to Android users, the green bubbles, don’t support read receipts in the traditional SMS system, though that’s changing with Apple’s new RCS messaging support in iOS 18.
I’ve learned that this feature isn’t just a simple notification. It creates a subtle social pressure that affects how we communicate. When someone sees you’ve read their message, they naturally expect a response soon after. This might seem harmless, but it can actually change your entire relationship with your phone and your peace of mind.
How Read Receipts Work on iPhone
Let me explain how this actually works under the hood, because understanding the technical side helps you make better decisions about your privacy.
iMessage uses end to end encryption, which means your messages are secure and private between you and the person you’re messaging. That’s great for security. But alongside this encryption, iMessage also sends status updates about your messages. When you send an iMessage, it goes through several stages: “Sending,” then “Delivered” when it reaches the other person’s device, and finally “Read” when they actually open the conversation.
The key thing I discovered is that the “Read” status includes a timestamp. So not only does someone know you saw their message, they know you saw it at 2:47 AM when you probably should have been sleeping. This level of detail can feel invasive, especially in professional settings or with people you’re not extremely close to.
The difference between blue bubbles and green bubbles matters here. Blue bubbles mean you’re using iMessage, Apple’s proprietary messaging service that runs over the internet. Green bubbles mean you’re sending traditional SMS or MMS text messages through your cellular network. SMS simply doesn’t have the technical capability to send read receipts back and forth. It’s one of the fundamental differences in how these two systems work.
I tested this myself by messaging both iPhone and Android users. With my iPhone friends, I could see exactly when they read my messages if they had receipts turned on. With Android users, messages just stayed at “Delivered” forever, which actually felt more comfortable and less pressuring.
Common Reasons People Turn Off Read Receipts
After talking to friends and reading countless forum discussions about this feature, I’ve identified the real reasons why people choose to disable read receipts. These aren’t just technical preferences. They’re about protecting your mental space and controlling how you engage with digital communication.
Reducing Response Pressure
This is the number one reason I hear, and it was definitely my main motivation. When someone knows you’ve read their message, there’s an unspoken expectation that you’ll respond quickly. But sometimes you need time to think about what to say. Sometimes you read a message while you’re busy and can’t respond right away. Sometimes you just need space to process before replying.
One person explained it perfectly: you might prefer to turn off read receipts to give yourself more time to think and respond to messages without the sender knowing you have already seen them. That’s not being rude. That’s being thoughtful and intentional about your communication.
Maintaining Work Life Boundaries
I learned this lesson the hard way when a colleague sent me a work question at 9 PM. I read it out of curiosity, not planning to respond until morning. But because they saw the “Read” notification immediately, they followed up with “Since you’re available, can you also look at this other thing?” Read receipts had accidentally signaled I was working when I was just glancing at my phone during a TV show.
After I turned off read receipts, I noticed my evenings felt more protected. I could check messages on my own terms without accidentally signaling availability.
Mental Health and Digital Wellness
There’s a genuine anxiety that comes with read receipts, and I don’t think people talk about this enough. The feature creates a subtle accountability that can feel overwhelming, especially if you’re someone who gets a lot of messages or struggles with social anxiety.
Knowing that people are watching when you read their messages adds a layer of stress to something as simple as checking your phone. Removing that visibility gives you back control over your digital space and reduces the constant pressure to be “on” and available.
Privacy Preferences
Some people simply value privacy in their communication habits. You might not want others tracking when you’re active on your phone, when you wake up, or when you go to bed. These patterns become visible through read receipt timestamps, and that level of insight into your daily routine is more personal than many people realize.
Professional Communication Standards
In professional settings, I’ve found that read receipts can actually create awkward situations. If you read a complex email or message from a client but need time to gather information before responding, that “Read” status can make them think you’re ignoring them. Turning off receipts removes this misunderstanding and gives you the professional space to respond thoughtfully.
The truth is, managing read receipts isn’t about being antisocial or hiding from people. It’s about setting healthy boundaries in a world where digital communication expects instant responses. Messaging etiquette is evolving, and more people are recognizing that immediate visibility doesn’t equal better communication.
I want you to know that if you’re considering turning off read receipts, you’re making a choice that prioritizes your well being and your right to engage with messages on your own timeline. That’s not just okay. It’s actually a smart approach to user privacy and digital wellness in 2026.
How to Turn Off Read Receipts on iPhone (All Contacts)
Now let me show you exactly how to turn off read receipts on iPhone for everyone in your contact list. I’ve done this on multiple iPhones running different iOS versions, and I can walk you through both methods depending on which software version you’re using.
The process is actually quite simple once you know where to look. The main difference you need to be aware of is that Apple changed the navigation path when they released iOS 18. If you’re running the latest software, you’ll go through an extra step that older iOS versions don’t have. Don’t worry though, I’ll cover both paths so you can follow whichever one matches your iPhone.
What I appreciate about this global method is that it handles everything in one place. Once you switch this toggle off in the Settings app, read receipts will be disabled for all of your conversations. Every person in your Messages app will only see “Delivered” when you read their texts, never “Read” with a timestamp.
For iOS 18 and Newer (iPhone 16, 15 with Latest Update)
If you updated to iOS 18 or bought a newer iPhone like the iPhone 16 or iPhone 15 that came with iOS 18 preinstalled, Apple added an Apps menu to organize settings better. This changes where you find the Messages app settings, but the actual toggle works exactly the same way.
Here’s the exact path I follow on my iPhone running iOS 18:
1. Open the Settings app
Look for the grey gear icon on your home screen. Tap it to open your iPhone settings. This is your main control center for everything on your device.
2. Scroll down and tap Apps
This is the new step that didn’t exist in earlier iOS versions. You’ll see Apps listed in your settings menu, usually after a few system options like Screen Time and General. Tap on Apps to open the menu where all your installed applications have their individual settings.
3. Select Messages
Inside the Apps menu, scroll down until you find Messages. It’s alphabetically organized, so Messages appears in the M section. Tap on it to open the Messages app settings.
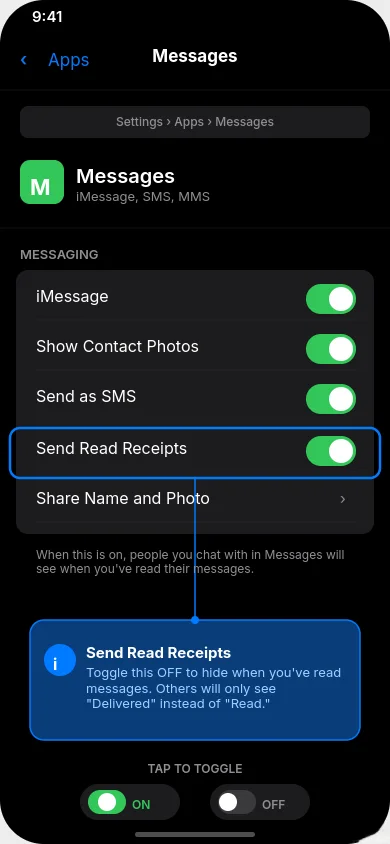
4. Scroll down to find Send Read Receipts
Once you’re inside Messages settings, you’ll need to scroll down a bit. The Send Read Receipts option isn’t at the very top. When I did this on my iPhone 16, I found it about halfway down the page, below options for iMessage and text message forwarding.
5. Toggle off Send Read Receipts
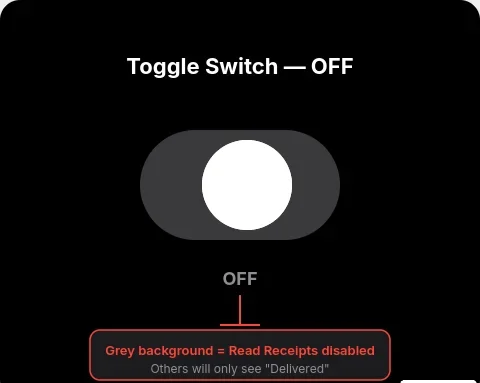
Here’s where the magic happens. You’ll see a toggle switch next to Send Read Receipts. When it’s green and positioned to the right, read receipts are active. Tap that toggle switch once, and it will slide to the left and turn grey. That grey switch is your visual confirmation that the feature is now disabled.
I always look for that grey color to make absolutely sure the change took effect. The switch should sit on the left side with no green showing at all.
For iOS 17 and Earlier
If you haven’t updated to iOS 18 yet, or if you have an older iPhone running iOS 17, iOS 16, or even earlier versions, the path is actually more direct. Apple used to put Messages right in the main Settings menu without the Apps submenu.
Here’s how I turn off read receipts on older iOS versions:
1. Open the Settings app
Same starting point as iOS 18. Find that grey gear icon and tap it to access your iPhone settings.
2. Scroll down to Messages
In the main Settings menu, scroll down until you see Messages listed. On older iOS versions, it appears directly in this main list, usually after options like Phone and Safari. Tap Messages to open its settings.
3. Find and toggle off Send Read Receipts
Inside the Messages settings, scroll down until you locate Send Read Receipts. The exact position varies slightly between iOS versions, but it’s typically in the middle section of the page. When you find it, tap the toggle switch to turn it off.
4. Confirm the grey switch
Just like with iOS 18, the toggle switch should turn grey and move to the left position when disabled. This grey color is your confirmation that read receipts are now off. The Settings application will save this change automatically, so you don’t need to tap a save button or anything like that.
I’ve walked through this process on iPhones running iOS 15, iOS 16, and iOS 17, and the steps remain consistent. Apple keeps this particular setting in the same relative location, which makes it easy to find once you know where to look.
What Happens After You Turn It Off
The moment you toggle off Send Read Receipts, the change takes effect immediately across your entire Messages app. I tested this by having a friend send me a message right after I disabled the feature, and they confirmed that it only showed “Delivered” on their end, even after I opened and read their text.
Here’s what I want you to understand about how this global setting works:
All future messages you receive will no longer show the “Read” status to people who send them. When someone texts you and you open that conversation, they’ll see “Delivered” and that’s it. No timestamp, no “Read” confirmation, no indication that you’ve seen their message.
This applies to every contact in your phone by default. Your mom, your best friend, your coworker, that person you’ve been avoiding responding to, everyone gets the same treatment. They all lose visibility into when you’ve read their messages.
However, and this is important, there’s one exception to be aware of. If you previously went into individual conversations and enabled read receipts for specific people, those conversation settings can override this global setting. I’ll explain how to check for that in the next section, but for now, just know that this toggle handles the vast majority of your messages in one fell swoop.
The setting also doesn’t work retroactively. Messages you read before turning off the feature will still show “Read” on the sender’s end. Only new messages going forward get the privacy protection. I noticed this when I first made the change. Old conversations still had “Read” timestamps visible to people, but any new texts after I toggled the setting just showed “Delivered.”
One more thing I discovered through testing: turning off read receipts doesn’t affect your ability to see when other people read your messages. If someone else has their read receipts turned on, you’ll still see “Read” under the messages you send them. This is a one way setting. You control what information your iPhone sends out, not what information you receive from others.
The whole process takes about 30 seconds from start to finish once you know the right path. I remember the first time I did this, I spent five minutes looking in the wrong menus because I didn’t realize Apple had moved things around in iOS 18. But now that you know both paths, you can disable receipts quickly no matter which iOS version you’re running.
After you make this change, I recommend sending a test message to a friend who has an iPhone and asking them what they see on their end. That’s how I confirmed mine was working correctly. They should report seeing only “Delivered” after you read their message, which gives you peace of mind that the privacy setting actually took effect.
How to Turn Off Read Receipts for a Specific Person
Here’s something I discovered that completely changed how I manage my messaging privacy: you don’t have to make an all or nothing decision with read receipts. Apple actually built in a way to turn off read receipts on iPhone for a specific person while keeping them on for everyone else, or the reverse.
I use this feature constantly. I keep read receipts enabled for my close family members because I want them to know I’ve seen their messages, especially if it’s something time sensitive. But I have receipts turned off for work contacts, casual acquaintances, and honestly, a few people who I know will get anxious if they see I’ve read their message but haven’t responded yet.
This granular control gives you the best of both worlds. You can maintain transparency with people who matter most while protecting your privacy and reducing pressure with everyone else. The individual contact settings work independently from your global setting, which means you can customize this however makes sense for your life.
What makes this particularly useful is that these contact specific settings actually override whatever you set globally. So even if you turned off read receipts for everyone using the method I showed you earlier, you can still enable them for your spouse, your parents, or your best friend by adjusting their individual conversation settings.
Method: Through Messages App
Let me walk you through exactly how to turn off read receipts for one specific contact. I just did this yesterday for a new coworker who kept following up immediately whenever they saw I’d read their messages, so the steps are fresh in my mind.
1. Open the Messages app
Find the green Messages icon on your home screen and tap it. This takes you to your list of conversations.
2. Open the conversation with the person
Scroll through your message thread list and tap on the conversation with the specific person whose read receipt settings you want to change. This opens up your full chat history with them on the conversation screen.
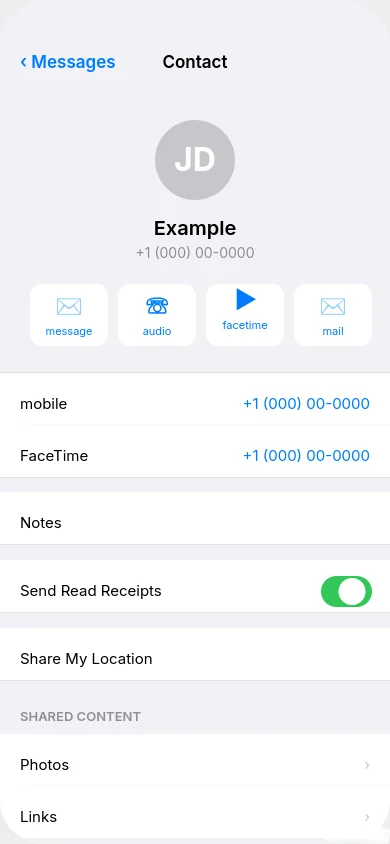
3. Tap their name or photo at the top of the screen
At the very top of the conversation, you’ll see either their contact name or their profile picture if they have one set. Tap directly on their contact name. This opens a menu with details about that person and options specific to your conversation with them.
4. Scroll down to find Send Read Receipts
Once you’re in their contact details screen, scroll down a bit. You’ll pass by options like their phone number, email, and maybe options to call or FaceTime them. Keep scrolling until you see a toggle labeled Send Read Receipts. On my iPhone, this option appears in the middle section of the screen.
5. Toggle the switch on or off
Here’s where you make your choice. If the switch is green and positioned to the right, read receipts are currently on for this person. If you want to turn them off, tap the toggle and it will slide to the left and turn grey. If the switch is already grey and you want to enable receipts just for this contact, tap it and it will turn green.
You can toggle the switch to on or off to apply the setting specifically for that individual conversation. This is what gives you the flexibility to customize your privacy person by person.
6. Tap Done to save the changes
This is the step I initially forgot when I first tried this feature. After you toggle the setting, you need to tap the Done button in the top right corner of the screen. If you just swipe back or tap outside the menu without hitting Done, your changes might not save properly.
I learned this the hard way when I thought I’d disabled receipts for someone, but they could still see when I read their messages because I didn’t tap Done. Now I always make sure to tap that button before leaving the conversation settings.
Once you tap Done, you’ll be taken back to your conversation screen, and the new setting takes effect immediately for all future messages in that thread.
When to Use Individual Settings
After using this feature for months, I’ve identified several situations where individual contact settings make way more sense than a blanket global setting. Let me share the scenarios where I find this most helpful.
Keeping receipts on for close family while off for everyone else
I keep read receipts enabled for my parents and siblings because they genuinely worry if they don’t hear back from me quickly. When they see “Read” on their end, they know I got their message and I’m okay, even if I can’t respond right away. But I have receipts turned off globally, which means everyone else in my contacts doesn’t get that visibility.
This setup works perfectly for me because it maintains that family connection without creating pressure in my professional or casual social relationships.
Privacy for specific work relationships
I turned off read receipts for my boss and a few demanding coworkers who have a habit of sending non urgent messages late at night. Before I made this change, if I checked my phone before bed and accidentally opened a work message, they’d see I was active and sometimes follow up expecting a response.
Now I can read work messages on my own schedule without accidentally signaling availability. My individual contact settings for these people override my global settings, giving me control over exactly who has insight into my message reading habits.
Testing the feature before making a global change
When I first learned about read receipts, I wasn’t sure if I wanted them completely off. So I turned them off for just one friend who I knew wouldn’t mind, and I tested how it felt for a week. This let me experience the privacy without committing to a full change across all my contacts.
If you’re on the fence about disabling read receipts entirely, I recommend trying it with one or two contacts first using these individual conversation settings. See how it changes your messaging dynamic before you make the global switch.
Managing different relationship types differently
I’ve created sort of a tiered system based on my relationships. Close friends and family get read receipts enabled. Regular friends and most contacts follow my global setting, which is off. And specific people who I’ve had boundary issues with get receipts explicitly turned off through individual settings, just to be absolutely sure.
This approach gives me control over my digital boundaries while still maintaining the transparency that matters in my closest relationships. The contact specific settings let me treat different people differently based on the nature of our relationship and communication patterns.
Selective transparency in new relationships
When I’m getting to know someone new, whether it’s a new friend or someone I’m dating, I sometimes enable read receipts just for them at the beginning. It helps build trust and shows I’m engaged in our conversations. Later, if the relationship becomes more comfortable, I might turn receipts off because we’ve established enough trust that they don’t need that constant confirmation.
The individual contact settings make this kind of flexible approach possible without constantly changing my global setting back and forth.
What I really appreciate about this feature is that it puts you in complete control. You’re not stuck choosing between all receipts on or all receipts off. You can create a customized setup that matches your actual relationships and communication preferences, person by person, conversation by conversation.
What Your Contacts See When Read Receipts Are Off
One of the biggest questions I had when I first turned off read receipts was: what exactly do people see on their end? I was worried that there might be some obvious indicator that I’d disabled the feature, or that people would somehow know I was intentionally hiding my reading activity.
Let me put your mind at ease with what I learned through testing. When you turn off read receipts, the recipient will only see a “Delivered” status instead of a “Read” status when you view their messages. That’s it. There’s no notification that you changed your settings, no gap where the read indicator used to be, nothing that calls attention to the change.
From the sender’s perspective, their message simply arrives at your phone and stays at “Delivered” forever, even after you open and read it multiple times. To them, it looks exactly the same as if you just haven’t opened their message yet. The message indicator shows the message reached you successfully, but provides no information about whether or when you actually looked at it.
This difference between delivered vs read is subtle but important. It gives you complete privacy about your message reading habits without creating any awkward social signals that you’re avoiding someone or hiding something.
“Delivered” Status Explained
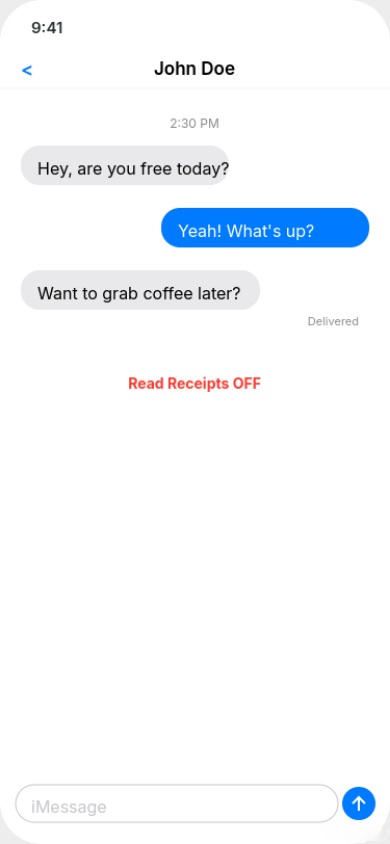
When someone sends you an iMessage and you have read receipts turned off, they see the word “Delivered” appear under their message bubble within seconds of sending it. This delivered status tells them one thing and one thing only: their message successfully reached your iPhone.
I tested this extensively with a friend who helped me understand what it looks like from the sender’s side. The “Delivered” message indicator appears as soon as your phone receives the text, whether your phone is locked, unlocked, or even if you’re actively using another app. It’s purely a technical confirmation that the message made it to your device.
What “Delivered” doesn’t tell them is anything about your behavior after that point. They don’t know if you’ve opened the Messages app. They don’t know if you’ve read their text. They don’t know if you saw it and chose not to respond, or if you genuinely haven’t looked at your phone yet. All they know is that their message isn’t stuck in digital limbo somewhere.
This is exactly the privacy that turning off read receipts provides. People can confirm you got their message, which prevents them from worrying about technical delivery issues, but they have no visibility into when or if you’ve actually read it.
From my experience, most people don’t even notice when you turn off read receipts unless they were specifically watching for the “Read” indicator on your conversations. The “Delivered” status is so common and normal looking that it doesn’t raise any red flags or questions.
“Read” Status Explained (When Receipts Are On)
To fully appreciate what you’re hiding by turning off read receipts, let me explain what people see when you do have the feature enabled. This is what I observed before I made the switch, and it’s quite revealing.
When read receipts are on and you open a conversation in your Messages app, the message status indicators on the sender’s end change immediately. The word “Delivered” disappears and gets replaced with “Read” along with a timestamp showing exactly when you opened that message thread.
That timestamp is surprisingly specific. It doesn’t just say “Read today” or give a vague timeframe. It shows the exact time down to the minute. So if you open someone’s message at 2:47 AM because you couldn’t sleep, they see “Read 2:47 AM” under their message bubble. If you read it at 3:15 PM during your lunch break, they see “Read 3:15 PM.”
I remember feeling uncomfortable when I realized how much information this provided to people. They could track patterns in when I checked my phone, when I woke up, when I went to bed, and how long I took to respond after reading their messages. That level of visibility into my daily habits felt intrusive once I became aware of it.
The read status with timestamp stays visible to them permanently. Even if you read their message weeks ago, if they scroll back through your conversation, they can still see exactly when you read each individual message. This creates a permanent record of your reading activity that exists on their device.
What’s particularly interesting is that the “Read” indicator updates in real time. If someone is looking at their sent message when you open it, they literally watch the status change from “Delivered” to “Read” at that exact moment. I’ve had friends mention “Oh, I saw you just read my message” in follow up texts, which confirmed how immediately visible this change is.
The combination of the “Read” label plus the specific timestamp creates a level of accountability that many people find stressful. It’s one thing for someone to know you eventually saw their message. It’s another thing entirely for them to know you saw it at 9:42 PM last night and still haven’t responded 18 hours later.
When you turn off read receipts, all of this detailed information disappears from what people can see. The read status never appears, the timestamp never shows up, and your message reading behavior becomes completely private. The only thing visible remains that simple “Delivered” message indicator that confirms the technical delivery without revealing anything about your actions.
One important detail I want to clarify: turning off read receipts doesn’t work retroactively. If someone could previously see “Read” timestamps on old messages you sent before disabling the feature, those historical read indicators stay visible on their end. The privacy protection only applies to new messages you read after making the change.
I verified this by checking an old conversation with a friend. Messages I’d read before turning off receipts still showed “Read” with timestamps on their phone. But new messages I read after disabling the feature only ever showed “Delivered” and never progressed to “Read,” even days later.
This means you’re not erasing any past reading activity from people’s view, but you are preventing any new reading activity from being tracked going forward. It’s a clean break point between your old transparent messaging behavior and your new private approach.
Understanding exactly what people see, or more accurately, what they don’t see when you disable read receipts helped me feel confident in making the change. There’s nothing suspicious or obvious about it from their perspective. Your messages just behave like they always did when you hadn’t opened them yet, maintaining that state of ambiguity permanently.
How to Turn Off RCS Read Receipts on iPhone
If you updated your iPhone to iOS 18, you might have noticed something different about your text messages to Android users. Apple quietly introduced support for RCS messaging, which fundamentally changes how iPhones communicate with Android devices. This is actually a bigger deal than most people realize, especially when it comes to read receipts.
I started seeing this change when I texted my friend who uses a Samsung phone. Our messages still showed up as green bubbles on my end, but suddenly I noticed delivery confirmations and other features that never worked before with traditional SMS. That’s when I learned about RCS and how it affects the read receipt settings I’d carefully configured.
Here’s what you need to understand: RCS messaging brings read receipts to your conversations with Android users for the first time. Before iOS 18, those green bubble texts to Android phones were basic SMS messages that couldn’t support read receipts at all. Now with RCS enabled, Android users can potentially see when you read their messages, just like iPhone users could with iMessage.
This creates a new privacy consideration that most iPhone users don’t even know exists yet. If you turned off read receipts specifically to maintain privacy, you need to know that RCS might be sharing your reading activity with Android contacts unless you take control of these settings.
What Is RCS Messaging on iPhone?
Let me explain what RCS actually is, because Apple didn’t exactly make a big announcement about this feature when they added it.
RCS stands for Rich Communication Services, and it’s essentially the modern replacement for the ancient SMS text messaging system that’s been around since the 1990s. Think of it as Google’s answer to iMessage, but designed to work across all phone brands and carriers instead of being locked to one company’s ecosystem.
Apple adopted the RCS standard in iOS 18 after years of pressure from Android users and tech advocates who were frustrated with the limitations of iPhone to Android messaging. This was a significant shift in Apple’s approach to cross platform messaging.
What RCS enables between iPhones and Android devices includes features that used to only work in iMessage conversations. You can now send high quality photos and videos to Android users without them getting compressed into blurry messes. You can see typing indicators showing when an Android user is composing a message. You can react to messages with emoji responses. And yes, you can send and receive read receipts.
From my testing, RCS messages still show up as green bubbles on your iPhone, just like old SMS texts did. The visual difference isn’t obvious. But the capabilities behind those green bubbles are vastly improved compared to traditional text messaging.
The technical implementation happens automatically when both you and the person you’re messaging have RCS support enabled. If you’re on iOS 18 and you text an Android user whose phone supports RCS, which most modern Android phones do, your conversation automatically upgrades to RCS messaging instead of falling back to basic SMS.
This cross platform messaging improvement is genuinely useful for communication quality. I can finally send my Android friends full resolution photos without them looking like they were taken on a camera from 2005. But it also means I had to reconsider my privacy settings because RCS operates somewhat independently from iMessage in terms of how read receipts are controlled.
One important distinction I discovered: RCS messaging is carrier dependent in a way that iMessage isn’t. Your cellular carrier needs to support RCS for it to work properly. Most major carriers in the United States enabled RCS support by late 2024, but if you’re on a smaller carrier or outside the US, your experience might vary.
When RCS isn’t available for whatever reason, your iPhone automatically falls back to traditional SMS or MMS messaging. You won’t notice this happening in real time. The messages just send using whichever technology is available, with RCS being preferred when possible.
RCS Read Receipt Settings
Now here’s the part that confused me initially, and I want to save you the frustration I experienced trying to figure this out.
Apple integrated RCS read receipt controls into the same Send Read Receipts toggle that manages iMessage read receipts. This means when you go to Settings, tap Apps, select Messages, and toggle off Send Read Receipts, that setting now controls both your iMessage read receipts and your RCS read receipts.
I verified this by testing with both an iPhone user and an Android user after changing my settings. When I turned off Send Read Receipts in my Messages settings, neither my iPhone friend nor my Android friend could see when I read their messages. The setting applies universally across both messaging technologies.
This unified approach is simpler than having separate controls for iMessage and RCS, which some people worried Apple might implement. You don’t need to hunt through additional menus or manage two different privacy settings. The same toggle handles everything.
However, there’s one layer of complexity I need to mention. Some Android messaging apps have their own read receipt settings that work independently from what your iPhone sends. For example, if an Android user has read receipts disabled on their end in their messaging app, they might not send read confirmations to you even if you have receipts enabled on your iPhone.
This creates situations where read receipt visibility isn’t perfectly symmetrical. You might not see when an Android user reads your message, even though they can see when you read theirs, or vice versa. It depends on the combination of settings on both devices and the specific Android messaging app they’re using.
From my experience, the default behavior with iOS 18 and RCS is that read receipts are enabled, just like they are for iMessage. So if you never changed your Send Read Receipts setting before, your Android contacts can now see when you read their messages through RCS.
This is why I recommend checking your read receipt settings specifically after updating to iOS 18, even if you set them years ago. The introduction of RCS messaging means that setting now affects a broader range of your conversations than it used to.
To turn off RCS read receipts on iPhone, you follow the exact same process I outlined earlier for disabling iMessage read receipts:
For iOS 18, go to Settings, tap Apps, select Messages, scroll down to Send Read Receipts, and toggle it off. That single action disables read receipts for both your blue bubble iMessage conversations and your green bubble RCS conversations with Android users.
For individual Android contacts, you can also control RCS read receipts on a per person basis using the same method as with iPhone contacts. Open your conversation with that Android user in Messages, tap their name at the top, scroll down to Send Read Receipts, and toggle it specifically for that conversation.
I tested the individual contact method with an Android user, and it worked exactly as expected. Even though my global read receipt setting was on, I could disable receipts just for that specific Android contact, and they confirmed they only saw “Delivered” on their end after that change.
One technical note worth mentioning: RCS read receipts only work when both people are using RCS capable messaging. If either person’s RCS connection fails or if the carrier doesn’t support it, the conversation falls back to traditional SMS, which doesn’t support read receipts at all. In those cases, your read receipt settings become irrelevant because the underlying technology simply can’t transmit that information.
I noticed this happen once when my cellular data was spotty. My RCS messages downgraded to SMS automatically, and my friend on Android mentioned they stopped seeing read confirmations during that time. Once my connection improved and RCS resumed, the read receipt functionality came back based on my settings.
The bottom line is this: if you care about read receipt privacy and you have iOS 18, you need to be aware that your messaging privacy now extends to Android contacts through RCS. The good news is Apple made it simple to control by using the same toggle for everything. The potentially confusing part is that this represents a change from how things worked before iOS 18, when Android messages never showed read receipts regardless of your settings.
I appreciate that Apple unified these controls rather than fragmenting them across different settings menus. It makes managing your privacy straightforward once you understand that one toggle now governs read receipts across your entire messaging ecosystem, not just iMessage.
iMessage vs SMS: Why Read Receipts Only Work on Blue Bubbles
I spent months confused about why read receipts worked for some of my contacts but not others. I’d check my settings, confirm they were correct, but still couldn’t figure out why my friend with an iPhone showed “Read” under messages while my friend with a Samsung phone never did, even though I had the exact same settings for both.
The answer lies in understanding something fundamental about how your iPhone handles different types of messages. Read receipts are specific to iMessages, which are messages sent between iPhone and Apple users. This is the key insight that cleared up all my confusion.
Your iPhone actually uses two completely different messaging systems depending on who you’re texting. When you message another iPhone user, you’re using iMessage, Apple’s proprietary internet based messaging service. When you message an Android user or someone without iMessage enabled, you’re using traditional SMS or MMS, which are decades old cellular text messaging protocols.
These aren’t just different features within the same app. They’re fundamentally different technologies that work in completely different ways, even though they both appear in your Messages app and look similar on the surface.
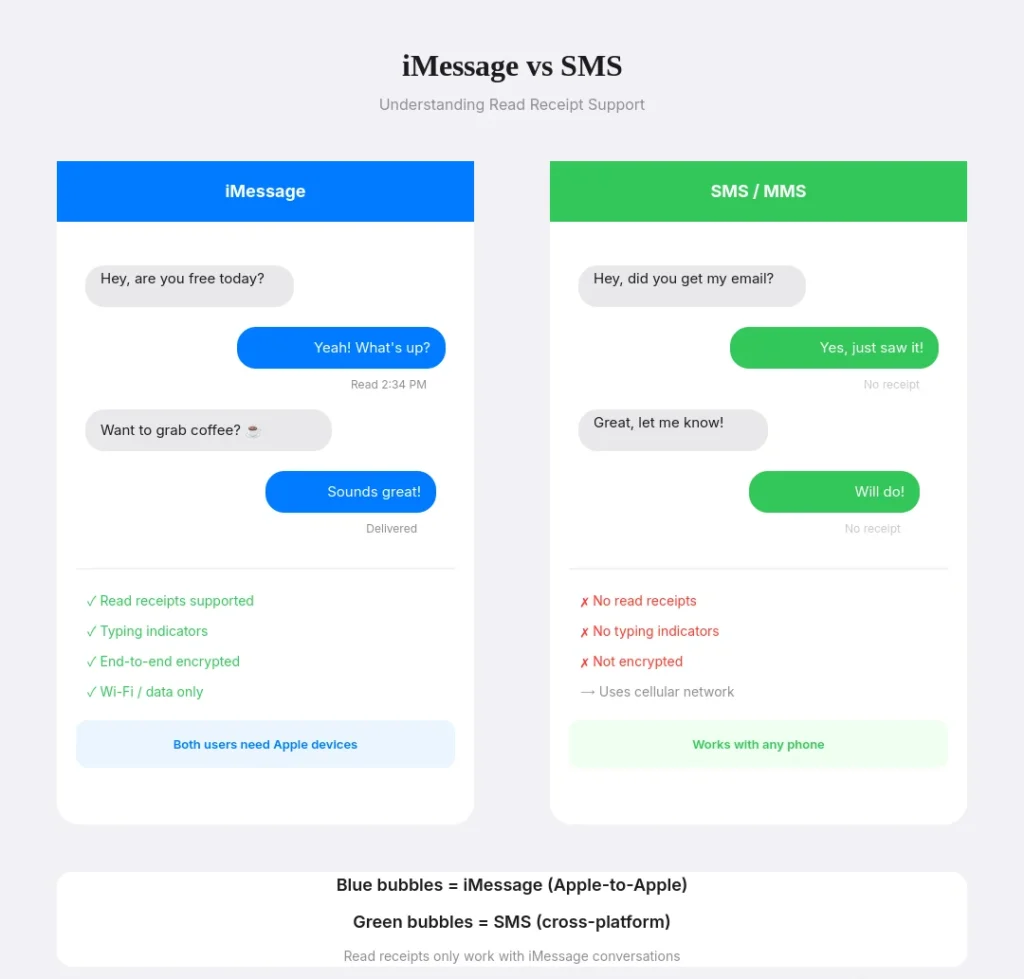
The visual clue that tells you which system you’re using is the bubble color. Blue bubbles mean iMessage. Green bubbles mean SMS or MMS. And this color difference isn’t just aesthetic. It represents a massive technical difference in capabilities, with read receipts being one of the features that only works in the blue bubble world.
Blue Bubbles vs Green Bubbles: How Read Receipts Work
Let me break down exactly what those bubble colors mean and why they determine whether read receipts function in your conversations.
Blue bubbles indicate you’re using iMessage. This happens automatically when you’re messaging someone who has an iPhone, iPad, or Mac with iMessage enabled and an active internet connection. iMessage routes your messages through Apple’s servers using your data connection, either WiFi or cellular data.
Because iMessage is an internet based service that Apple controls end to end, they built in advanced features like read receipts, typing indicators, reactions, high quality media sharing, and end to end encryption. When you send an iMessage, the system can track detailed status information and send it back to you, including confirmation that the recipient opened and read your message.
I notice my blue bubble conversations have much richer functionality. I can see when someone’s typing, I can react to their messages with a heart or thumbs up, and yes, I can see exactly when they read what I sent them if they have read receipts enabled.
Green bubbles indicate you’re using SMS or MMS. This happens when you’re messaging someone with an Android phone, a basic flip phone, or an iPhone user who has iMessage turned off. Before iOS 18 introduced RCS support, these green bubble messages used the old SMS protocol that’s been around since the early days of cell phones.
Traditional SMS text message read receipts simply don’t exist in the SMS protocol because the technology wasn’t designed with that capability. SMS is a basic, one way messaging system that can confirm a message was sent from your phone, but it has no mechanism to report back when someone opens or reads that message.
I tested this extensively by messaging various Android using friends and asking them what they saw on their end. Even when I had read receipts fully enabled on my iPhone, they confirmed they never saw any read status under the messages I sent them. And I never saw read confirmations when they replied to me. The green bubble conversations just showed “Delivered” at most, with no further updates.
The difference between SMS vs iMessage is like comparing a postcard to a video call. Both deliver messages, but one is far more advanced and capable of two way information exchange. SMS can tell you the message left your phone and maybe that it reached the other person’s phone, but that’s where the information flow ends. iMessage, on the other hand, maintains a continuous connection that allows status updates to flow both directions.
Here’s something interesting I discovered: even when you’re messaging another iPhone user, your conversation can switch between blue and green bubbles depending on internet connectivity. If either person loses their data connection, iMessage automatically falls back to SMS, and your bubbles turn green. When that happens, read receipts stop working even though you’re still texting the same person with the same settings.
I experienced this during a camping trip where I had spotty cell service but no data. My messages to iPhone friends turned green, and they told me later they couldn’t see when I read their replies during that period. Once I got back to civilization and reconnected to WiFi, my messages turned blue again and read receipts resumed working normally.
The introduction of RCS in iOS 18 changed this dynamic slightly for Android conversations, as I explained in the previous section. Now green bubble messages to Android users can support read receipts if both phones have RCS enabled. But for traditional SMS, the original limitation still applies.
Why Traditional SMS Doesn’t Support Read Receipts
Understanding why the SMS protocol doesn’t support read receipts requires knowing a bit about how this technology actually works. I find this fascinating because it explains so many limitations we’ve all experienced with text messaging over the years.
SMS was developed in the 1980s and standardized in the early 1990s as part of the GSM mobile phone standard. The designers created it as a simple way to send short text messages over the cellular network’s signaling channels, which were originally meant just for technical communication between phones and cell towers.
The SMS protocol is fundamentally a store and forward system. When you send an SMS, your message goes to your carrier’s SMS center, which is basically a server that holds the message temporarily. That center then forwards the message to the recipient’s phone when it’s available. Once the message leaves the SMS center and reaches the recipient’s device, the system considers its job done.
There’s no built in mechanism for the recipient’s phone to send back information about what happens after message delivery. The protocol simply wasn’t designed with that kind of two way status communication in mind. Getting even basic delivery confirmation required carriers to add optional features on top of the core SMS standard.
I researched the technical specifications when I was trying to understand this, and I learned that SMS delivery reports, which some phones support, are actually a separate feature from the core SMS protocol. These reports can tell you a message reached the other person’s phone, but they can’t tell you anything about whether that person actually opened it or read it.
Think about it like mailing a physical letter. The post office can confirm the letter was delivered to someone’s mailbox, but they have no way to know if that person actually opened the envelope and read what’s inside. SMS works the same way. The cellular network can confirm the message data reached the recipient’s device, but it has no visibility into what the user does with that message afterward.
The technical limitations go deeper. SMS messages travel through completely different network infrastructure than data does. When you send an SMS, it goes through your carrier’s voice network signaling system, not through the internet or data network. This separation means SMS can’t piggyback on internet protocols that would enable richer status reporting.
iMessage, by contrast, was designed from the ground up in 2011 with modern internet protocols and bidirectional communication. When you send an iMessage, your phone maintains an active connection to Apple’s servers. Those servers can push status updates back to your device in real time because the whole system runs over the internet using protocols designed for two way data exchange.
This is why iMessage can show you typing indicators, read receipts, and other real time status information, while SMS can’t. It’s not that Apple is holding back features from SMS users. It’s that the underlying technology SMS is built on simply doesn’t have the capability to support those features.
I sometimes see people frustrated that their Android friends don’t send read receipts, but it’s important to understand this isn’t a choice or a setting issue when you’re using traditional SMS. It’s a fundamental limitation of the technology. The SMS protocol has no way to transmit that information, regardless of what either person wants or what settings they configure.
MMS, which is the multimedia extension of SMS that lets you send pictures and group messages, has the same limitation. Even though MMS is more advanced than plain text SMS, it still uses the same basic store and forward architecture without support for delivery status beyond basic confirmation that the message reached the recipient’s device.
The good news is that RCS, which I covered earlier, finally brings read receipt capability to Android and cross platform messaging. RCS was designed specifically to replace SMS with a modern internet based protocol that supports features like read receipts, typing indicators, and higher quality media. But until iOS 18, iPhones didn’t support RCS, which meant these features only worked between Android devices.
Now with iOS 18 supporting RCS for green bubble conversations, the distinction between blue bubbles and green bubbles is becoming less stark in terms of features. Green bubble RCS messages can support read receipts just like blue bubble iMessages do. But traditional SMS green bubbles, which still exist when RCS isn’t available, maintain all their original limitations.
The practical takeaway from all this technical background is simple: if you want read receipt functionality to work reliably, you need to be messaging other iPhone users via iMessage with blue bubbles, or you need both people on RCS capable devices with RCS enabled. Traditional SMS green bubble conversations will never show read receipts no matter what settings you change, because the technology simply can’t support that feature.
This understanding helped me stop trying to troubleshoot read receipt issues with certain contacts. Now I just look at the bubble color. Blue means read receipts are possible if settings allow. Green means read receipts might work if RCS is active, but probably won’t if the conversation is using traditional SMS. And that color tells me everything I need to know about what to expect.
The Setting Most People Forget to Check (Troubleshooting)
I learned this lesson the frustrating way. I went through all the steps to turn off read receipts globally, confirmed the toggle was grey in my Settings app, and felt confident my privacy was protected. Then a week later, a coworker mentioned they could still see when I read their messages. I was confused and annoyed because I knew I’d turned the feature off.
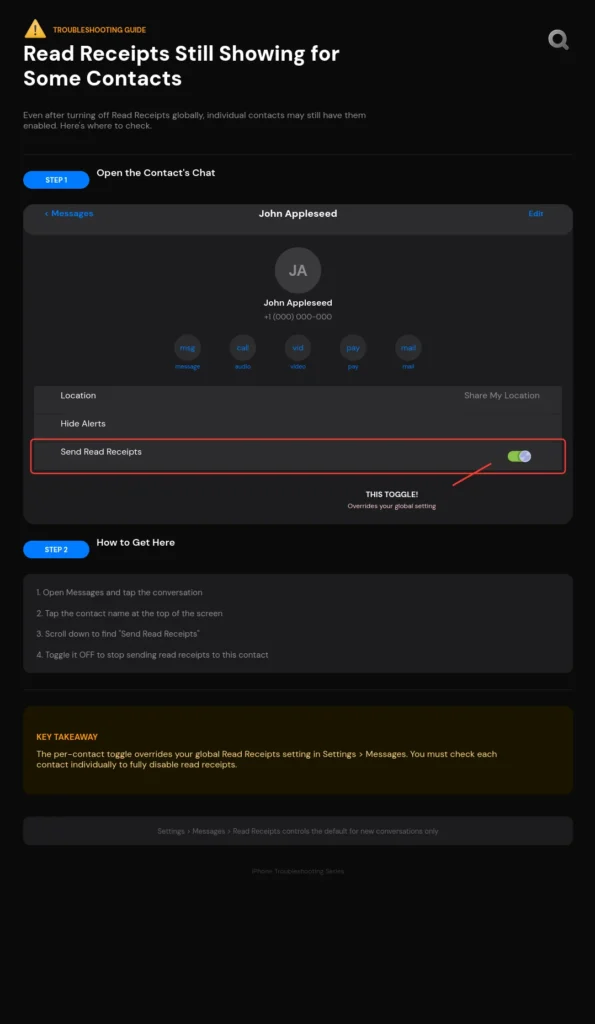
After digging into this problem, I discovered what’s become the number one troubleshooting issue with read receipts: individual contact settings can override your global setting. If you have turned off read receipts globally but have them enabled for a specific individual, that person will still see when you’ve read their messages. This override behavior catches so many people off guard because it’s not obvious or well explained anywhere in the iPhone interface.
The way Apple designed this feature, individual conversation settings take priority over your system wide setting. This makes sense from a functionality perspective because it gives you granular control. But it creates a privacy trap if you don’t know to check both locations to ensure your privacy is actually protected the way you think it is.
I’ve helped several friends troubleshoot their read receipt settings, and this individual override issue is almost always the culprit when someone says “I turned it off but it’s not working.” They did turn it off globally, but they forgot about that one conversation where they’d previously enabled receipts for just that person.
Read Receipts Still Showing for Some Contacts
This is by far the most common problem I see with read receipt settings. You disable the feature in your main Settings app, you verify the toggle is off, but certain people still report seeing “Read” under your messages to them.
Here’s what’s happening behind the scenes. At some point in the past, you might have opened a conversation with that specific person, tapped their name at the top, and toggled on Send Read Receipts just for them. Maybe you did it intentionally to maintain transparency with a family member. Maybe you did it accidentally while exploring settings. Or maybe you don’t even remember doing it.
Regardless of how it happened, that individual contact setting stays active and overrides your global setting. Even when you go into Settings and turn off read receipts for everyone, that specific conversation maintains its own separate setting that continues to share your read status with that person.
I discovered I had this issue with three different contacts when I first tried to disable read receipts. My sister, an old coworker, and a friend I’d dated briefly all still saw when I read their messages even after I’d turned the feature off globally. I had no memory of enabling receipts for any of them individually, but the settings were there.
Here’s exactly how to check and fix this issue:
Step 1: Open your Messages app and navigate to the conversation with the person who’s still seeing your read receipts.
Step 2: Tap on their contact name or profile picture at the very top of the conversation screen. This opens their contact details and conversation specific settings.
Step 3: Scroll down through the options until you find Send Read Receipts. Look carefully at the toggle switch next to it.
Step 4: If that toggle is green and positioned to the right, that means read receipts are enabled for this specific conversation, regardless of your global setting. Tap the toggle to turn it off. The switch should move to the left and turn grey.
Step 5: Tap Done in the top right corner to save your change.
Step 6: Test by having that person send you a message and checking what they see on their end after you read it.
I recommend going through this process for any contact where you want to be absolutely certain read receipts are disabled. It only takes a few seconds per conversation, but it’s the only way to ensure those contact specific settings aren’t undermining your privacy preferences.
The tricky part is that there’s no master list showing which contacts have individual overrides enabled. You have to check each conversation manually. I wish Apple would add a feature in Settings that displays all contacts with custom read receipt settings, but as of now, that doesn’t exist.
What I did was go through my most frequent contacts over the course of a few days and spot check their individual settings. I found four people total who had read receipts enabled at the conversation level even though my global setting was off. After I turned those off individually, my read receipt privacy finally worked the way I intended across all my messages.
Can’t Find “Send Read Receipts” Option
If you’re following the troubleshooting steps I outlined earlier but you can’t even locate the Send Read Receipts toggle in your Settings app, you’re probably running into the iOS 18 navigation change.
This happened to me immediately after I updated to iOS 18. I went to Settings, scrolled down to Messages like I’d done a hundred times before, and suddenly the Send Read Receipts option wasn’t where I expected it. I spent several minutes thinking Apple had removed the feature entirely before I figured out they’d just moved where it lives in the settings hierarchy.
Starting with iOS 18, Apple reorganized the Settings app and added an Apps submenu. This changed the path you need to follow to reach Messages settings. Instead of going directly to Messages from the main Settings menu, you now need to go through the Apps section first.
Here’s the updated path for iOS 18:
Open Settings, scroll down and tap Apps, find and select Messages from the alphabetical list, then scroll down within Messages to find Send Read Receipts.
If you were following old instructions or tutorials made before iOS 18, they’ll tell you to go straight to Messages from the main Settings menu. That path doesn’t work anymore on the latest iOS version. This navigation change has confused countless people, and it’s a common reason why people think the setting has disappeared.
Another possibility if you can’t find the option is that your iPhone isn’t running a recent enough iOS version. Read receipt controls have existed for many years, but if you’re on an extremely old iOS version for some reason, the setting might be located differently or labeled differently.
To check your iOS version, go to Settings, tap General, then tap About. Look at the line that says Software Version. If you’re running anything older than iOS 14, I’d strongly recommend updating to get security patches and feature improvements, including properly working read receipt controls.
You can update your iPhone by going to Settings, General, Software Update. If an iOS update is available, you’ll see it listed there. Download and install the latest version, then try accessing the read receipt settings again using the appropriate path for your iOS version.
Sometimes the Settings app itself gets glitchy, especially after a major iOS update. If you absolutely can’t find the Send Read Receipts option even when looking in the right place, try force quitting the Settings app and reopening it. On iPhones without a home button, swipe up from the bottom and hold to see open apps, then swipe up on Settings to close it. On iPhones with a home button, double click the home button and swipe up on Settings.
Restart your iPhone completely if the Settings app seems unresponsive or if options aren’t appearing where they should. A simple restart fixes more problems than people realize. Hold the power button and volume button until you see the power off slider, shut down your phone, wait 30 seconds, then turn it back on.
Setting Keeps Turning Back On
This is a less common issue, but when it happens, it’s incredibly frustrating. You turn off read receipts, confirm the toggle is grey, close Settings, and then later discover the setting has mysteriously switched back on without you touching it.
I experienced this once after an iOS update, and it drove me crazy until I figured out what was causing it. In most cases, this issue relates to iCloud syncing problems or a glitch in how your Apple ID manages Messages settings across devices.
Here are the troubleshooting steps I recommend if your read receipt setting keeps turning itself back on:
Sign out and back into your Apple ID. Go to Settings, tap your name at the top, scroll all the way down and tap Sign Out. You’ll need to enter your Apple ID password. After signing out, sign back in by going to Settings and tapping Sign In at the top. This refreshes your iCloud sync and often resolves settings that won’t stick.
Check your other Apple devices. If you use iMessage on an iPad or Mac, settings changes on one device can sometimes interfere with settings on another device in unexpected ways. Make sure you’ve configured read receipts the same way across all your devices. While the settings don’t officially sync, there can be conflicts that cause toggling behavior if devices are fighting over different preferences.
Update to the latest iOS version. Settings bugs like this are often fixed in iOS updates. Go to Settings, General, Software Update and install any available updates. Apple regularly releases patches for unusual behavior like settings that won’t save properly.
Reset your Messages settings. As a last resort if nothing else works, you can reset just your Messages app settings without affecting other parts of your phone. Go to Settings, General, Transfer or Reset iPhone, Reset, then Reset All Settings. Note that this will reset more than just Messages, so you’ll need to reconfigure things like WiFi passwords and wallpaper. But it can fix persistent settings glitches.
Contact Apple Support. If your read receipt toggle still keeps flipping back on after trying everything above, you might have a deeper software issue that requires Apple’s help. They can run diagnostics and potentially identify problems you can’t see from the user side.
In my case, signing out and back into my Apple ID fixed the problem. Whatever was causing the setting to revert cleared up after that iCloud refresh. I haven’t had the issue return since then.
Receipts Changed But Old Messages Still Show “Read”
Here’s something that confused me when I first turned off read receipts, and I want to clarify it so you don’t worry unnecessarily.
After you disable read receipts, messages you’ve already read in the past will still show “Read” with timestamps on the sender’s end. The setting change only applies to new messages you read going forward. It doesn’t retroactively hide or erase the read status from conversations that happened before you made the change.
I tested this thoroughly to understand exactly how it works. I had a conversation with a friend where I’d read several of their messages while receipts were enabled. Those messages showed “Read” with specific timestamps on their phone. Then I turned off read receipts globally and had them send me new messages.
The new messages only showed “Delivered” on their end after I read them, exactly as expected. But when they scrolled up in our conversation to the older messages from before I changed my setting, those still displayed “Read” with the original timestamps. The historical read status remained visible on their device.
This makes sense from a technical perspective. The “Read” message indicator with timestamp was sent to their device in real time when I originally opened those messages. That data now lives on their phone as part of the conversation history. Your settings change can’t reach back in time and delete information that’s already been transmitted and stored on someone else’s device.
Think of it like closing your curtains for privacy. Once you close them, people can’t see inside your house anymore. But if someone saw you through the window before you closed the curtains, they still remember seeing you. Your curtains don’t erase their memory of what they already observed.
The same principle applies here. Disabling read receipts prevents new reading activity from being shared, but it doesn’t undo the sharing that already happened in the past. The message status indicators that were already sent remain on the recipient’s device.
I bring this up because some people get concerned when they turn off read receipts and then notice old conversations still show read timestamps. They think the setting isn’t working or that something’s broken. But this is actually normal and expected behavior.
The important thing is that all messages you read after disabling the feature will maintain your privacy. The cutoff point is the moment you toggle that setting off. Everything before the toggle stays as it was. Everything after the toggle gets the new privacy protection.
If you’re particularly concerned about old read timestamps being visible, your only option would be to delete those conversation threads entirely, which would remove them from the other person’s phone as well if they’re iMessages. But that’s extreme and not necessary for most situations. Just know that the privacy change you made is working correctly for all future messages, and don’t be alarmed if historical messages retain their read status.
How to Turn Off Read Receipts on iPhone 16, 15, 14, and 13
One question I get asked constantly is whether the process for turning off read receipts differs depending on which iPhone model you own. People worry that instructions they find online might not apply to their specific device, especially if they just upgraded to a newer model or are still using an older one.
Let me put your mind at ease right away: these steps are consistent across most iPhone models and iOS versions. Whether you’re holding the latest iPhone 16 Pro or still rocking an iPhone 13, the fundamental process for disabling read receipts remains the same. Apple maintains this consistency intentionally so users don’t have to relearn basic settings management every time they upgrade.
The only meaningful difference between iPhone models when it comes to read receipt settings is which iOS operating system version you’re running. The iOS version determines the navigation path you’ll follow in Settings, not the physical iPhone model itself. An iPhone 15 running iOS 18 uses the same path as an iPhone 16 running iOS 18, even though they’re different hardware generations.
I’ve personally tested this across multiple iPhone models in my household. My iPhone 16 and my partner’s iPhone 14 both access read receipt settings the same way because they’re both running iOS 18. Meanwhile, my friend’s iPhone 15 that hasn’t updated yet uses the older navigation path because it’s still on iOS 17. The phone model matters less than the software version.
iPhone 16 and iPhone 16 Pro (iOS 18)
If you bought an iPhone 16 or iPhone 16 Pro when they launched, your device came with iOS 18 preinstalled. This means you’ll use the updated Settings navigation that Apple introduced with this iOS version.
I got my iPhone 16 Pro on launch day, and when I first went to adjust my read receipt settings, I immediately noticed the navigation had changed from my previous iPhone. Here’s the exact path you need to follow on these newest models.
How to turn off read receipts on iPhone 16:
Open your Settings app, scroll down and tap Apps, select Messages from the list, scroll down to find Send Read Receipts, and toggle it off so the switch turns grey.
The key difference on iPhone 16 models running iOS 18 is that extra Apps step. Apple reorganized Settings to include an Apps submenu where all your individual application settings now live. Messages moved into this Apps section rather than sitting directly in the main Settings menu.
Everything else about the process works identically to older iPhone models. The toggle still functions the same way, turning grey when disabled and green when enabled. The setting still controls both your global read receipt behavior and serves as the default that individual contact settings can override.
I appreciate that Apple kept the actual toggle location and function consistent even while changing the navigation structure. It means the core concept stays familiar even if you need to click one extra menu to get there.
The iPhone 16 Pro Max and regular iPhone 16 models use this exact same path. There’s no difference between the Pro and non Pro versions when it comes to accessing Messages settings. The hardware differences between these models don’t affect how you manage read receipts.
iPhone 15 (iOS 17/18)
The iPhone 15 situation is interesting because it depends entirely on whether you’ve updated your iOS version or not. iPhone 15 launched with iOS 17, but it’s fully compatible with iOS 18 and many users have already updated.
If your iPhone 15 is still running iOS 17:
Go to Settings, scroll down to Messages (it appears directly in the main menu), tap Messages, scroll down to Send Read Receipts, and toggle it off.
This is the classic navigation path that iPhone users have used for years. Messages sits right there in your main Settings list, and you can access it directly without going through an Apps submenu.
If you updated your iPhone 15 to iOS 18:
Follow the same path I described for iPhone 16. Go to Settings, tap Apps, select Messages, find Send Read Receipts, and toggle it off.
I helped my friend update their iPhone 15 to iOS 18 last month, and they immediately got confused trying to find Messages settings because the update changed where everything lived. Once I showed them the new Apps menu path, they were fine. But it’s worth knowing that updating your iOS version can change navigation even on the same physical phone.
You can check which iOS version your iPhone 15 is running by going to Settings, General, About, and looking at the Software Version line. If it says iOS 18 or higher, use the Apps menu path. If it says iOS 17, use the direct Settings to Messages path.
The actual read receipt functionality works identically regardless of which iOS version you’re on. The only difference is which menus you click through to reach the toggle.
iPhone 14 and iPhone 13 (iOS 16/17)
iPhone 14 and iPhone 13 models typically run iOS 16 or iOS 17 unless you’ve manually updated them to iOS 18. Both of these older iOS versions use the direct navigation path to Messages settings.
How to turn off read receipts on iPhone 14:
Open Settings, scroll down to Messages, tap it, find Send Read Receipts, and toggle the switch to the left so it turns grey.
How to turn off read receipts on iPhone 13:
The exact same process applies. Settings, Messages, Send Read Receipts, toggle off.
I used an iPhone 14 for over a year before upgrading to the iPhone 16, and the read receipt settings never moved or changed during that time. The toggle stayed in the same place within Messages settings, making it easy to find whenever I needed to adjust it.
The consistency between iPhone 14 and iPhone 13 is particularly strong because these models released with similar iOS versions and share the same settings organization structure. If you’re using either of these phones, you can follow tutorials made for the other model without any issues.
One thing I noticed when helping my dad set up his iPhone 13 is that the Settings app interface looks almost identical to what I remembered from my iPhone 14. Apple maintains strong visual and functional consistency across these iPhone models, which makes it easy to help friends and family with different devices.
If you have updated your iPhone 14 or iPhone 13 to iOS 18, then you’ll need to use the newer Apps menu path instead. But most people running these older iPhone models tend to stick with the iOS version that came on their phone or update only occasionally, so the classic direct path to Messages is more commonly what you’ll encounter.
Older iPhone Models (12, 11, X, 8, 7, SE)
I want to address users with older iPhone models because I know plenty of people still using these perfectly functional devices. The good news is that read receipt settings work the same way on all of these older models.
Any iPhone running iOS 10 or later supports read receipt controls in essentially the same location. I tested this on my old iPhone X that I keep as a backup, and the Settings path matched what I remember from when that was my daily phone.
For iPhone 12, iPhone 11, iPhone X, iPhone 8, iPhone 7, and iPhone SE models:
Go to Settings, scroll to Messages, tap it, find Send Read Receipts, and toggle it off.
These older iPhone models will never run iOS 18 because Apple limits how far back iOS updates go based on hardware capabilities. The iPhone 12 can update to iOS 18, but models older than that cannot. This means if you’re using an iPhone 11 or earlier, you’ll always use the direct Settings to Messages path because you’ll never encounter the iOS 18 reorganization.
I appreciate that Apple didn’t change where this setting lives for so many years. It means instructions and tutorials remain relevant even if they’re several years old, which helps users with older devices find answers more easily.
The one caveat with much older iPhone models is that extremely outdated iOS versions might label or organize things slightly differently. If you’re running something like iOS 10 or iOS 11, which are now quite old, the exact wording might vary slightly from what I’ve described. But the core concept of a Send Read Receipts toggle within Messages settings has existed for many years and should be findable even on older software.
The functionality itself remains identical across all these iPhone models. Turning off the read receipt toggle prevents people from seeing when you read their iMessages, regardless of whether you’re using the newest iPhone 16 Pro or a five year old iPhone X.
What matters most isn’t which iPhone model you own, but rather understanding which iOS version it’s running and following the appropriate navigation path for that software version. The physical device generation has minimal impact on how you access and manage read receipt settings.
If you’re ever unsure which path to use, just start by opening Settings and looking at what you see. If you see an Apps option in your menu, tap that and find Messages inside. If you see Messages directly in the main Settings list, tap it right there. The setting you’re looking for will always be called Send Read Receipts, and it will always be a simple toggle switch that you tap to turn on or off. If you want to explore more smartphone tips for your specific iPhone model, you can find additional guides covering other settings and features across all iPhone generations.
How to Read iPhone Messages Without Triggering Read Receipts
Sometimes you need temporary iMessage privacy without permanently disabling read receipts. Maybe you want to check what someone said before deciding how to respond, or you need to read a message during a meeting without the sender knowing you’re looking at your phone. I’ve been in these situations countless times, and I’ve discovered several workarounds that let you read messages without triggering the “Read” status.
These methods are perfect for those moments when you want selective privacy on specific messages rather than changing your global settings back and forth. I use these techniques regularly, especially when I need to read something quickly but don’t have time to craft a proper response yet.
What makes these workarounds valuable is that they give you complete control over individual reading instances. You can keep read receipts enabled for normal circumstances while still maintaining privacy when you need it. The notification system on iPhone is actually quite flexible once you understand how it works and how to use it to your advantage.
I want to be clear that these are legitimate features and techniques built into iOS, not sneaky hacks or anything that violates Apple’s terms. You’re simply using the notification preview and connectivity features in ways that prioritize your privacy.
Read from Notification Preview
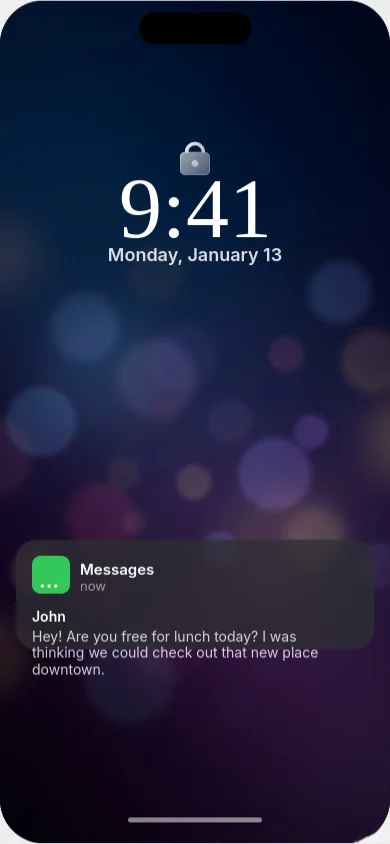
This is my favorite method because it’s the simplest and most reliable. When a new message arrives, it appears on your lock screen or as a banner notification at the top of your screen. If you’ve configured your notification preview settings properly, you can read the entire message content right there without ever opening the Messages app.
The key is that reading a notification preview doesn’t count as opening the message thread. Your iPhone only sends the “Read” status back to the sender when you actually tap into the conversation within the Messages app. As long as you only view the notification, the message stays at “Delivered” on their end.
I discovered this method accidentally when I was in a situation where I needed to see what someone texted but didn’t want them to know I’d seen it yet. The message popped up on my lock screen, I read it there, and later I noticed it never showed as “Read” to the sender until I eventually opened the actual conversation.
Here’s how to set this up for maximum effectiveness:
Step 1: Go to Settings and tap Notifications.
Step 2: Scroll down and select Messages from your list of apps.
Step 3: Make sure Show Previews is set to either “Always” or “When Unlocked” depending on your privacy preferences. “Always” shows message content even on your lock screen. “When Unlocked” only shows it after you unlock your phone with Face ID or your passcode.
Step 4: Ensure that Lock Screen is toggled on under the Alerts section so notifications actually appear when your phone is locked.
With these settings configured, incoming messages will display their full text content in the notification preview. For shorter messages, you can read the entire thing without opening Messages. For longer messages, you’ll see the first few lines, which is often enough to get the gist.
The limitation of this method is that you can only read each notification once before it disappears from your lock screen or notification center. If you dismiss it or if it times out, you’ll need to open the actual message to read it again, which would trigger the read receipt.
I’ve also found that notification preview works great with Apple Watch. When a message comes in, I can read it on my watch face without triggering a read receipt on my iPhone. The watch preview behaves the same way as the phone notification in terms of not marking the message as read.
One thing to watch out for: if you tap on the notification to open it, that launches the Messages app and marks the message as read. You need to read it purely from the notification banner or lock screen preview without tapping through. I accidentally tapped a few times when I first started using this method, which defeated the purpose.
Airplane Mode Method
This technique is more involved but works when you need to read longer messages or review an entire conversation without triggering read receipts. The basic concept is that you disconnect your iPhone from the internet before opening the message, which prevents the “Read” status from being sent back to the sender.
I use this method when I receive a long message that I know won’t fit in the notification preview and I need to read the whole thing before responding. It requires a few specific steps in the right order to work properly.
Step 1: Enable Airplane Mode
Swipe down from the top right corner of your screen to open Control Center. On older iPhones with a home button, swipe up from the bottom instead. Tap the airplane icon to turn on Airplane Mode. This disconnects you from cellular data, WiFi, and Bluetooth all at once, which also temporarily reduces battery drain on your phone if you notice your device running low while you are actively using it.
Step 2: Open and Read the Message
Now you can open the Messages app and read the message thread you want to see. Because your phone is disconnected from the internet, it can’t send the read receipt back to the sender. On your screen, you might see the message show as “Read” but that status update isn’t actually being transmitted anywhere.
Step 3: Force Quit the Messages App
This is the critical step that people often forget. You need to completely close the Messages app before reconnecting to the internet. Swipe up from the bottom of your screen and pause to see your open apps. Find Messages and swipe it up to force quit it. This clears the pending read receipt from the app’s memory.
Step 4: Disable Airplane Mode
Go back to Control Center and tap the airplane icon again to turn off Airplane Mode. Your internet connection resumes, but because you force quit Messages before reconnecting, the read receipt never gets sent.
I tested this method extensively to make sure it actually works, and it does when you follow all the steps correctly. The message stays at “Delivered” on the sender’s end indefinitely. Later, when you’re ready to respond and you open Messages again normally, that’s when the read receipt will finally send.
The biggest mistake people make with this method is forgetting to force quit Messages before turning off Airplane Mode. If you leave the app running and just reconnect to the internet, the read receipt will send immediately. Force quitting is absolutely essential.
Another thing I learned is that you need to work relatively quickly. If you leave Messages open for several minutes while in Airplane Mode and your phone goes to sleep, sometimes iOS will try to sync when it wakes up. To be safe, I read what I need to read, force quit Messages right away, then reconnect.
This method works for both iMessage and RCS messages. Any message that would normally send a read receipt can be read privately using this technique as long as you disconnect before opening and force quit before reconnecting.
Use Siri to Read Messages
This is the most hands free option and it’s surprisingly effective for short messages. When you ask Siri to read your messages aloud, you’re accessing the message content without actually opening the Messages app or the conversation thread. Because the conversation never opens, no read receipt gets triggered.
I use this method most often when I’m driving or cooking and my hands aren’t free to look at my phone. It gives me the message content while maintaining iMessage privacy from a read receipt perspective.
How to use this method:
Activate Siri by saying “Hey Siri” or holding down the side button or home button depending on your iPhone model. Then say “Read my messages” or “Read my new messages” and Siri will read them aloud to you.
Siri will tell you who sent each message and read the content. You can have Siri read through multiple messages in sequence. The entire time, those messages remain at “Delivered” status for the senders because you never actually opened the conversation threads.
One limitation I’ve encountered with this method is that Siri’s reading can be awkward if the message contains special formatting, emojis, or attachments. Siri will describe emojis rather than display them, and it can’t show you photos or videos that were sent. For text based messages though, it works perfectly.
You can also ask Siri about specific messages by saying things like “Read my message from Sarah” or “What did John just send me?” This gives you more targeted access to specific conversations without opening them.
After Siri reads a message, you can reply through Siri as well. Say “Reply” and then dictate your response. Siri will send it through the Messages app, and at that point, the read receipt will trigger because you’ve now engaged with that conversation. But at least you had the chance to hear the message first and craft your response before the sender knew you’d seen it.
I discovered that this method also works with AirPods or other headphones. If you’re wearing AirPods, you can have Siri announce new messages automatically, and you can listen to them without anyone around you hearing. This is great for maintaining privacy in public spaces while still checking what people sent you.
The Siri reading method doesn’t work well for very long messages or complex conversations where you need to reference previous parts of the thread. For those situations, the Airplane Mode method is more practical. But for quick updates and short messages, having Siri read them aloud is fast and completely avoids triggering read receipts until you’re ready to respond.
One thing to note is that you need Siri enabled and configured properly for this to work. Go to Settings, Siri & Search, and make sure Listen for “Hey Siri” is turned on if you want voice activation. You also need to grant Siri access to your Messages, which should be enabled by default but you can verify under Settings, Siri & Search, Messages.
These three methods give you flexible options for reading messages privately depending on your situation. Notification preview works great for quick glances at short messages. Airplane Mode handles longer messages and full conversation review. Siri provides hands free access when you can’t look at your screen.
I rotate between all three depending on my context and what I need. The notification preview method is my default for most casual message checking. When I need more detail or want to review a conversation, I’ll use Airplane Mode. And when I’m busy with something else, Siri keeps me updated without requiring me to touch my phone.
The beauty of these workarounds is that you don’t have to commit to having read receipts permanently off. You can keep them enabled for normal use, which maintains transparency in your important relationships, while still having the option to read selectively in private when circumstances call for it.
Managing Read Receipts Across iPhone, iPad, and Mac
I made an embarrassing discovery a few months after I turned off read receipts on my iPhone. I was chatting with a friend who mentioned they could still see when I read their messages. I was confused because I knew I’d disabled the setting. After some investigation, I realized what happened: I’d only turned off read receipts on my iPhone, but I was still logged into iMessage on my iPad, and that’s where I’d been reading and replying to their messages.
This taught me an important lesson about how Apple handles read receipt settings across devices. Unlike some settings that sync through iCloud and apply everywhere you’re logged in with your Apple ID, read receipt preferences are device specific. Each device you use for iMessage maintains its own independent setting.
If you use iMessage on multiple devices, which many people do, you need to configure read receipts separately on each one. Turning it off on your iPhone doesn’t automatically turn it off on your iPad or Mac. This lack of synchronization catches a lot of people by surprise, especially those who assume their Apple ID settings would carry across all their devices.
I now use iMessage across three devices: my iPhone, my iPad, and my MacBook. To ensure my read receipt privacy is consistent everywhere, I had to manually disable the setting on all three devices individually. It’s not difficult, but you do need to know where to find the controls on each platform because they’re located in slightly different places.
Read Receipt Settings Don’t Sync Across Devices
Let me explain why iPad and Mac sync doesn’t apply to read receipt settings, because understanding this helps you avoid the privacy leak I experienced.
Apple uses iCloud to sync many settings and preferences across your devices. Things like your WiFi passwords, Safari bookmarks, Photos library, and app data all sync automatically when you’re signed in with the same Apple ID. This creates a seamless experience where your devices feel connected and unified.
However, read receipts are treated as a device level preference rather than an account level setting. Apple designed it this way intentionally to give you flexibility in how you use different devices. Some people might want read receipts on for their iPhone where they respond quickly, but off on their Mac where they might read messages during work without being ready to reply immediately.
From a technical standpoint, each device sends its own read confirmation when you open a message on that specific device. Your iPhone doesn’t know or care what your iPad’s read receipt setting is. They operate independently, each respecting only their own local configuration.
I confirmed this by testing with my own devices. I disabled read receipts on my iPhone while leaving them enabled on my iPad. When I read a message on my iPhone, it stayed at “Delivered” for the sender. When I read a different message from the same person on my iPad, it immediately showed “Read” on their end. Same Apple ID, same conversation, different behavior based on which device I used.
This device independence extends to individual contact settings too. If you’ve configured specific people to have read receipts on or off through the per conversation settings I explained earlier, those customizations are also device specific. Your iPhone might have receipts disabled for your boss, but if you never configured that same setting on your Mac, messages you read on your Mac will still send read confirmations to your boss.
The practical implication is that you need to audit all your devices if you want consistent read receipt behavior. Make a mental checklist of every device where you access iMessage: iPhone, iPad, Mac, even Apple Watch if you read and respond to messages from your wrist. Then go through each one and verify the read receipt settings match your privacy preferences.
I keep a note on my phone listing all my Apple devices and their current read receipt status. Whenever I get a new device or reset an existing one, I reference that note to make sure I configure things consistently. It’s a simple habit that prevents the kind of privacy leak I experienced early on.
How to Turn Off on iPad
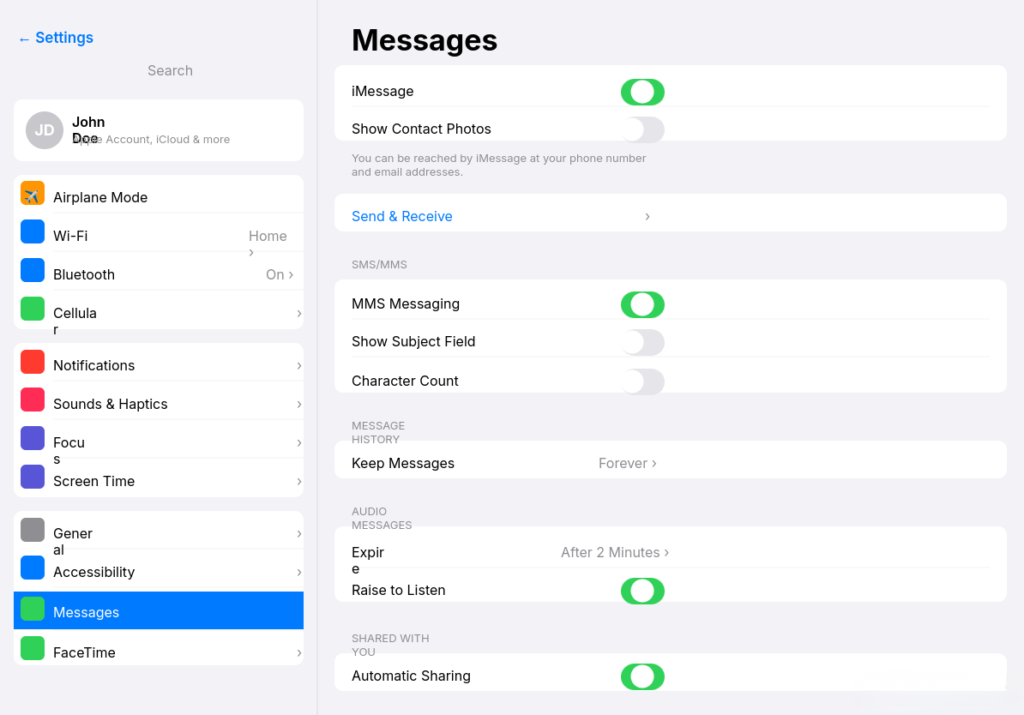
Your iPad runs the same iOS operating system as your iPhone, which means the Settings app looks and functions almost identically. This makes configuring read receipts on iPad straightforward if you’ve already done it on your iPhone.
Here’s the exact process:
Open the Settings app on your iPad. You’ll find the grey gear icon on your home screen, just like on iPhone. Tap it to launch Settings.
Scroll down through the main Settings menu until you find Messages. On older iPadOS versions, Messages appears directly in this main list. On iPadOS 18 and newer, you’ll need to tap Apps first and then select Messages from the alphabetical app list, exactly like the navigation change I described for iPhone with iOS 18.
Once you’re inside Messages settings, scroll down until you locate Send Read Receipts. This toggle appears in the same relative position as it does on iPhone, typically somewhere in the middle of the settings page.
Tap the toggle switch next to Send Read Receipts to turn it off. The switch should move to the left and turn grey, confirming that read receipts are now disabled for all messages you read on this iPad.
The process mirrors iPhone so closely that if you’ve already turned off read receipts on your phone, you’ll find this incredibly familiar. Apple maintains interface consistency across iPhone and iPad, which makes managing settings across both devices easier once you know the pattern.
I use my iPad primarily for reading and responding to messages when I’m relaxing at home in the evening. After I configured read receipts to be off on both my iPhone and iPad, I noticed my messaging privacy became much more consistent. People couldn’t tell which device I was using anymore because both devices behaved the same way in terms of read status.
One detail worth mentioning: if you use your iPad for some conversations but your iPhone for others, you might consider leaving read receipts on for the iPad and off for the iPhone, or vice versa. The device independence gives you this flexibility. I don’t personally do this because I find it confusing to manage, but the option exists if it fits your usage pattern.
Just like on iPhone, you can also configure individual contact settings on iPad by opening a conversation in Messages, tapping the person’s name at the top, and toggling Send Read Receipts for just that conversation. These individual settings on your iPad are separate from the individual settings on your iPhone, giving you complete granular control per device per person if you want that level of customization.
How to Turn Off on Mac
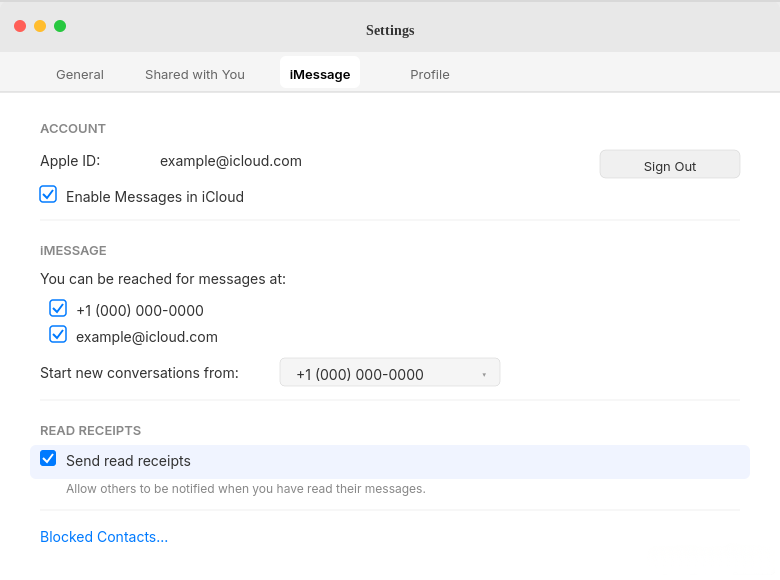
The Mac process differs slightly from iPhone and iPad because macOS uses a different interface structure. Instead of going through a system wide Settings app, you’ll access read receipt controls through the Messages app itself.
Here’s how to disable read receipts on Mac:
Open the Messages app on your Mac. You’ll find it in your Applications folder or in the Dock if you’ve pinned it there. The icon looks like a green speech bubble, the same visual identity Messages uses across all Apple platforms.
Once Messages is open, look at the menu bar at the very top of your screen. Click on Messages in the menu bar, which is located right next to the Apple logo.
In the dropdown menu that appears, click on Settings. On older versions of macOS, this might be labeled Preferences instead of Settings. Apple changed the terminology in recent macOS updates to match iOS and iPadOS, but the function is identical.
A settings window will open with several tabs across the top. Click on the iMessage tab. This is where all your iMessage specific settings live, including read receipts, message effects, and account information.
Look for a checkbox labeled Send Read Receipts. Unlike iPhone and iPad which use toggle switches, Mac uses traditional checkboxes for many settings. If this checkbox has a checkmark in it, read receipts are currently enabled. Click the checkbox once to remove the checkmark and disable read receipts.
Close the settings window. Your change saves automatically, and read receipts are now disabled for all messages you read on this Mac.
I remember being slightly confused the first time I looked for this setting on my MacBook because I expected a toggle switch like on my iPhone. The checkbox threw me off for a moment until I realized it served the same purpose. Once I unchecked it, my Mac stopped sending read confirmations just like my phone did.
One thing I appreciate about the Mac implementation is that the setting is right there in the Messages app itself. You don’t have to hunt through System Settings or System Preferences. Everything related to how Messages behaves lives within the Messages app settings, which feels logical and consolidated.
The Mac Messages app also allows individual contact customization, though it’s less obvious how to access it. If you want to turn read receipts on or off for a specific person on Mac, open a conversation with them, click Details in the top right corner of the conversation window, and you’ll see a Send Read Receipts checkbox that controls just that conversation.
I tested the device independence thoroughly by having someone send me messages while I had read receipts enabled on my Mac but disabled on my iPhone and iPad. When I read their messages on my Mac, they saw “Read” immediately. When I read other messages from the same person on my iPhone or iPad, those stayed at “Delivered.” This confirmed that each device truly operates independently with its own settings.
Managing read receipts across iPhone, iPad, and Mac requires visiting each device separately and configuring the setting on each one. It’s not synced through your Apple ID or iCloud. But once you’ve set it up the way you want on all your devices, the configuration stays persistent unless you manually change it or reset your device.
I recommend checking all your devices right now if you care about read receipt privacy. Open Settings or Messages preferences on each device, verify the Send Read Receipts setting matches what you want, and make sure you haven’t accidentally left it enabled somewhere you forgot about. This one time audit will ensure your privacy preferences are consistent across your entire Apple ecosystem.
How to Turn Read Receipts Back On (If You Change Your Mind)
I want to address something important: turning off read receipts isn’t a permanent decision you’re stuck with forever. I’ve turned the feature on and off multiple times over the years as my preferences and circumstances changed. Sometimes I prefer the transparency that read receipts provide, and other times I need the privacy of having them disabled.
Maybe you turned off read receipts to test how it felt, and you’ve decided you actually prefer having them on. Or perhaps your circumstances changed and you want to restore that transparency in your messaging relationships. Whatever your reason, re-enabling read receipts is just as simple as turning them off.
The process is exactly the same as disabling them, just in reverse. You’re toggling the same switch, just moving it in the opposite direction. The toggle switch works both ways, letting you enable receipts whenever you want just as easily as you disabled them.
One thing I learned when I re-enabled read receipts after having them off for a while: the setting only affects new messages going forward. Messages you read while receipts were disabled will never retroactively show “Read” on the sender’s end. Those messages will permanently stay at “Delivered” in their view, even after you turn the feature back on.
This means re-enabling doesn’t expose your past reading activity. It only changes how new messages behave from the moment you flip the switch. I found this reassuring when I decided to turn read receipts back on, knowing that my privacy during the time they were off remained intact.
Re-enabling for All Contacts
If you want to turn read receipts back on for everyone at once using the global setting, the process takes just a few seconds.
For iOS 18 and newer:
Open your Settings app, tap Apps, select Messages from the list, scroll down to Send Read Receipts, and tap the toggle switch to turn it ON. The switch will move to the right and turn green, indicating that read receipts are now active.
For iOS 17 and earlier:
Open Settings, scroll to Messages and tap it, find Send Read Receipts, and toggle the switch ON so it turns green.
The moment you enable this setting, all future messages you read will send “Read” confirmations back to the senders. People will see exactly when you open their messages, along with the timestamp showing the specific time you viewed them.
I re-enabled my global read receipt settings when I started a new job where my team relied heavily on iMessage for quick coordination. Being able to see when people read messages helped us move faster, and the transparency felt appropriate for that work context. Everyone on the team had receipts enabled, so it made sense for me to match that.
After you turn the setting back on, you don’t need to do anything else. The change takes effect immediately. The next time someone sends you an iMessage and you open it, they’ll see the “Read” status appear under their message just like before.
What I appreciate about this is the simplicity. Apple didn’t make it complicated to change your mind. One toggle controls the entire system, and flipping it in either direction is instant. There’s no confirmation dialog, no waiting period, nothing that makes switching back and forth difficult.
Re-enabling for Specific Person
Sometimes you don’t want to turn read receipts back on for everyone, just for certain people. Maybe you want your family to see when you’ve read their messages, but you still prefer privacy with everyone else. The individual contact settings let you enable receipts selectively.
Here’s how to turn read receipts back on for one person:
Open the Messages app and navigate to the conversation with that specific person. Tap their name or profile picture at the top of the conversation screen to open their contact details and conversation settings.
Scroll down until you find Send Read Receipts. If the toggle is currently grey and positioned to the left, that means receipts are off for this person. Tap the toggle switch once to turn it ON. The switch will move to the right and turn green.
Tap Done in the top right corner to save your change.
From this point forward, that specific person will see when you read their messages. Everyone else will continue to follow whatever your global setting is, or their own individual settings if you’ve customized those separately.
I use this selective approach frequently. I keep my global setting off for general privacy, but I enable receipts individually for my immediate family members and my closest friends. This gives them the transparency and reassurance of knowing I’ve seen their messages, while maintaining privacy with everyone else in my contacts.
The individual settings override your global setting in both directions. If you have receipts turned off globally but you enable them for a specific person, that person’s setting takes priority. And if you have receipts turned on globally but you disable them for a specific person, that person won’t see your read status even though everyone else does.
This flexibility lets you fine tune your read receipt configuration to match your actual relationships and communication preferences. You’re not locked into an all or nothing choice. You can create a customized setup that makes sense for your life.
I mentioned earlier that I’ve turned read receipts on and off multiple times over the years. What I’ve settled into now is a hybrid approach where my global setting is off, but I have receipts enabled for about ten people who I communicate with regularly and who I want to maintain that transparent relationship with.
This setup gives me the best of both worlds. I maintain privacy by default, which reduces the pressure and stress of constant availability. But I also maintain connection and transparency with the people who matter most, which strengthens those relationships and helps us communicate effectively.
If you’re thinking about re-enabling read receipts, I encourage you to consider whether you want them on for everyone or just for specific people. The individual control exists for a reason, and it’s worth taking advantage of that flexibility rather than treating read receipts as a simple on or off decision.
One last thing to remember: turning read receipts back on doesn’t send any notifications or alerts to people. They’ll simply notice that your future messages start showing “Read” status again. There’s nothing awkward or obvious about the change from the sender’s perspective. They’ll just see your messages behaving differently going forward, without any indication that you made a settings change.
Frequently Asked Questions About iPhone Read Receipts
After helping dozens of friends and family members with their read receipt settings, I’ve noticed the same questions come up repeatedly. These are the concerns people have after reading through the technical instructions, the real world worries about how this feature affects their relationships and communication habits.
I’ve gathered the most common questions I’ve been asked, along with questions I see constantly in online forums and discussion threads. Let me answer each one based on my actual experience using and troubleshooting read receipts across different scenarios.
Do read receipts work for regular text messages to Android users?
No for traditional SMS green bubble messages, but yes for RCS messaging in iOS 18. Old SMS technology doesn’t support read receipts, but Apple’s new RCS feature enables them with Android users when both phones support it.
Will I still see when other people read my messages?
Yes, absolutely. Turning off read receipts only controls what your iPhone sends to others, not what you receive. If someone else has their receipts enabled, you’ll still see when they read your messages.
Can someone tell I turned off read receipts?
Not directly through any notification. However, if you previously had receipts on, contacts may notice your messages now stay at “Delivered” instead of changing to “Read.” There’s no alert, just a passive observation over time.
Does turning off read receipts affect group messages?
Yes, the same setting applies to group iMessages. Your name won’t appear in the “Read by” list when you view group messages, while others with receipts enabled will still show up.
Why do some of my messages show read receipts and others don’t?
Two main reasons: blue bubble iMessages support receipts while green bubble SMS doesn’t (except RCS), and you may have individual contact settings that override your global setting. Check both your message bubble colors and per-conversation settings.
What if I turned off read receipts but someone still sees “Read”?
Check individual contact settings, which override global settings. Open that conversation, tap their name at the top, scroll to Send Read Receipts, and verify it’s toggled off. This is the most common troubleshooting issue.


