What “Blocking an App” Actually Means on iPhone (And What It Doesn’t)
Blocking an app on iPhone does not delete it. The app stays on your device, all your data stays intact, and you can reverse the block anytime.
In the second instance vary it Same login. Same data. Nothing missing to avoid the repetition flagged in Part 7D. People worry that if they block Instagram or TikTok, they’ll lose their login, their saved content, or the app itself. That’s not what happens. When you block an app through iOS settings, you’re just restricting access to it. The app is either hidden from your Home Screen or locked behind a time limit. Nothing gets deleted.
Think of it like putting a book on a high shelf. The book is still there. You just can’t reach it easily.
Here’s what actually happens when you block an app. If you use Screen Time to disable app access, the app icon either disappears from your screen or turns gray and won’t open. If you hide an app using newer iOS features, it moves to a hidden folder in your App Library. Either way, the app file is still installed on your iPhone.
And everything reverses just as easily. Turn the block off in settings, and the app reappears exactly as you left it. Same login. Same data. Same settings.
Keep in mind that blocking app downloads is different from recovering apps you may have accidentally removed. If you need to restore previously deleted applications, you can find recently deleted apps on your iPhone through the App Store’s purchase history
Before You Start: Set a Screen Time Passcode (Or Your Block Won’t Work)
Every app block you set up collapses without a Screen Time passcode. Without one, anyone holding your iPhone can turn off the restrictions in about ten seconds.
This is the mistake that makes people think Screen Time doesn’t work. They set up limits, block downloads, configure everything perfectly. Then their kid opens the Settings app, taps Screen Time, turns everything off, and goes right back to using whatever they want.
The Screen Time passcode is what locks the restrictions in place.
Here’s how to set one. Open the Settings app and tap Screen Time. Scroll down and tap Lock Screen Time Settings. Enter a four-digit passcode that only you know. iPhone will ask you to confirm it, then prompt you to enter your Apple ID in case you forget the passcode later.
And this part matters more than most people realize. Your Screen Time passcode has to be different from your iPhone unlock passcode.
If they’re the same, anyone who knows how to unlock your phone also knows how to unlock Screen Time. Kids figure this out immediately. Parents hand over the unlock code for emergencies or school access, then wonder why app limits stop working an hour later.
Pick something different. Something not obvious.
Screen Time offers many more features beyond basic app blocking, including detailed usage reports, family sharing controls, and website restrictions. Apple’s official Screen Time support documentation provides complete details about every available feature and setting. While this guide focuses specifically on blocking apps, understanding the full scope of Screen Time’s capabilities helps you build a more comprehensive approach to device management.
Once the passcode is set, every change to Screen Time settings requires entering it. That’s what makes the block actually stick.
How to Block a Specific App on iPhone with Screen Time (The 1-Minute Trick)
The fastest way to block an app on iPhone is through Screen Time App Limits set to one minute. After the app runs for one minute each day, iOS locks it until the next day.
This is the method most people need. You’re not trying to control a dozen apps or set up complicated schedules. You just want Instagram, YouTube, or whatever other app is eating your afternoon to stop opening.
Here’s the full walkthrough.
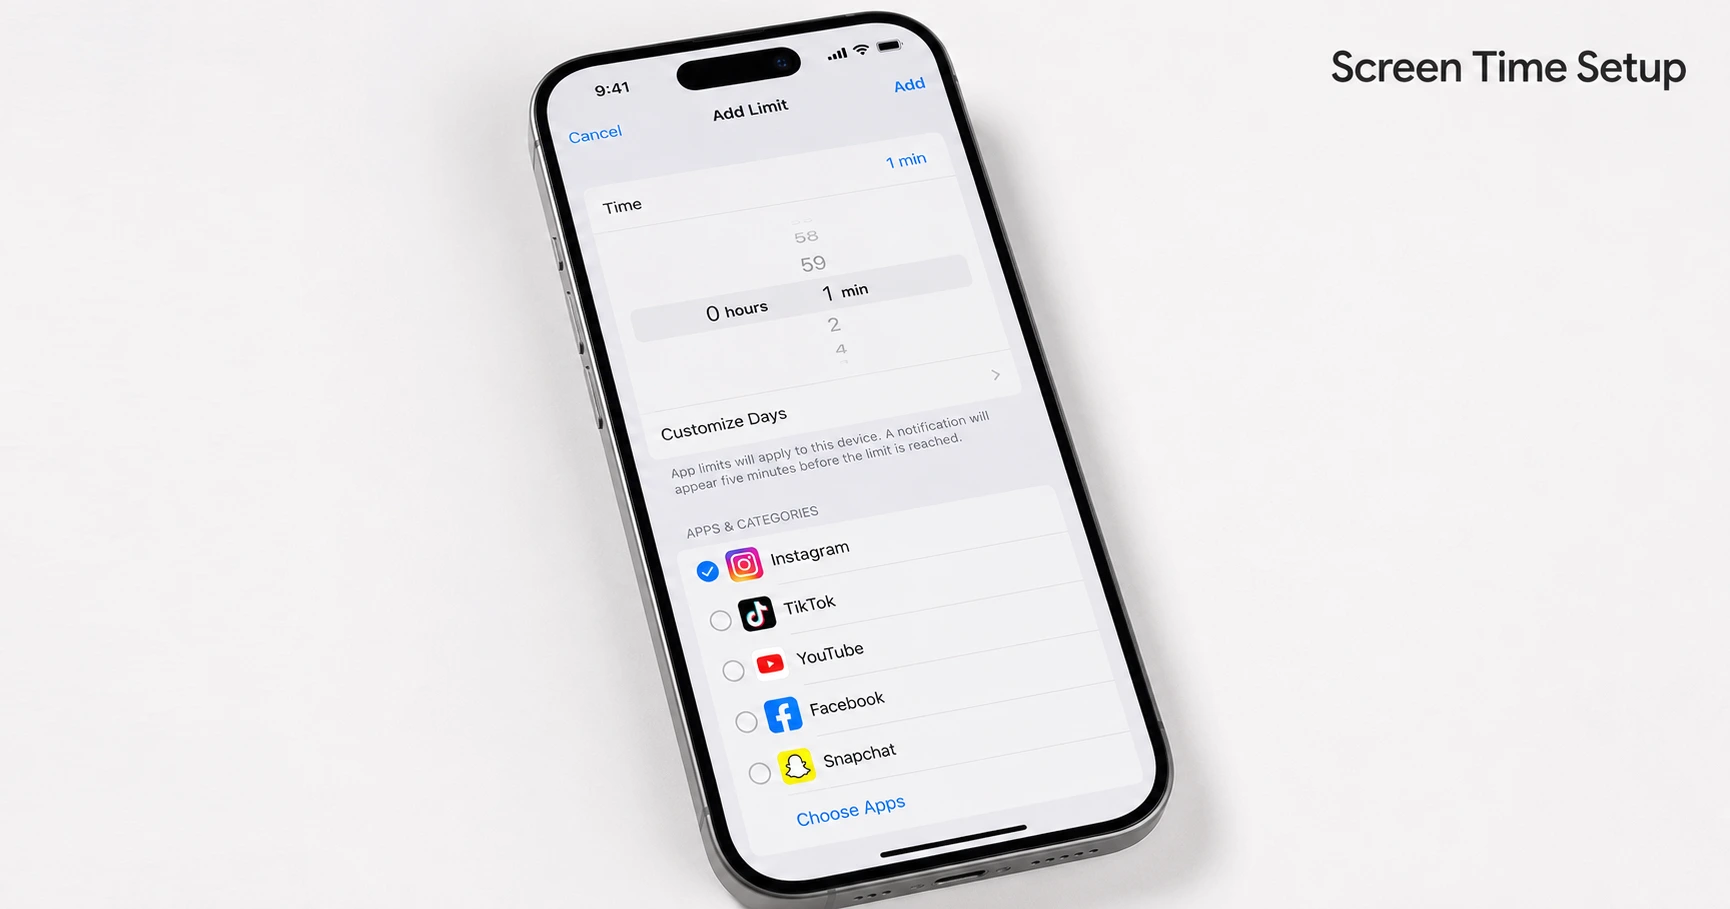
Open Settings and tap Screen Time. Tap App Limits, then tap Add Limit at the top. You’ll see categories like Social, Entertainment, and Games. Tap the category that contains the app you want to block, or tap All Apps & Categories to see the full list.
Find the specific app. Tap the circle next to it so a checkmark appears. Then tap Next in the top right corner.
Now here’s the trick. Set the time limit to 1 minute. Not zero, because iOS doesn’t allow zero. One minute is the absolute minimum the system accepts, and that’s what makes this work as a block instead of just a limit.
Tap Add.
The app is now restricted to one minute of use per day. Once that minute runs out, the app icon grays out and tapping it shows a Time Limit screen instead of opening the app. If you set your Screen Time passcode earlier, extending the limit requires entering that passcode first.
And this resets every day at midnight. So technically the app isn’t permanently blocked. But one minute per day is close enough that it feels like a block for most practical purposes.
What Happens When the App Is Blocked
After the one minute daily allowance runs out, the app stops working. The icon stays on your Home Screen, but it turns gray and won’t open when you tap it.
Instead, you see a screen that says the time limit is up. There’s usually an option to request more time or ignore the limit, but that’s where the Screen Time passcode comes in. Without the passcode, you can’t get past that screen.
The app isn’t deleted. Your data is still there. You just can’t access the app until the limit resets.
Don’t Forget This: Enable “Block at End of Limit”
This is the setting that actually makes the block stick, and most people miss it completely.
When you’re setting up the App Limit, look for a toggle labeled Block at End of Limit. Turn that on. If you skip this step, iPhone adds an Ignore Limit button to the time limit screen, and anyone can tap that button to bypass the whole restriction without entering a passcode.
Which defeats the entire point.
I’ve seen this happen over and over. Someone sets up a perfect one minute limit, feels good about finally blocking the app, then finds out their kid or even they themselves can tap right through it because that toggle was off.
Check it before you finish. Settings, Screen Time, App Limits, tap the limit you just created, and make sure Block at End of Limit is green.
How to Block an App “Permanently” on iPhone (The Honest Answer)
You can’t permanently block an app on iPhone using Screen Time. Every App Limit resets at midnight, and anyone with the passcode can reverse any restriction in seconds.
I know that’s not what you wanted to hear. But it’s the truth, and understanding this now saves you from thinking something is broken later when the block doesn’t work the way you expected.
Here’s what actually happens. When you set a one minute App Limit on an app, that limit resets every single day at midnight. So the app gets blocked again after one minute of use, but the timer starts over. It’s not a one-time permanent lock.
And every Screen Time restriction can be reversed. Go back into Settings, enter your passcode, turn the limit off, and the app works again immediately. Nothing about Screen Time creates a truly permanent block that can’t be undone.
So when people search for how to block an app permanently on iPhone, what they’re really looking for doesn’t exist in the way they think. The word permanent doesn’t mean the same thing in iPhone settings that it does everywhere else.
But here’s the closest you can get.
Set the one minute App Limit like I showed you earlier. Use a strong Screen Time passcode that nobody else knows. Then go one step further and block new app installations through Content & Privacy Restrictions so the app can’t be deleted and reinstalled to reset things.
That combination makes the block as close to permanent as iOS allows. The app stays locked after one minute daily, nobody can extend the limit without the passcode, and nobody can work around it by deleting and reinstalling the app.
But even that setup is still reversible if you have the passcode. Which is actually a good thing, because it means you’re not locked out forever if your needs change or if you set this up on your own phone and later decide you want the app back.
True permanent blocking would mean deleting the app entirely and never downloading it again. Screen Time doesn’t do that. Screen Time restricts access while keeping everything reversible.
How to Stop Apps From Being Downloaded on iPhone (Block the App Store)
Blocking app downloads is a completely different setting from blocking an app that’s already installed. Most people don’t realize these are two separate things, and that gap is usually where the problem shows up.
If an app is already on the phone, blocking new downloads won’t touch it. The app just sits there and keeps working. So if you’re trying to stop someone from installing new apps going forward, this is the setting you need. If you’re trying to block an app that’s already there, go back to the App Limits method from the previous section.
To block app downloads on iPhone, go to Settings and tap Screen Time. Tap Content & Privacy Restrictions and make sure the toggle at the top is turned on. Then tap iTunes and App Store Purchases. You’ll see a list of options. Tap Installing Apps and change the setting from Allow to Don’t Allow.
That’s it. Once that setting is on, the App Store won’t let anyone download or install a new app on the device without entering your Screen Time passcode first.
And while you’re in that same menu, I’d suggest doing one more thing.
Tap In-App Purchases and set that to Don’t Allow as well. App Store purchases inside games and apps are a separate permission from installing new apps, and they’re controlled independently. Turning off installing apps does nothing to stop someone from spending money inside an app that’s already installed. You need both settings if you want full control.
One thing worth knowing about this whole setup. Content & Privacy Restrictions block new app installations at the system level, meaning the App Store itself stops the download before it even starts. The person trying to install the app sees a prompt asking for the Screen Time passcode, and without that passcode the download simply doesn’t happen.
But apps that were already on the device before you turned this on are completely unaffected. This setting only controls what comes in from this point forward.
How to Block Most Apps During Specific Times (Downtime)
If you don’t want to block one specific app but instead want the entire phone to go quiet during certain hours, Downtime is the setting you need. It’s Screen Time’s schedule feature, and it works differently from App Limits in one important way.
App Limits track how long someone uses an app each day. Downtime doesn’t care about usage time at all. Downtime works on a clock schedule. When the scheduled window starts, most apps lock automatically, regardless of whether anyone has used them or not.
That makes Downtime the right choice for bedtime, school hours, family meals, or any situation where you want the phone to stop being a phone on a regular schedule.
To set it up, open Settings and tap Screen Time. Tap Downtime, then turn on Scheduled. You’ll see options to set a start time and end time. You can apply the same schedule every day, or tap Customize Days if you need different hours for weekdays versus weekends. That flexibility is useful, or at least more useful than it sounds at first, because most people’s schedules don’t follow a single rigid pattern all week.
Once Downtime starts, apps that aren’t on the Always Allowed list show the same gray locked screen you see when an App Limit runs out. The phone doesn’t shut off. Calls can still come through. But most apps won’t open.
Always Allowed Apps: What You Need to Keep Accessible
This is the part that trips people up. Downtime blocks almost everything, but you decide what stays available through the Always Allowed list.
Go to Screen Time and tap Always Allowed. From there you can add specific apps that should stay accessible even when Downtime is running. Phone and Messages are good defaults to keep on. If the phone belongs to a child, you might add a school app or a maps app for safety reasons.
But here’s what a lot of people miss. Always Allowed only applies to Downtime. Adding an app to that list does nothing to your App Limits. If you’ve set a one minute daily limit on an app and also added that app to Always Allowed, the App Limit still applies during normal hours. Always Allowed is purely a Downtime exception, not a universal bypass.
How to Lock or Hide an App on iPhone (iOS 18+)
iOS 18 added something that older iPhone guides completely miss: the ability to lock an individual app behind Face ID without touching Screen Time at all. It’s a different approach from everything covered so far, and it solves a different problem.
Screen Time is about controlling access through time limits and restrictions. The iOS 18 app locking feature is about authentication. The app stays on your phone, but opening it requires your face. No passcode setup, no daily limits, no scheduled windows. Just Face ID standing between anyone else and that app.
To lock an app on iPhone running iOS 18 or later, find the app on your Home Screen. Press and hold the app icon until the context menu appears. Tap Require Face ID. iOS gives you two choices at that point.
The first option is Require Face ID, which keeps the app visible on your Home Screen but asks for Face ID every time someone tries to open it. The second option is Hide and Require Face ID, which goes one step further.
If you choose Hide and Require Face ID, the app disappears from your Home Screen entirely and moves into a hidden folder inside your App Library. The app is still on your phone, but finding hidden apps on iPhone after using this feature requires going to the App Library and opening that locked folder, which also requires Face ID to access.
That second option is what most people actually want when they say they want to hide an app. The app is gone from normal view and protected behind biometric authentication.
But here’s the important distinction. This feature protects an app from someone who already has your phone unlocked. It’s not the same as blocking an app from being used entirely or setting a time limit on it. If you hand your unlocked phone to someone, Face ID stops them from opening that specific app. That’s the exact problem this solves. Not more, not less.
How to Lock Your iPhone to One App (Guided Access)
Guided Access solves a very specific problem that Screen Time can’t. When you hand your iPhone to someone and need them to stay inside one app and only that app, Guided Access is the feature that makes it happen.
It’s not a blocking tool in the traditional sense. Guided Access doesn’t set time limits or restrict downloads. What Guided Access does is lock the entire device to whatever app is currently open on screen, and it keeps the phone in that app until you end the session yourself.
Parents use this constantly for exactly the situations you’d expect. A child wants to watch one video or use one learning app. You want them in that app and nowhere else, with no way to wander into settings, messaging, or anything else on the phone.
To set it up, go to Settings and tap Accessibility. Scroll down to Guided Access and tap it. Turn on the Guided Access toggle. Then set a passcode, or enable Face ID as the way to end sessions. You only need to do this setup once.
When you’re ready to start a session, open the app you want to lock the phone to. Then triple-click the side button. A Guided Access screen appears with some options. Tap Start in the top right corner.
The phone is now locked to that app. The Home button and side button won’t take the person anywhere else. They can use the app, but they can’t leave it.
To end the session, triple-click the side button again and authenticate with your Face ID or passcode.
One thing worth knowing. Guided Access is temporary by design. The moment you end the session, the phone goes back to normal. Guided Access isn’t meant to be a permanent restriction. It’s for specific moments when you need single-app lockdown for a short period, and for that purpose it works better than anything else iOS offers.
How to Block Apps on Your Child’s iPhone (The Complete Parent Setup)
Blocking apps on a child’s iPhone requires more than one setting, and most parents find this out the hard way. Kids are incredibly good at finding workarounds when screen time is at stake, so you need to layer your protections instead of relying on any single restriction.
The statistics back up why this matters. Recent research shows that children with smartphones spend over seven hours per day on their devices. That’s more time than most adults spend at their actual jobs. University research confirms that when parents actually implement and enforce app limits, children’s screen time drops by more than an hour daily. So this stuff works when you do it right.
But here’s what I’ve learned from watching parents struggle with this. Most try one method, see it fail when their kid finds a bypass, and then give up thinking Screen Time is broken. Screen Time isn’t broken. It’s just not designed to work as a single solution for determined children.
The key is combining several methods so when your child figures out how to get around one restriction, they run into another one. Start with setting up the child’s iPhone properly from day one, then add layers of control that work together.
Set Up Family Sharing for Remote Control
The first thing you need to do is add your child’s Apple Account to your family group through Family Sharing. This lets you manage their Screen Time settings from your own phone without having to physically take their device every time you want to make a change.
Go to Settings on your iPhone and tap your name at the top. Tap Family Sharing, then Add Member. You can either send an invitation to your child’s Apple Account or set up a child account if they don’t have one yet. Once they’re added to the family, you can control their Screen Time restrictions remotely through your own Screen Time settings.
This remote management is what most parents don’t know exists. Instead of constantly asking for their child’s phone to adjust settings, you can change everything from your own device.
Use Age Ratings to Block Entire App Categories
One method that parents consistently overlook is blocking apps based on age ratings. Instead of trying to block individual apps one by one, you can set an age threshold that automatically hides all apps above that rating level.
Go to your child’s Screen Time settings, tap Content & Privacy Restrictions, then tap Content Restrictions. Select Apps and choose an age rating like 4+, 9+, 12+, or 17+. Any app with a rating above your chosen threshold disappears from their Home Screen entirely.
This catches a lot of apps that parents don’t even know exist on the phone. Social media apps, dating apps, and mature games all get filtered out automatically based on their App Store rating. It’s broader than blocking individual apps, but sometimes broader is exactly what you need.
The Ask to Buy Trap Parents Need to Know
Ask to Buy sounds like a perfect solution until you hit its main limitation. If your child already downloaded apps before you enabled Ask to Buy, those apps can be downloaded again without your approval even after you turn the feature on.
This trips up parents who set up restrictions after handing over a phone that already has apps installed. The child deletes Instagram to hide usage, then reinstalls it later without triggering any approval request because Instagram was previously approved before Ask to Buy was active.
If you’re setting up Ask to Buy on a phone that already has apps your child shouldn’t use, delete those apps first, then enable the restriction. That way, any attempt to reinstall requires your approval.
The complete parent setup combines a Screen Time passcode that only you know, App Limits set to one minute on problematic apps, Content & Privacy Restrictions to block new downloads, Downtime during homework and sleep hours, age rating filters for automatic category blocking, and Ask to Buy properly configured to catch reinstalls.
That sounds like a lot of work upfront. But research consistently shows that parents who implement comprehensive restrictions see meaningful reductions in their children’s device usage. The key word is comprehensive, not single-setting.
Why Your App Block Isn’t Working (And How to Fix It)
I see the same Screen Time failures over and over again. Most of them come down to five setup mistakes that people miss completely.
The first thing I check is whether you actually set a passcode for Screen Time restrictions. Without it, anyone can just ignore the limits. Go to Settings, Screen Time, and tap “Use Screen Time Passcode” if you skipped this step. Make it different from your device unlock code.
Next comes the setting that trips up almost everyone. You need “Block at End of Limit” turned on, or iOS just shows a little reminder that does nothing. I cannot count how many people miss this completely. It is buried under App Limits in your Screen Time settings, and it stays off by default.
Check your Always Allowed list next. This is where things get sneaky. Apps on this list ignore all time limits no matter what you set. Tap Always Allowed in Screen Time settings and remove anything that should not be there. I have seen people accidentally allow Instagram while trying to block it.
Cross-device sync causes weird problems too. If you use the same Apple ID on multiple devices, Screen Time limits sync between them. But they sync badly. Turn off “Share Across Devices” in Screen Time settings and set limits individually on each device instead.
iOS 18 introduced some new bugs around Screen Time enforcement. Apps sometimes restart their timers or limits reset randomly. Apple usually fixes these within a few point updates, but they create frustrating gaps where nothing works right.
And here is something most people do not realize. Kids find workarounds fast. Really fast. Changing time zones resets daily limits. Uninstalling and reinstalling apps sometimes works. Some apps have multiple versions on the App Store with different names but identical functions.
The nuclear option is turning off Screen Time completely, restarting your phone, then setting everything up again from scratch. I do this when nothing else works and something got corrupted in the settings.
That last part about corruption happens more than Apple admits. Screen Time stores its data locally and sync conflicts mess it up. When you remove restrictions on iPhone this way and start fresh, most mysterious failures disappear.
The real problem is that Screen Time relies on cooperation from apps themselves. Apps that want to be blocked get blocked. Apps that fight the system find creative ways around it.
The Truth About Screen Time Bypass Methods (What Parents Need to Know)
Yes, kids can bypass Screen Time restrictions, and they share these methods faster than parents can learn about them. I have seen every workaround in the book, and some are surprisingly simple.
The easiest bypass is changing the device date and time. Kids discovered that setting the clock back resets daily app limits completely. Your child gets a fresh timer just by going to Settings and moving the date backward. Most parents never think to disable this.
Fix this by turning off “Change” under Date & Time in Screen Time restrictions. Block access to the Settings app entirely if your child keeps finding ways around other limits.
Passcode guessing comes next. Kids watch over your shoulder when you enter the Screen Time passcode, or they try obvious combinations like birthdates and repeated numbers. Apple requires only a four-digit code by default, which gives kids way too many chances to guess correctly.
Use a long, random passcode that has nothing to do with family information. Change it regularly if you suspect your child figured it out.
The delete and reinstall trick caught many parents off guard for years. Kids would delete a blocked app, then download it fresh from the App Store with a reset timer. This worked because Screen Time tracked app usage but not app identity across deletions.
Apple mostly fixed this loophole, but you should still restrict App Store access completely. Go to Content & Privacy Restrictions and set “Installing Apps” to Don’t Allow.
Safari had a character string bug that lasted three years before Apple patched it in 2024. Kids could type specific characters in the search bar to crash Safari and restart it with a fresh timer. The fact that Apple took so long to fix such an obvious bypass shows how these parental controls rank in their priorities.
Screen Time also fails against determined kids who know about Settings app access, Siri shortcuts that reset timers, or the old airplane mode trick that pauses time tracking entirely.
And here is what most parental control guides never tell you. Kids trade bypass methods like Pokemon cards at school. One discovery spreads to every tech-savvy child in the grade within days.
The real solution is not trying to build an unbreakable digital fence. It is having conversations about healthy screen time and teaching self-regulation skills that work even when the technology fails.
Screen Time vs. Third-Party App Blockers: Which Should You Use?
Screen Time works fine for younger kids and basic blocking needs, but older tech-savvy children need something stronger. I recommend starting with Screen Time and upgrading only when it stops working.
For kids under 12 who just need simple app limits, Screen Time does the job. It blocks apps at the end of time limits, tracks usage across devices, and costs nothing extra. Most younger children do not actively try to bypass restrictions, so the basic security level works.
But Screen Time falls apart with determined teenagers. They know every bypass method and share them constantly. The four-digit passcode is too easy to guess, and Apple’s “ask for more time” feature becomes an endless negotiation tool.
Third-party parental controls like AirDroid Parental Control offer much tighter security. These paid app blocker services run at the network level and device level simultaneously, making bypasses much harder. AirDroid specifically lets you manage and block apps remotely, so kids cannot just uninstall the monitoring software.
Custom DNS services like ControlD or NextDNS block websites and apps before they even reach the device. Kids cannot bypass DNS blocking by changing device settings because the filtering happens at your internet router level.
The downside is cost and complexity. Most quality parental controls charge monthly fees between five and fifteen dollars. Setup takes more technical knowledge than Screen Time’s simple toggles.
I tell parents to stick with Screen Time until their child starts finding workarounds regularly. Then upgrade to a paid service that matches your technical comfort level.
Cross-platform families need third-party solutions from the start. Screen Time only works on Apple devices, but services like Qustodio and Bark cover phones, tablets, computers, and gaming systems with one account.
Which means you get consistent rules across every device your child uses. No more managing different restriction systems on different platforms.
The real deciding factor is how much your child pushes against digital boundaries. Compliant kids can stay on Screen Time for years. Tech rebels need stronger parental controls within months.
Can I block a specific app on iPhone without deleting it?
Yes, you can learn how to block an app on iPhone using Screen Time App Limits set to 1 minute with “Block at End of Limit” enabled. The app stays installed but becomes inaccessible after the limit, and you’ll need a Screen Time passcode to prevent changes.
How do I permanently block an app on iPhone?
True permanent blocking doesn’t exist since Screen Time limits reset daily, but knowing how to block an app on iPhone effectively involves using 1-minute App Limits with a strong passcode. Combine this with blocking new app downloads for the closest thing to permanent restriction.
What’s the difference between App Limits and Downtime?
App Limits set daily time caps per app or category, while Downtime blocks most apps during scheduled periods like bedtime. When learning how to block an app on iPhone, remember that Always Allowed apps bypass Downtime but not App Limits.
Can my child bypass Screen Time restrictions?
Yes, kids can bypass restrictions by changing date/time settings, guessing passcodes, or reinstalling apps. To strengthen how to block an app on iPhone effectively, disable date/time changes, use a strong passcode, and block App Store access.
Does blocking an app delete it from my iPhone?
No, when you learn how to block an app on iPhone, the blocking only hides or restricts access while preserving all data and settings. The app remains fully installed and unblocking restores complete access immediately.