Before You Pick a Method, Read This First
If you’ve already tried something and the website is still loading, you’re not doing it wrong. Most guides on how to block website in Android phone skip the real reason this keeps failing Android has no single ‘block this site’ switch, so the fix depends entirely on which of several tools you use
There is no single “block this site” button built into Android. That’s the actual reason so many guides leave people frustrated. You search, you follow some steps, nothing changes, and you end up back here wondering what you missed.
What Android has instead is several different methods, each with a completely different scope. Some block sites only inside Chrome. Some block across every app on your phone. Some only work while you’re connected to your home WiFi and disappear the moment you switch to mobile data. Picking the wrong one for your situation means the block either doesn’t work at all or fails the first time it actually matters.
The Two Wrong Tools Most People Try First
Here’s what I see happen constantly. Someone wants to block a site, so they flip on SafeSearch or crack open Digital Wellbeing the two settings every Android phone already has. Neither one blocks anything. Not really
SafeSearch filters what shows up in Google search results. It does not stop anyone from typing a website address directly into the browser bar and opening it. Digital Wellbeing sets time limits on apps, not on specific websites. Neither of these blocks a URL.
If either of those is what you tried, that’s exactly why it didn’t work.
What Actually Determines Which Method You Need
Before looking at any specific steps for how to block websites on Android, ask yourself one question: who is this block for, and where does it actually need to work?
A parent blocking a site on a child’s device needs something completely different from someone trying to stay focused during work hours. Someone who wants their block to work across every browser and app needs a different approach than someone who just wants Chrome filtered.
The methods in this guide cover three situations:
Parents managing a child’s Android phone Google Family Link is the right tool. It works at the account level and is the hardest to bypass.
Blocking specific websites in Chrome NextDNS configured through Chrome’s secure DNS settings handles this without installing anything.
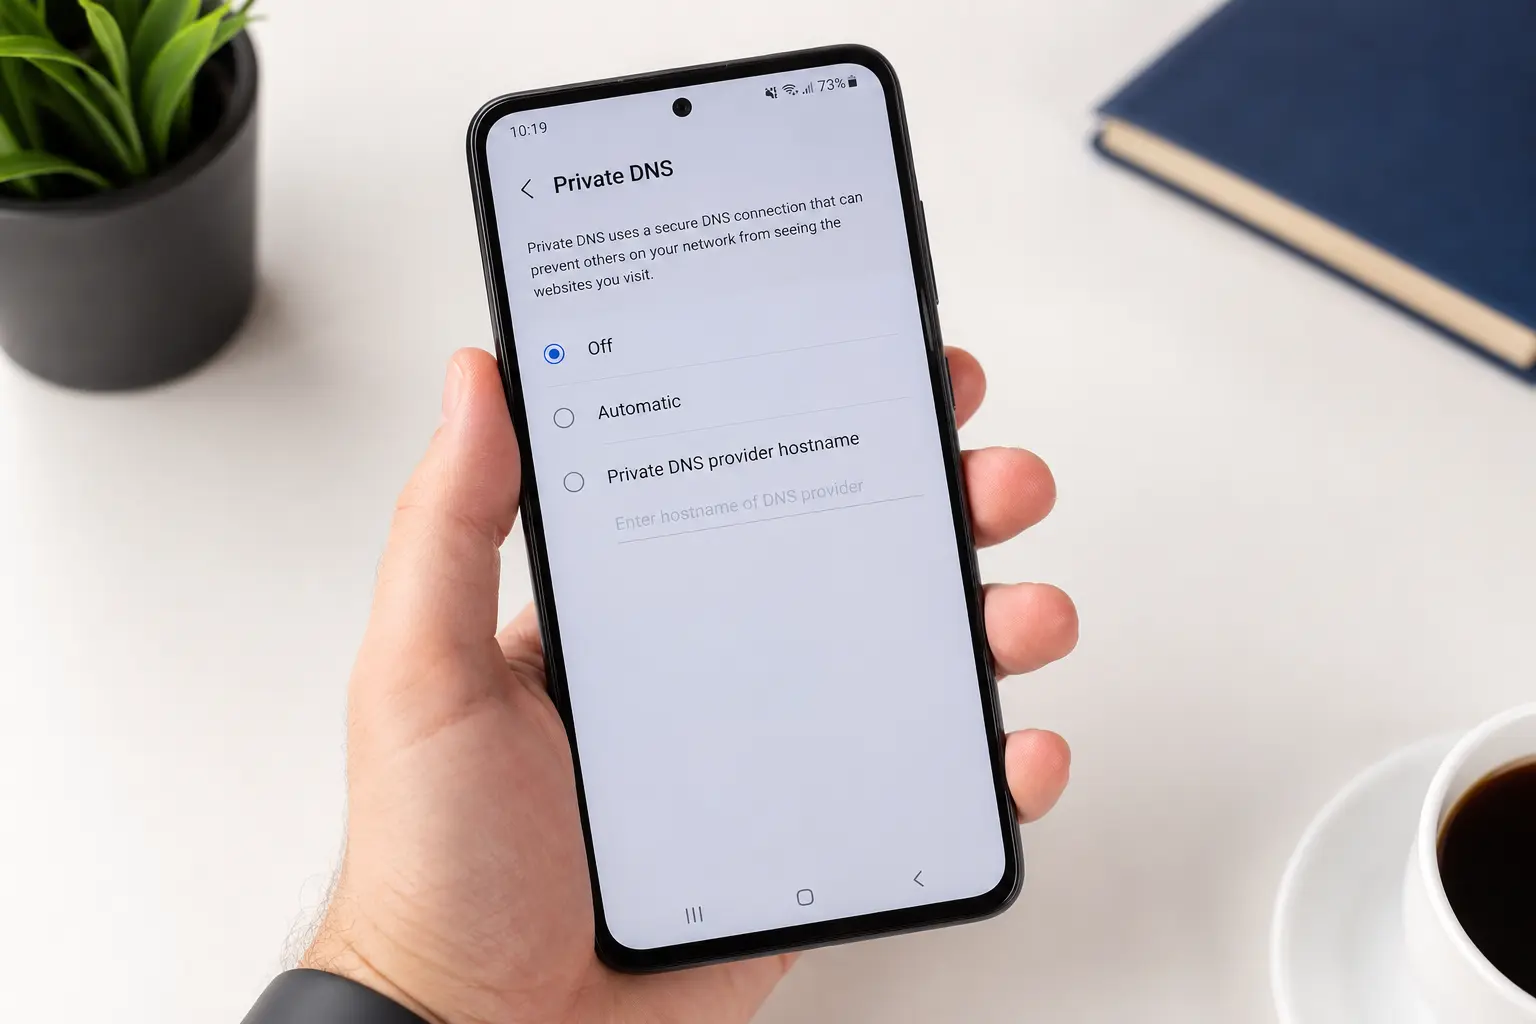
System-wide blocking across all apps and browsers Private DNS in Android settings does this in about three taps. Most people don’t know this setting exists. No app download required.
There’s also a method for layering these together if you want something that actually holds up when someone tries to get around it. That’s covered later.
For now, pick the situation that matches yours and go straight to that section. Every method here is current as of 2025, including the updated Family Link interface that older guides still show incorrectly.
Which Method Is Right for You? Pick Your Situation
The right way to block websites on Android depends entirely on your situation, not on which method shows up first in a guide. I’ve seen people spend an hour setting up the wrong tool because they followed generic steps that didn’t match what they actually needed.
Here’s the honest truth. No single method works perfectly for every situation. The best approach for a parent managing a child’s phone is completely different from what works for someone trying to stay off distracting websites during work hours. Getting this decision right upfront saves a lot of frustration later.
Use the table below to find the setup that matches your situation parent, remote worker, business, or someone just trying to stop opening the same three sites
| Your Situation | Best Method | Cost | Works Across | Setup Time |
|---|---|---|---|---|
| Parent managing a child’s device | Google Family Link | Free | Chrome and Google apps on child’s account | 10 to 15 minutes |
| Blocking specific URLs in Chrome only | NextDNS via Chrome Secure DNS | Free | Chrome browser only | 2 to 3 minutes |
| Quick Chrome family filter with no account | CleanBrowsing preset in Chrome | Free | Chrome browser only | Under 1 minute |
| System-wide blocking across all apps | Private DNS in Android settings | Free | All browsers and most apps | 2 to 3 minutes |
| Blocking distracting sites on a schedule | Third-party app like BlockSite | Free or paid | All browsers with permission | 5 to 10 minutes |
| Managing multiple devices for a business | MDM solution | Paid | All managed devices centrally | Varies |
One thing I want to flag before you pick. Relying on just one method is exactly where most people run into problems later. A block set only in Chrome does nothing if someone opens Firefox. A router-level block vanishes the moment the phone switches to mobile data. The most reliable setups combine two methods, and the guide covers exactly how to do that.
And Private DNS surprises most people. It’s a built-in Android setting that blocks content across every app and browser on the phone, and it requires no app download at all. Most people assume they need to install something. They don’t.
The 3-Tap Android Setting That Blocks Websites Without Installing Anything
That’s it. Three taps, one hostname, and Android starts filtering before Chrome even loads the page.There’s a built-in setting called Private DNS that handles content filtering across every app and browser on the phone, and almost nobody knows it exists.
Private DNS is Android’s system-level DNS filtering feature, which means it intercepts website requests before any browser even sees them. Block something through Private DNS and it stays blocked in Chrome, Firefox, Samsung Internet, and every other app that connects to the internet. Not just one browser. All of them.
Here’s how to set it up on a standard Android phone:
- Open Settings
- Tap Network & Internet
- Tap Private DNS
- Select Private DNS provider hostname
- Type family.adguard-dns.com
- Tap Save
That’s it. Three taps to reach the setting, one hostname to type, done. The filter goes active immediately and stays active whether the phone is on home WiFi or mobile data. That last part matters because router-level content filtering only works at home. Private DNS travels with the phone everywhere.
One thing I want to be clear about. Private DNS is not a VPN app. It doesn’t route your traffic through an external server or slow your connection down. It simply tells Android which DNS provider to use for resolving website addresses, and a filtering provider like AdGuard quietly blocks the categories you want filtered at that level.
After you save the setting, test it. Open any browser and try to visit a site that the DNS provider filters. If the page fails to load, the block is working. If it loads normally, double-check the hostname for typos and try again.
And one more thing most guides skip completely. If you’re using a third-party DNS filtering app alongside this setting, make sure to enable “Connect on system startup” inside that app. Without that option turned on, the filter disconnects every time the phone restarts. Private DNS itself doesn’t have this problem since it’s a system setting, but apps that overlay DNS do.
Samsung Users: Your Path to Private DNS Is Different
If you’re trying to block websites on a Samsung Android phone, the Private DNS setting is in a different place than on stock Android. Samsung’s One UI interface reorganises several network settings, and this is one of them.
On a Samsung device, go here instead:
- Open Settings
- Tap Connections
- Tap More Connection Settings
- Tap Private DNS
- Select Private DNS provider hostname
- Enter family.adguard-dns.com
- Tap Save
The setting itself works exactly the same way once you find it. Same hostname, same result. The only difference is the path to get there.
Which DNS Provider Should You Use?
The hostname you enter determines what actually gets filtered, so this choice matters more than most people realise. Here are the three I’d point most readers toward, depending on what they need.
AdGuard Family DNS family.adguard-dns.com
This is the one I recommend for most people who want a straightforward setup. AdGuard Family DNS blocks inappropriate content and malicious sites across the board without requiring any account creation or configuration. You type the hostname, save it, and the filtering starts. Good for families who want broad protection without managing a dashboard.
CleanBrowsing Family Filter
CleanBrowsing runs a stricter filter than AdGuard. The family filter blocks inappropriate content but also restricts mixed-content sites that fall into grey areas. The DNS hostname for the CleanBrowsing family filter is family-filter-dns.cleanbrowsing.org. It’s a solid choice if you want tighter controls and don’t mind the occasional false positive on borderline sites.
NextDNS
NextDNS is the most flexible option of the three. (Quick note: DNS hostnames occasionally change, so it’s worth confirming the current one on the provider’s site before you type it in.) It lets you build a custom blocklist, block specific individual domains, and see a log of what the DNS is filtering. But NextDNS requires setting up a free account to get your personal configuration hostname. For someone who just wants a quick system-wide filter with no setup overhead, AdGuard is simpler. For someone who wants to block specific websites by name at the DNS level and track what’s being blocked, NextDNS is worth the extra five minutes of setup.
How to Block a Specific Website in Chrome on Android
Chrome on Android has no built-in option to block a website. There’s no setting buried in the menus, no toggle to flip, nothing. So if you’ve been hunting through Google Chrome settings looking for a block feature, you won’t find one because it genuinely doesn’t exist on mobile.
The workaround that actually works is NextDNS. It’s a free DNS filtering service that you configure through Chrome’s Secure DNS setting, and it lets you block any specific website by domain name. No app to install. No account required to get started.
Here’s the full step-by-step, confirmed working as of 2025.
Part 1: Add the website to your NextDNS blocklist
- Open Google Chrome on your Android phone
- Go to nextdns.io
- Tap Try it now — a personal dashboard loads immediately, no sign-up needed
- Swipe across the top menu and tap Deny list
- Type the domain you want to block (for example, youtube.com)
- Tap Go or Next on your keyboard to add it
- Make sure the toggle next to the domain is switched ON
That last step is the one most people skip. The domain shows up in the list but the toggle is off by default, which means nothing is actually blocked yet. Switch it on before moving to the next part.
Part 2: Connect NextDNS to Chrome
- Tap Setup in the top menu of the NextDNS dashboard
- Scroll down to find the DNS over HTTPS section
- Long-press the URL shown there and tap Copy
- Tap the three-dot menu in Chrome and open Settings
- Tap Privacy and security
- Tap Use secure DNS
- Select Choose another provider
- Paste the copied NextDNS URL into the field
- Tap back to save
Verify it’s working
Try to open the website you blocked. If the setup worked correctly, Chrome shows a “site can’t be reached” error. Not a filtered page, not a warning screen. A genuine connection failure. That’s the confirmation you want.
If the site still loads, go back to the NextDNS Deny list and check the toggle. That’s the fix nine times out of ten.
One important scope note. NextDNS configured through Chrome’s Secure DNS setting only blocks websites inside Chrome. If someone opens a different browser on the same phone, the block doesn’t apply there. For blocking websites across every app and browser, the Private DNS method covered earlier in this guide handles that at the system level instead.
The Quickest Chrome Filter That Needs Zero Setup
If you don’t need to block one specific website but want Chrome to automatically filter inappropriate content, there’s a faster option built directly into Chrome’s browser settings. No NextDNS dashboard. No URL to copy. No account.
It’s called CleanBrowsing Family Filter and it’s a preset inside Chrome’s Secure DNS menu. Here’s how to turn it on:
- Open Google Chrome
- Tap the three-dot menu and go to Settings
- Tap Privacy and security
- Tap Use secure DNS
- Tap Choose another provider
- Select CleanBrowsing (Family Filter) from the dropdown list
Four taps from Chrome settings and Chrome routes all its DNS queries through CleanBrowsing’s family filter automatically.
The difference between this and SafeSearch is significant. SafeSearch only filters what appears in Google search results. CleanBrowsing Family Filter blocks entire categories of content at the DNS level inside Chrome, which means a site doesn’t even load rather than just being hidden from search. That’s a meaningful difference for anyone who thought SafeSearch was giving them real protection.
The tradeoff is that CleanBrowsing filters categories, not specific sites. If you need to block one particular domain by name, go back to the NextDNS method above. But if you want a fast, no-account family filter for Chrome on Android, CleanBrowsing is genuinely the quickest way to get there.
SafeSearch: What It Actually Blocks (And the One Thing It Can’t Do)
SafeSearch does not block websites. I want to be clear about that upfront because this is the single biggest misconception parents have when trying to block restricted websites in Google on Android phones.
What SafeSearch actually does is filter explicit content out of Google search results. If someone searches for something inappropriate, SafeSearch hides those results from appearing in the list. That’s useful, but it’s also where the protection ends.
Here’s what SafeSearch cannot do. It cannot stop anyone from typing a website address directly into the Chrome address bar and going straight to that site. A child who knows the URL of a blocked site can bypass SafeSearch completely just by typing it in. No search involved, so SafeSearch never sees the request.
That gap is exactly why so many parents turn on SafeSearch, assume their child is protected, and then discover weeks later that the filter did nothing at all when it came to direct site access. The search results looked clean. The browsing history did not.
If you still want to enable SafeSearch as one layer among several, here’s how:
- Open Chrome and go to google.com
- Tap the three-line menu in the top left
- Tap Settings
- Tap SafeSearch filters
- Turn on Filter explicit results
- Sign into your Google Account so the setting sticks
Just know what you’re getting. SafeSearch filters searches, not sites. For actual website blocking, the DNS-based filtering methods or CleanBrowsing Family Filter covered earlier in this guide handle what SafeSearch leaves open.
How to Block Unwanted Websites on Android Using Google Family Link
Google Family Link is the most complete native solution Android offers for blocking unwanted websites on a child’s phone. It’s Google’s official parental controls tool, and unlike browser settings or DNS that a child can change in Settings, Family Link enforces restrictions at the Google account level on supervised child accounts.
That account-level control makes Family Link significantly harder for a child to bypass on their own. But before assuming this solves everything, understand what you’re actually getting and what you’re not.
Family Link received a major interface redesign in February 2025, consolidating management tools into a new Screen Time tab and adding School time features. For the most current setup instructions and feature updates, Google maintains comprehensive documentation on how to set up and manage Family Link parental controls that covers all recent interface changes. If you’re following an older guide with screenshots that don’t match what you see in the app right now, Google’s official documentation shows the current interface
Here’s what matters about the different filtering levels Family Link offers.
Try to block explicit sites is the first option, and most parents don’t realise what this actually does. Google uses AI-powered content filtering to automatically block sites flagged as containing inappropriate content. You don’t manually list every bad site you’re worried about. The AI catches them without you building a blocklist one URL at a time.
Only allow approved sites flips the entire model. Instead of blocking bad sites, this mode blocks everything except the specific URLs you manually approve. Good for younger children who should only visit a handful of educational or entertainment sites. Extremely restrictive but also extremely effective.
Manual block or allow lets you add individual sites to a blocked list or an approved list while leaving general browsing open. If you want to block one particular site like reddit.com but otherwise let your child browse freely, this is the setting that handles it.
The context parents need here is screen time data. Children ages 8 to 12 in the United States spend between 4 and 6 hours a day on screens, and teens spend up to 9 hours according to the American Academy of Child and Adolescent Psychiatry. That level of exposure is exactly why medical organisations like the American Academy of Pediatrics recommend active digital supervision as part of helping children develop healthy technology habits.
Family Link gives you the tools Google designed specifically for that supervision. But it only works on a supervised child account, not on your own adult Google account. If you want to restrict websites on your own phone for productivity or self-control, you need one of the other methods in this guide instead.
How to Manually Block or Allow Specific Sites in Family Link
If you want to block or allow a specific website by its URL using Google Family Link parental controls, here’s the exact path through the app to get there.
Open the Family Link app on your parent device. Tap your child’s profile. Go to Controls at the bottom of the screen. Tap Content Restrictions. Tap Google Chrome. Tap Manage Sites.
From here you can tap Add a website and type the full URL of any site you want to block. That site gets added to your child’s blocked list immediately and won’t load in Chrome on their phone.
Or if you’re using the “Only allow approved sites” whitelist mode, this is also where you add the specific URLs your child is allowed to visit. Everything not on that list gets blocked by default, which is the most restrictive way to restrict websites on a child’s Android device.
What Family Link Can and Cannot Block
Family Link controls Chrome and some Google-integrated apps on the child’s supervised account. That’s the scope. It does not block third-party browsers like Firefox or Opera that a child might install from the Google Play Store.
If your child installs a different browser and you’re relying only on Family Link to filter content, every restriction you set in Chrome vanishes the moment they open that other browser. The filter doesn’t follow.
The fix is layering. Combine Family Link with system-level Private DNS filtering covered earlier in this guide. Private DNS blocks at the network layer across all browsers and apps, which closes the gap Family Link leaves open when it comes to third-party browser access.
Digital Wellbeing Cannot Block Websites Here’s What It Actually Does
Digital Wellbeing does not block specific websites. I see this confusion constantly, and it’s one of the most common mistakes people make when trying to block websites on Android.
Digital Wellbeing is a screen time management tool built into most Android phones. It sets daily timers on apps, pauses apps during Focus Mode, and schedules Bedtime mode to reduce distractions. Those are app-level controls, not URL-level blocking.
Here’s the difference that matters. If you want to limit how much time you spend in the Chrome app itself, Digital Wellbeing can do that. Set a one-hour daily timer on Chrome and the app pauses when the timer runs out.
But if you want to block youtube.com while still using Chrome freely for everything else, Digital Wellbeing is completely useless for that goal. Digital Wellbeing controls which apps you can use and for how long. It has zero ability to block one specific website address while leaving the rest of the browser functional.
That’s app blocking, not website blocking. Not the same thing.
The reason this confusion exists is that Digital Wellbeing is marketed as a digital wellness solution, and people assume wellness includes blocking distracting or inappropriate websites. The name sounds like it should cover that. But the feature set doesn’t.
If you’re trying to block websites on Android, go back to the DNS filtering, Family Link, or Chrome-specific methods covered earlier in this guide. Digital Wellbeing won’t get you there no matter how you configure it.
How to Block Websites Using a Dedicated App (And Which One to Choose)
Third-party website blocker apps fill the gap that Android’s built-in tools leave open. They let you block specific websites across all browsers, set up scheduled blocking times for work hours or sleep, and protect blocks with a password so you can’t just turn them off when tempted.
These apps work in one of two ways. Some use Accessibility Services to monitor what loads in your browser and block sites before they appear. Others use what Android calls a local VPN to filter website requests at a deeper system level before content reaches any browser at all.
That VPN part scares a lot of people. I get it. When a website blocker app asks for VPN permission, the immediate thought is that your browsing data is being routed through someone else’s server. But these apps use a local VPN that filters traffic entirely on your device. No data leaves your phone. The filtering happens locally before anything touches the network, which is why the permission request uses the word VPN even though no external connection is involved.
Here are the three website blocker apps worth considering, based on what you actually need.
BlockSite is the most popular option with over 5 million users. It’s the simplest to set up and covers the basics well. You add websites to a block list, the app blocks them across browsers, and you can set time schedules or use password protection. Good for straightforward blocking without needing advanced features.
AppBlock focuses on scheduling and productivity. It lets you create time-based blocking sessions, has a Strict Mode that prevents you from turning off blocks during active sessions, and offers keyword blocking to catch entire categories of distracting websites at once. Better for people who need structured focus time during work or study hours.
Freedom works across multiple devices and platforms. If you want blocks that sync between your Android phone, tablet, and computer, Freedom handles that. More expensive than the others but justified if you need cross-device consistency.
All three offer free versions with basic features and paid plans that unlock scheduling, password protection, and sync. Cost ranges from free to around five dollars per month depending on which features you need.
One more thing most guides skip. Some blocker apps offer a Device Administration option that prevents the app from being uninstalled without entering a password. If you’re trying to block distracting websites for self-control and worry you’ll just uninstall the blocker when willpower runs low, activating Device Administration makes that significantly harder to do. And enable the “Connect on system startup” setting if the app offers it, or the block disappears every time your phone restarts.
The One Permission Step That Makes or Breaks Your App Setup
Every time I see someone complaining that a website blocker app doesn’t work, this is the first thing I check. They installed the app. They added websites to the block list. But they skipped granting Accessibility permissions, so the app has no way to actually intercept and block anything.
The app installs fine without Accessibility access. It looks like it’s working. But when you try to open a blocked site, the site loads normally because the app never had the system-level permission it needs to intercept browser requests.
Here’s how to fix it:
- Go to Settings on your Android phone
- Tap Accessibility
- Tap Installed apps or Downloaded apps
- Find your blocker app in the list (BlockSite, AppBlock, etc.)
- Tap the app name and toggle Use [App Name] to ON
The app needs Accessibility permission because that’s how Android lets apps monitor what’s happening in other apps like Chrome or Firefox. Without that permission, the blocker has no visibility into what you’re trying to load and cannot block anything.
Test it immediately after granting permission. Try to open a blocked website. If the site fails to load or shows a block screen, the app is working. If the site opens normally, go back and confirm the Accessibility toggle is actually on.
Block Websites on Your Home Network (Router-Level Method)
Router-level blocking filters every device connected to your home WiFi network in one place. Parents use this approach when they want content filtering across phones, tablets, and computers without configuring each device separately.
The setup happens in your WiFi router settings. You access the router admin panel, change the DNS settings to a filtering provider like OpenDNS Family Shield or NextDNS, and apply the configuration. From that point forward, any device using your home WiFi routes its DNS requests through the filtering service you chose, and blocked categories or specific sites won’t load.
But here’s what I need to be clear about upfront. Router-level blocking only works when the Android phone is connected to your home WiFi. The moment the phone leaves your house and switches to cellular data, every router-based block disappears completely.
The phone isn’t using your home network anymore. It’s using the mobile carrier’s network. Your router has zero control over what happens on cellular data. Parents set up router blocking, test it at home, see that it works, and assume their child’s phone is protected everywhere. It is not.
This is exactly where router-level content filtering fails for phones specifically. Laptops and tablets that rarely leave home stay protected. Phones that go to school, friends’ houses, or anywhere outside WiFi range bypass every router restriction the moment they switch networks.
The fix is layering. Set up router-level DNS filtering for household devices that stay home, and combine it with device-level Private DNS on the Android phone itself. Private DNS travels with the phone on any network, which closes the gap that router filtering leaves wide open when the phone uses mobile data.
Why Your Android Website Block Isn’t Working (Fix It Here)
Most Android website blocks fail for one of three reasons: missing app permissions, wrong setup scope, or no reboot persistence. I see the same troubleshooting patterns over and over.
The biggest mistake people make is assuming their block works just because they set it up. Always test immediately after setup. Visit the blocked site to confirm it actually stops loading.
Here are the five most common failure scenarios and their exact fixes:
Block not working in any browser. This usually means your blocking app lacks Accessibility permissions, or your private DNS setting never activated. Go to Settings > Accessibility and enable your blocking app. For DNS methods, check Settings > Network > Private DNS and confirm your custom server appears active.
Block works at home but fails elsewhere. You only configured router-level blocking, which disappears on cellular data. Router blocks only work on your home WiFi. Add a device-level method like private DNS or a blocking app to cover cellular connections.
Block stopped working after reboot. Your method lacks startup persistence. Most blocking apps have a “Connect on system startup” toggle that must be enabled. DNS apps particularly need this setting turned on, or they reset to default after restart.
Blocked site loads in a different browser. You applied a browser-specific block instead of system-wide blocking. Chrome extensions only block Chrome, while Samsung Internet filters only affect Samsung’s browser. If you’re constantly switching between browsers to bypass blocks, consider changing your default browser app on Android to one you trust with your filtering setup, then use private DNS or a system-level blocking app for complete coverage across all browsers.
NextDNS shows setup but blocks nothing. The domain toggle in your Deny list is probably off. This catches almost everyone who sets up NextDNS correctly but sees no blocks. Log into your NextDNS dashboard, find your blocked domains, and verify each toggle shows green/enabled.
How to Make Your Block Completely Bypass-Proof
No method stops someone determined to bypass restrictions. But you can make it much harder.
Enable Device Administration for your blocking app. This prevents uninstallation without entering your device passcode. Most blocking apps offer this in their security settings.
Layer private DNS with app-based blocking. This closes the browser-switching loophole since DNS blocks work system-wide while apps add extra verification.
For extreme self-control, use the random PIN method. Set a long random PIN for your blocking app, write it down, and have someone else hide the paper. You cannot bypass what you cannot remember.
Family Link on supervised accounts creates the strongest blocks, but requires setting up parental controls.
Frequently Asked Questions
Can I block a specific website on Android without downloading any app?
Yes, Android has built-in Private DNS that blocks websites across all browsers without any app installation. Go to Settings → Network & Internet → Private DNS and enter a filtering hostname like dns.adguard.com. For Chrome-only blocking, you can configure NextDNS directly in Chrome’s Secure DNS settings.
Why is my website block working at home but not when I leave?
Router-level blocking only affects your home WiFi network and stops working on cellular data. When learning how to block website in android phone effectively, always use device-level methods like Private DNS. This ensures the block travels with your phone on any network connection.
Does Google Family Link actually block websites or just filter search results?
Family Link blocks specific websites by letting parents add individual URLs to a restricted list for supervised accounts. This is different from SafeSearch which only filters Google search results and cannot block direct website access. Family Link applies real website blocking within Chrome on the child’s device.
How do I permanently block a website so I can’t turn it off myself?
Use a blocking app with Device Administration enabled to prevent uninstallation, then set a random PIN you immediately discard. Without the PIN, you cannot disable the block without doing a factory reset. For the most permanent solution when setting up how to block website in android phone, Family Link’s supervised account controls are nearly impossible to bypass.
Will the website block work in all browsers, or just Chrome?
Private DNS at the system level blocks websites across all browsers and apps on your device. Chrome Secure DNS settings only block within Chrome browser specifically. Website blocking apps using Accessibility Services typically work across all browsers, while Family Link only affects Chrome and Google Search.