

Why Connect Your Phone to Your Computer in 2026?
I connect my phone to my computer almost every day. Not because I have to because it genuinely saves me time in ways I didn’t expect when I first set it up.
Most people only think about how to connect my phone to my computer when they need to grab vacation photos. That’s the narrow version of this. Once your devices are properly linked, you can answer texts from your keyboard, take calls through your computer speakers, and even run your phone’s apps on a screen three times the size.
The shift that changed things for me was moving between devices without losing my place. Start drafting something on my phone during a commute, open the same document on my computer twenty minutes later, and pick up exactly where I left off. Or tap into my phone’s cellular data when the home WiFi dies. These aren’t edge cases they’re things I use weekly.
File transfer is still the most common reason people want to connect devices. But after testing every method available, I can tell you the ‘best’ approach depends entirely on what you’re moving and how fast you need it done. Single photo? Go wireless. Moving 50GB of raw video? Plug in a cable.
The biggest practical change in 2026 is wireless reliability. Phone storage access used to mean cables, drivers, and praying your computer would actually see the device. That’s mostly gone now. I can access files on my phone from across the room without touching a cable.
Remote work made this whole setup feel essential. Taking calls while keeping my hands on the keyboard. Seeing phone notifications on my monitor instead of getting constantly dragged back to a small screen. Using my phone’s LTE as a backup connection during outages.
But a lot of the connection methods that get recommended online are either outdated or require setup steps people consistently get wrong the first time. This guide covers what actually works, in plain steps, so you don’t spend an afternoon troubleshooting something that should take five minutes.
Method 1: Connect Your Phone to Computer with USB Cable (Fastest Option)
For raw speed and reliability, USB cable connection is still the method I go back to first when I need to move large files or when wireless keeps dropping. But the cable itself is where this goes wrong for most people, and nobody warns them about it upfront.
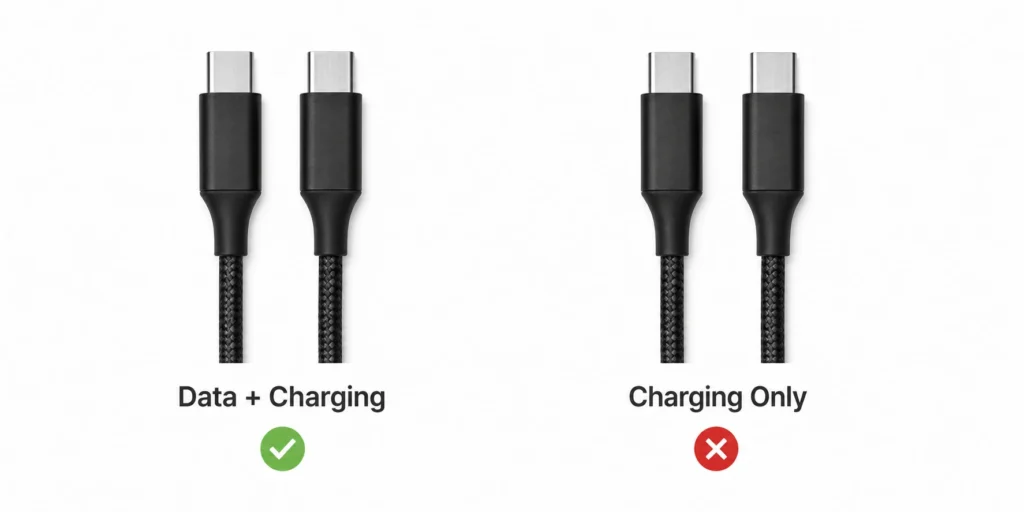
You need a data cable, not a charging cable. Those cables bundled with car chargers and random power banks? Pure power only. No data signal travels through them, which means your computer will never detect your phone no matter what settings you dig through.
I spent a full hour checking drivers, restarting services, and re-plugging the same cable before I tried swapping it. Different cable, phone showed up in 10 seconds. That hour is gone forever.
USB cable connection gives you direct phone storage access without apps, accounts, or anything extra installed. Your phone shows up as a regular drive in your file manager. Drag files between windows exactly like moving anything else on your computer.The speed gap is real and substantial.
Moving large photo collections takes just minutes with USB connections. If your phone screen is cracked or damaged and you need to recover photos urgently, check our guide on how to extract photos from a damaged Android phone which covers additional recovery methods beyond standard USB transfer. For wireless transfers, expect significantly longer times especially for large files
USB also works when your internet is completely down. One thing worth knowing before you start: the setup steps are different depending on whether you own an Android or iPhone. Android uses MTP mode.
iPhone requires iTunes on Windows or Finder on Mac. Same cable. Completely different process from that point forward.
Connect Android Phone via USB Cable
Android file transfer runs through MTP mode that’s Media Transfer Protocol, though knowing the name won’t help you at all.
What matters is turning it on. Plug your Android phone in with a data cable and unlock the screen immediately. Locked phones don’t expose their contents to computers, so this step cannot be skipped.
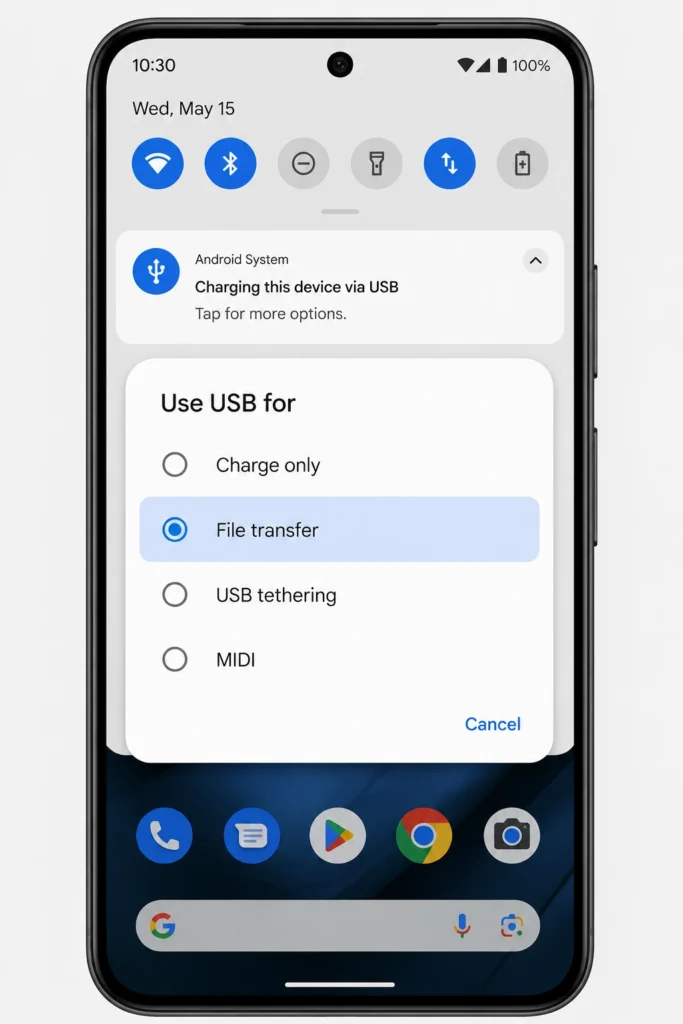
Watch for a notification that reads ‘Charging this device via USB’ or something close to that wording. Tap it. A menu appears with options including ‘Charge only,’ ‘File transfer,’ and sometimes ‘USB tethering.’ Select ‘File transfer’ or ‘MTP mode’ and your phone shifts from power-only mode to data mode.
From there, open your computer’s file manager. On Windows, your phone appears under ‘This PC.’ On Mac, it shows up in the Finder sidebar. Inside you’ll find folders like DCIM for photos, Download, Music, and others depending on your device.
Copy files by dragging between windows like you would with anything else on your computer. Some Android phones add one more step a popup asking ‘Allow access to phone data.’ Tap yes on that. Without it, you’ll see the phone listed but every folder inside it will be locked.
Connect iPhone to Computer via USB Cable
iPhone to computer connection requires iTunes on Windows or Finder on Mac. Apple controls how iPhones communicate with computers and there is genuinely no path around their software.
Plug in your iPhone using a Lightning or USB-C cable depending on which model you have. The phone will immediately ask ‘Trust this computer?’ — tap Trust and enter your passcode. On Windows, open iTunes. On a Mac running Catalina or any version after it, open Finder instead.
Your iPhone shows up in the left sidebar in either app. Click your iPhone’s name, select what you want to sync photos, music, other content and hit Apply. Before you do anything else: iTunes can wipe your phone’s content if sync settings don’t match what’s already on the device.
I back up every iPhone before connecting it to a new computer for the first time. Do not skip that step. The folder browsing experience you get with Android does not exist on iPhone.
Everything moves through Apple’s sync system. For just pulling photos quickly, the Photos app on Windows or Image Capture on Mac handles that faster than going through iTunes at all no full sync required.
Method 2: Connect Your Phone to Computer Wirelessly (Built-in Screen Mirroring)
Windows has a built in Wireless Display feature that lets you connect phone to computer wirelessly without downloading anything or creating any account.
Your phone, your computer, and a shared WiFi network are the only requirements.
This feature has existed for years, and Microsoft buried it deep enough in settings that most users stumble across it only by accident. I found it while hunting for alternatives to third party screen sharing software.
The wireless connection phone computer setup mirrors your phone screen directly onto your monitor in real time scroll, swipe, watch video, or just show someone sitting next to you what’s on your screen.
There’s one firm requirement: both devices must be on the exact same WiFi network. Not the same internet connection. The same network name Not just the same internet connection. The same network name and password.
I ran into this personally when my phone was connected to the guest network and my computer was on the main one. Both pulling from the same router, same internet service, completely different networks from the router’s perspective.
The pairing attempt failed every single time and gave me no useful error message about why. Once I moved both to the same network, it connected in under 10 seconds. Screen mirroring runs on Wi-Fi Direct technology underneath.
Your computer broadcasts itself as an available display, and your phone connects to it the same way it would connect to a TV or projector.
Setting Up Windows for Wireless Display
Windows 11 phone sync begins in Settings > System > ‘Projecting to this PC.’ If that option is greyed out or missing from the sidebar entirely, the Wireless Display optional feature is not installed on your machine yet and that missing installation is the reason most screen mirroring attempts fail before they start.
Fix it by going back to Settings and searching ‘Optional features.’ Hit ‘View features’ or ‘Add a feature,’ type ‘Wireless Display’ into the search box, install it, and restart.
After the restart, return to ‘Projecting to this PC.’ Set the first dropdown to ‘Available everywhere’ so nearby devices can discover your computer. Set the second to ‘First time only’ so you only get one confirmation prompt per new device.
Click ‘Launch the Wireless Display app to project to this PC’ and a blue window opens. Your computer is now visible as a wireless display on your network.
Worth noting: with ‘Available everywhere’ enabled, any device on the same network can see your computer in casting options so if you’re on a shared or public WiFi, set this back to ‘Off’ when you’re done.
Connecting from Android Phone
Built-in screen mirroring exists on every major Android phone, but manufacturers gave it different names which makes it hard to find if you don’t know what to look for. Samsung calls it Smart View. LG uses Screen Share. HTC labels it HTC Connect.
On most phones, swipe down from the top of your screen twice to see all quick setting tiles and look for Cast, Screen Cast, Wireless Display, or Screen Mirroring. Tap it and wait a few seconds for your computer to appear in the list. The name shown matches your computer’s name in Windows settings. Tap it to start the connection.
If the first attempt fails — and it often does on the first try because the two devices are still negotiating the initial handshake cancel and tap your computer’s name again immediately. Second attempts connect almost every time. Once connected, the mirrored window follows your phone’s orientation. Rotate your phone sideways and the window shifts to landscape on your computer.
Keep it upright and you get a tall narrow window instead. One firm limit to understand before you rely on this: what you have is view only. You can watch your phone screen on your computer but your mouse does nothing to it. For actual mouse and keyboard phone control, the ADB method in Method 7 covers that
Method 3: Sync Your Phone with PC Using Microsoft Phone Link
Microsoft Phone Link is probably the easiest way to sync phone with PC if you have a Windows computer and an Android phone. The whole setup involves scanning a QR code no cables, no complicated network configurations. I use it every day at this point.
Replying to texts from my keyboard while I’m mid document. Picking up calls through my computer speakers without ever touching my phone.
Browsing recent photos from my phone on my monitor without setting up a transfer. The way it works: Phone Link connects through your Microsoft account and your WiFi network and the phone link app running on your Android keeps your Windows Phone Link dashboard updated with new messages, calls, and photos as they arrive.
The part that causes the most trouble during setup is permissions. Every single permission request during the pairing process needs to be approved. Miss one and the corresponding feature stops working completely.
I’ve watched people debug Phone Link for hours only to discover they accidentally denied notification access on step three of six. Samsung Galaxy and Honor devices have the Link to Windows app pre installed, which saves one step. Every other Android brand requires a download from Google Play Store first.
The connection also only works while both devices are on the same WiFi network. Walk out of the house with your phone and the link breaks until you come back which is different from cloud services that follow your internet connection wherever you go.
Phone Link Setup for Android Phones
Start on your Windows computer. Search ‘Phone Link’ in the Start menu and open the app. If it’s not there, download it from the Microsoft Store. Sign in with your Microsoft account the same one tied to Windows, Xbox, or Outlook. Both devices need to be logged into the same account. Phone Link generates a QR code on your screen.
Keep that window open and pick up your Android phone. If the Link to Windows app isn’t already on your phone Samsung Galaxy, Honor and a few other brands include it by default download it from Google Play Store.
Open the app, tap ‘Sign in using the QR code on your PC and point your camera at your computer screen. Enter your Microsoft account password on your phone when it asks.
Now the part that breaks most setups: your phone is about to ask for multiple permissions in a row. Contacts, call logs, messages, notifications, photos. Every single one needs to be approved.
People rush through and tap ‘Don’t Allow’ on one without realizing it, and then one entire feature quietly stops working with no explanation. If you miss a permission, fix it through Settings > Apps > Link to Windows > Permissions and enable everything manually.
When your phone shows ‘Device linking is complete,’ check your computer the Phone Link dashboard should be open and already showing recent content from your device.
What You Can Actually Do with Phone Link
In practice, Phone Link makes your computer a second front end for your phone’s communication. The dashboard pulls in recent messages, missed calls, and photos automatically.
Text messages update in real time you can type a reply from your computer keyboard mid-task without ever picking up your phone, and new conversations can be started directly from your synced contact list.
Calls route through your computer’s speakers and microphone, so incoming calls show up as a popup on your screen and you answer with a click. Photos are the part I use most.
Any photo taken on your phone appears in the Photos tab within a minute or two, and copying it to your computer is a single click. No cable, no manual transfer trigger.
Phone app notifications route through Windows notifications as well email alerts, social media pings, app updates. Dismiss them from your computer and they clear from your phone at the same time.
Screen mirroring with actual mouse-and-keyboard phone control is limited to select Samsung Galaxy devices and the Surface Duo. On those devices, you can click through your phone apps directly from your computer.
Every other Android phone gets the messaging, calls, and photos features only which is still genuinely useful but not full control. What Phone Link cannot do: browse your phone’s file system, access music libraries, open documents stored in app folders, or reach any app data outside of messages and recent photos.
If you need any of that, USB or LocalSend is the right tool instead. Battery drain is lower than I expected.
Because most of the communication routing runs over WiFi rather than pushing through the cellular radio constantly, the impact on phone battery is noticeably lighter than heavy app usage.
Method 4: Transfer Files Using Bluetooth Connection
Bluetooth file transfer is the right choice for small files when you don’t want cables or app installations. Documents, a single photo, short audio clips anything under 50MB moves well enough.
I reach for it specifically when I need to send one file to someone else’s computer without setting up any account or sharing link. No internet required.
Pair the devices once and you can send files back and forth anytime. The honest part is what Bluetooth handles badly. Large files take a very long time. Video files frequently fail partway through without explaining why.
Music albums are brutal you’re looking at one song at a time, manually accepted on the receiving device, at speeds that max out around 2–3 MB per second in ideal conditions and slower than that in real ones.
USB cables move gigabytes in the time Bluetooth moves a few hundred megabytes.
The advantage is simplicity. Both devices have Bluetooth built in. No additional software needed. Works between any two Bluetooth devices regardless of operating system.
Enable Bluetooth on both your phone and computer. On Windows, click the Bluetooth icon in the system tray or navigate to Settings > Devices > Bluetooth.
Make sure your computer is set to ‘Discoverable’ or ‘Allow devices to find this PC’ some computers hide themselves from nearby devices by default and you’ll search your phone forever wondering why nothing shows up.
On your Android phone, open Settings, find the Bluetooth menu, turn it on, and confirm the phone is visible to other devices. From your computer, click ‘Add Bluetooth or other device’ and select Bluetooth.
Your phone should appear in the available devices list within a few seconds. Click your phone’s name and follow the pairing prompts.
Both devices display a matching numeric code verify the numbers are the same on both screens, then accept on both.
After that first pairing, the devices remember each other and reconnect automatically whenever Bluetooth is active on both
To send a file from your computer to your phone, right-click the Bluetooth icon in the system tray and select ‘Send a File.’ Pick your phone from the list, browse to your file, and click Send.
Your phone gets a notification asking whether to accept the incoming file tap Accept and it lands in the Download folder. Going the other direction, find the file on your phone, tap Share, select Bluetooth, and choose your computer from the paired devices list.
The process works, but it’s slow in a way that becomes genuinely annoying for anything over a few megabytes. A single document or photo is fine. An album of photos is not.
A video file is essentially out of the question. Range is also limited Bluetooth holds well within about 10 feet and gets unreliable fast once walls are involved.
File transfers in progress cancel if the connection drops mid way. So this stays in my toolkit for one specific situation: sending a single file to someone else’s device quickly, when no other option is convenient. That’s it
Method 5: Share Your Phone’s Internet with Computer (Hotspot Method)
Phone hotspot is the method I actually rely on when home internet dies or I’m working somewhere with WiFi that keeps dropping.
I’ve used it in coffee shops, during router outages, and once during a three hour power failure when mobile data was the only connection still working. This one is different from everything else in this guide it’s not about moving files between your devices.
Hotspot tethering turns your phone into a portable WiFi router that shares its cellular data connection with your computer.
Most phone plans include hotspot access, though some carriers limit the data you can share or charge extra for it worth checking your plan before you rely on it heavily.
On Android, open Settings and look for ‘Hotspot’ or ‘Mobile Hotspot.’ Samsung labels this section ‘Mobile Hotspot and Tethering.’ Google Pixel calls it ‘Hotspot & tethering.’ Tap ‘Portable hotspot’ or ‘WiFi hotspot’ and flip the toggle on.
Before connecting your computer, check the auto-generated network name and password. Most phones create something like ‘AndroidAP’ or a variation of your phone model for the name and a long random string for the password.
Both can be changed to something easier to remember under ‘Set up portable hotspot.’
On your computer, open WiFi settings, find your phone’s hotspot network name and connect using the password from your phone. Check ‘Connect automatically’ if your computer offers it that way it reconnects to your hotspot without re entering the password every time you turn it on.
Tap “Set up portable hotspot” to customize these settings.
On your computer, open your WiFi settings and look for your phone’s hotspot network name. Connect to it using the password from your phone.
Hotspot connections work well for web browsing, email, and video calls. What they burn through fast is data streaming video or downloading large files can hit your monthly limit in a few hours without you realizing it.
I track usage through the built-in data monitor in my phone’s Settings and most carriers send a text warning when you get close to the limit.
Hotspot mode significantly impacts battery life since your phone works harder to broadcast WiFi signals.
If you’re experiencing fast battery drain on your phone even without hotspot use, that’s a separate issue with specific fixes. Keep a charger handy for extended hotspot sessions, and consider the power management tips in our battery optimization guide
Speed depends almost entirely on your cellular signal and carrier. Somewhere with solid 4G or 5G, hotspot performance often beats the WiFi at the coffee shop you’re sitting in
Method 6: Modern Wireless Apps That Actually Work
There’s a newer generation of wireless file transfer apps that most people haven’t tried yet because they never went looking.
I found them through tech communities where people share what actually holds up after regular use not what a product page claims, not affiliate review sites. Just people saying ‘this one doesn’t break’ or ‘this one doesn’t suck.’ That’s a higher bar than it sounds
These apps solve the problems that made older wireless methods frustrating. Transfer speeds that beat Bluetooth significantly. Setup that takes under three minutes.
Cross-platform compatibility that works even when the devices on either end are running different operating systems.
LocalSend and KDE Connect are the two that come up most often when experienced users compare what’s available right now.
AirDroid is still functional but the interface and feature set feel like they haven’t kept pace. Most of these newer options are free with no data limits or recurring fees, which matters when you’re using them regularly.
LocalSend: The Modern AirDrop Alternative
LocalSend does for everyone what AirDrop does exclusively for Apple devices. Install it on your phone and computer, open both, and they find each other automatically on the same WiFi network.
No account, no pairing code, no configuration screen to fight through. Select files, pick the destination device from the list, send. I’ve heard people describe it as ‘simple and just works’ which is accurate and also a genuinely rare thing to say about a cross platform file transfer app.
The transfer happens directly between your devices. Nothing routes through a cloud server, which means your files stay private and the speed depends entirely on your local network rather than your internet connection.
A folder of photos from phone to laptop in under a minute. A single document in a few seconds. Video files move faster than I expected from something that costs nothing.
LocalSend runs on Android, iPhone, Windows, Mac, and Linux, which means you can connect phone to laptop regardless of what combination of devices and operating systems you’re working with.
You can download LocalSend directly from the official LocalSend website which includes installation guides for all supported platforms and troubleshooting tips for common setup issues
The interface feels familiar if you’ve used any modern messaging app. Drag files into the app window or select them from the file picker. Choose the destination device from a list. Done.
Worth noting: LocalSend works even when the internet is out, as long as both devices are still connected to the same WiFi router. The router just needs to be on — the internet connection behind it doesn’t matter.
I’ve used it during outages specifically for this reason. The interface takes about 30 seconds to understand. Drag files into the app window, or pick them through a file browser. Select the destination device from a short list of what’s visible on the network. The file moves. That’s the whole process.
KDE Connect for Cross Platform Users
KDE Connect goes well past file transfer. Messages, notifications, clipboard sync, remote control the feature list is longer than LocalSend’s by a significant margin.
Someone in a Linux community I follow described it as something they run across all three of their computers simultaneously Mac, Linux and Windows which says something about how reliable the cross-platform support is.
The setup takes about five minutes more than LocalSend. Download KDE Connect on both devices, pair them by confirming a matching security code on each screen and the connection opens up a set of features that makes your phone and computer feel like they’re running on the same network by design
File transfers work through a dedicated menu option. Right-click any file, select ‘Send to,’ and your connected devices appear as options.
The file shows up in whatever download folder the receiving device is configured to use. The clipboard sync is the feature that surprised me most about KDE Connect.
Copy something on your phone and it’s immediately in your computer’s clipboard, ready to paste. Phone notifications mirror to your computer screen.
And there’s a remote input option that turns your phone into a wireless mouse and keyboard for your computer useful in ways I didn’t expect until I had it set up.
KDE Connect runs on Windows, Mac, Linux, Android, and a few niche systems that most other apps don’t bother supporting. Firewall configuration is the thing most likely to block a successful setup.
The app needs to communicate across your local network, and both Windows Defender and third-party security tools will sometimes block that by default without telling you why.
If both devices paired successfully but still won’t connect, firewall exceptions are the first thing to check. Linux users also have Warpinator as a built-in alternative it comes preinstalled on Linux Mint and handles wireless file transfers without any additional configuration.
KDE Connect has broader OS support though, which matters if you regularly move between a Windows work machine and a Linux personal one
Method 7: Full Phone Control from Computer (Advanced Users)
This method gives you complete control over your Android phone from your computer. Not just screen mirroring or file access. Full control with mouse clicks, keyboard input, and every app working exactly like it would on your phone.
I use this setup when I need to run mobile apps for extended periods but want the comfort of a real keyboard and large screen. Testing apps, managing multiple social media accounts, or using mobile-only banking apps on a proper computer setup.
The wireless connection phone computer method relies on Android’s developer tools and a program called Scrcpy. Both are free, but the setup requires comfort with command line interfaces and developer settings.
Most people should stick with Phone Link or the simpler methods I covered earlier. This approach is for users who know their way around technical setups and don’t mind troubleshooting when things go wrong.
Enable Developer Mode on your Android phone first. Go to Settings, scroll to About Phone, and find either Software Information or the Build Number entry depending on your phone model.
Tap Build Number seven times in a row. Your phone displays ‘You are now a developer’ after the seventh tap that’s not a figure of speech, it literally shows that message.
Head back to the main Settings menu and a new ‘Developer options’ section will have appeared near the bottom. Open it, scroll down to ‘Wireless debugging,’ and turn it on.
Your phone asks for permission to enable wireless debugging on your current WiFi network allow it.
Once enabled, the wireless debugging screen shows your phone’s IP address and a port number. Note both of these down somewhere; you’ll need them in the next step
Download ADB (Android Debug Bridge) and Scrcpy on your computer. ADB is available with Android Studio or as a standalone command-line tool. Scrcpy is a separate program that handles both the screen display and the input controls.
Open a command prompt or terminal and type the ADB connect command using the IP address and port number you noted from your phone. It looks like ‘adb connect 192.168.1.100:5555’ but with your actual numbers in place of those.
Check your phone screen within a few seconds of running that command. A prompt appears asking for wireless debugging permission tap Allow and check ‘Always allow from this computer’ if you plan to use this more than once. Run the ADB connect command a second time.
It should return ‘connected.’ Then launch Scrcpy. A window opens on your computer showing your phone screen at full resolution and your mouse clicks and keyboard input go directly to the phone. Every app, every tap, every swipe all controlled from your desk.
The wireless debugging connection stays active until you either turn it off manually or restart your phone.
Worth keeping in mind: every time your phone reboots, wireless debugging needs to be re enabled and you’ll need to run the ADB connect command again.
The first time through the setup takes maybe 15 minutes if you’re reading instructions carefully. The second time takes about two
And this is exactly what separates casual users from people who really want to control their mobile device experience from their desktop setup.
Why Your Computer Won’t Recognize Your Phone (And How to Fix It)
Your phone connected fine last week. Today your computer looks at it like it’s never existed. This is one of the most common frustrations in the connection process, and the cause is almost always one of a short list of things. In practice, the issues split cleanly into two buckets: hardware problems with USB connections, and software or permission problems with wireless setups. Different causes, completely different fixes.
I’ve troubleshot hundreds of these problems, and the causes usually fall into two categories: hardware issues with USB connections or software problems with wireless setups. The good news is most problems have simple fixes once you know what to look for.
When a phone is not recognized by the computer, my first question is what type of connection is being attempted. USB cable failures behave differently from wireless failures, and the fixes are completely different.
The mistakes are predictable once you’ve seen them a few times: wrong cable type, missed permission prompts, two devices on different WiFi networks.
The less obvious thing is that the exact same symptom can have different causes depending on your phone manufacturer, your computer’s OS, and even which app you’re trying to use to connect
Most connection failures happen during the setup process, not after everything is working. That tells me the real problem is usually something simple that people skip or don’t notice during the initial configuration.
USB Connection Issues
USB connection problems usually come down to three things: wrong cable, locked phone, or missing drivers. These hardware-related issues are easier to fix than wireless problems because you can see and touch everything involved.
The cable issue catches more people than anything else. Charging cables and data cables look identical but work completely differently. Many phone chargers only carry power, not data signals. Your computer can’t see your phone through a charging-only cable no matter what settings you change.
I learned this the hard way after spending an hour checking drivers and phone settings. Swapped the cable and the phone appeared instantly in my file manager.
Your phone must be unlocked when you connect the USB cable. Locked phones don’t show their file contents to computers for security reasons. But here’s the part people miss: you need to confirm a dialog box that appears on your phone screen after plugging in.
The dialog usually says something like “Allow access to phone data” or “Use USB for file transfer.” Many people plug in their phone, see nothing happen on the computer, and assume something is broken. Meanwhile their phone is waiting for permission that never comes.
USB data transfer requires your phone to switch from charging mode to file transfer mode. On Android phones, this setting is called MTP mode. Swipe down from the top of your phone screen after connecting the cable. Look for a notification about USB connection options and tap it to select “File transfer” or “MTP.”
Driver issues occur less frequently now, but connection problems can stem from various hardware issues. If your phone won’t charge properly, that same faulty cable or port might prevent data transfer too. For charging-specific problems that affect USB connections, our charging troubleshooting guide covers the overlap between power and data connectivity issues
Wireless Connection Failures
Wireless connection failures almost always involve network problems or permission issues. The most common mistake is having your phone and computer on different WiFi networks.
Both devices must connect to the exact same WiFi network. Not just the same internet connection. The same network name and password. I’ve seen people struggle for hours because their phone was on a guest network while their computer used the main network.
Your router treats these as separate networks even though they share the same internet connection. Devices on different networks can’t discover each other for local connections like screen mirroring or file sharing.
Screen mirroring connections fail on the first attempt more often than they succeed. If your phone can’t connect to your computer’s wireless display, cancel the connection attempt and try again immediately. The second attempt usually works because both devices remember the initial handshake.
Permission problems kill more wireless setups than network issues. Phone Link, wireless debugging, and screen mirroring all require explicit permission from your phone. Miss one permission dialog and the entire feature stops working.
Check your phone notifications carefully during wireless setup. Apps often ask for access to contacts, location, files, and other sensitive data. Deny any permission and related features won’t work until you manually enable them in your phone’s app settings.
And here’s the timing issue nobody warns you about: your computer needs a stable internet connection during the initial setup of wireless features like Phone Link. The apps download configuration data and verify your Microsoft account during pairing. Slow or interrupted internet can cause setup failures that look like device compatibility problems.
Platform-Specific Tips: Windows vs Mac vs Linux
Most phone connection guides assume everyone uses Windows, but your computer’s operating system dramatically changes which methods work best. I’ve helped people on all three major platforms, and the differences are bigger than you’d expect.
Windows has the most native phone integration options. Microsoft Phone Link comes pre-installed on Windows 10 and 11. The built-in Wireless Display feature works well for screen mirroring. USB connections handle both Android and iPhone with minimal setup.
But here’s where Windows falls short: third-party wireless apps often work better than Microsoft’s official solutions. Phone Link has device limitations and feature restrictions that cross-platform apps like KDE Connect avoid completely.
Mac users face the opposite problem. Apple designed macOS to work seamlessly with iPhones but makes Android connections unnecessarily difficult. When you connect iPhone to Windows, you need iTunes. Connect an iPhone to Mac and everything just works through Finder and AirDrop.
Android on Mac requires third-party software for anything beyond basic USB file access. The built-in Android File Transfer app from Google works but feels clunky compared to what Windows and Linux users get.
Linux users actually have the best cross-platform phone connectivity options. KDE Connect runs natively on most Linux distributions and provides more features than Phone Link. File sharing, clipboard sync, notification mirroring, and remote control all work smoothly.
Warpinator comes built into Linux Mint and handles wireless file transfers perfectly. No setup complexity, no account requirements. Install the Android app and both devices discover each other automatically on your local network.
The cross-platform advantage goes to Linux because the same tools that work on Linux also run on Windows and Mac. KDE Connect, LocalSend, and other open-source solutions don’t have the artificial platform restrictions that commercial software imposes.
For people who switch between different computers regularly, I recommend focusing on cross-platform solutions rather than platform-specific features. Your phone connection methods should work the same way regardless of which computer you’re using.
And that’s exactly why Linux users often have fewer connection problems than Windows or Mac users. Their tools were designed to work everywhere from the beginning.
Which Connection Method Should You Choose?
The best method depends on what you actually need to do with your phone and computer connection. Most people overthink this choice when the answer is usually obvious once you know your main use case.
For large file transfers or backing up photos, USB cable wins every time. Nothing beats the speed and reliability of a direct wired connection. I use USB when moving gigabytes of data because wireless methods take forever and often fail partway through.
Phone Link is the best method for daily productivity if you have Windows and Android. Answer texts, take calls, and see notifications without picking up your phone. The setup takes 10 minutes and works seamlessly once configured properly.
Screen mirroring works great for presentations or showing someone else what’s on your phone. The built-in Windows wireless display feature handles this without installing extra software.
Skip Bluetooth for anything larger than a few documents. The speed is painful and connections drop frequently. Use Bluetooth only when you need to quickly send a single file to someone else’s device.
Modern wireless apps like LocalSend make the most sense for regular file sharing between your own devices. Faster than Bluetooth, simpler than USB cables, and works across different operating systems.
Hotspot mode solves a completely different problem. Use this when your home internet goes down or you’re working somewhere with terrible WiFi. Your phone becomes a backup internet connection for your computer.
The advanced ADB method is only worth the setup complexity if you need full phone control from your computer. Skip this unless you’re testing apps or managing multiple social media accounts.
Here’s my simple decision framework: Start with the easiest option for your main use case. USB for large files, Phone Link for communication, wireless apps for regular file sharing. You can always add other methods later when you need specific features.
Most people end up using two or three different connection methods depending on what they’re doing. And that’s exactly how to connect my phone to my computer most effectively.
Frequently Asked Questions
What if my computer doesn’t recognize my phone when I plug it in?
Check three things first: use a data USB cable (not charging-only), unlock your phone completely, and select “File transfer” from the USB notification that appears on your phone screen. If your phone still doesn’t show up, try a different USB port or install device drivers from your phone manufacturer’s website.
Do I need to download anything to connect my phone wirelessly?
For screen mirroring, Windows might need the Wireless Display optional feature installed through Settings. Phone Link requires the “Link to Windows” app on your Android phone (Samsung phones have this built-in). Third-party apps like LocalSend or KDE Connect are optional but often work better than built-in features.
Can I control my phone from my computer once connected?
Limited control is possible with Phone Link on Samsung Galaxy and Surface Duo devices – you can use apps through screen mirroring. For full control with mouse and keyboard, you need the advanced ADB wireless debugging method, but this requires developer mode and technical setup.
Which connection method is fastest for large files?
USB cable is always fastest for large file transfers – nothing beats wired speed for moving gigabytes of photos or videos. LocalSend and AirDroid are decent wireless options for regular files. Avoid Bluetooth for anything larger than a few documents – it’s painfully slow.
Why do I need to allow so many permissions for Phone Link?
Each permission enables specific features – contacts for call sync, messages for text access, notifications for alerts, photos for sharing. You must allow every prompt during setup or those features won’t work. If you missed any, go to Settings > Apps > Link to Windows > Permissions and enable them manually.


