

Why Won’t My Phone Battery Charge? Start Here
I’ve seen this panic dozens of times, usually late at night when someone’s phone is at 2% and nothing is happening when they plug in. The immediate assumption is always the battery. Or worse, that the phone is finished.
Most of the time, it isn’t either of those things.
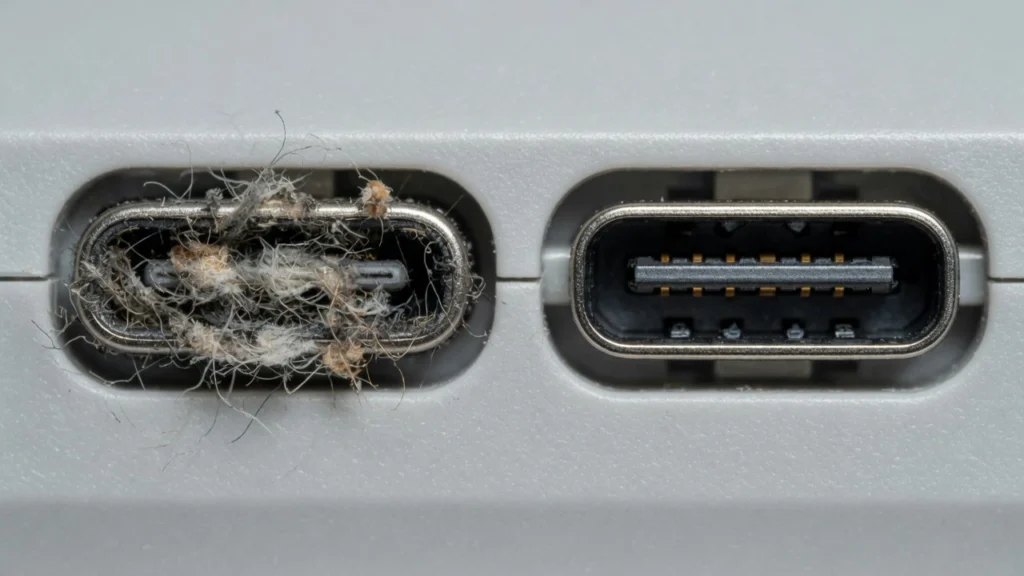
When I troubleshoot why a phone battery won’t charge, the first place I go is the charging port not the battery, not the software. That tiny opening collects pocket lint, dust, and compressed debris every single day, and most people never think to clean it. Once that debris packs in tightly enough, the charging cable physically cannot reach the metal contact pins inside. The phone detects nothing. No charge starts.
A repair tech I know cleared out five non charging iPhones in a single afternoon last month. He used a toothpick and some isopropyl alcohol. No replacement parts, no diagnostic equipment. Just debris removal.
The cable itself is the second most likely cause. The copper wires inside break down over time, particularly right at the connector where the cable bends most. The insulation on the outside looks completely fine. Inside, the wire is fractured and carrying no current.
After that I check the power source the wall outlet, the charging adapter, sometimes even the power strip. These fail quietly and rarely show obvious signs.
Software is the last thing I check but it does happen. The operating system manages the entire charging process, and a frozen or corrupted system state can prevent the phone from recognising a connected charger entirely.
I’ll take you through each of these in the same order a repair shop would fastest fix first, most complex last
Test Your Charging Equipment First (2-Minute Check)
Before touching your phone’s settings or cleaning anything, I check the equipment. The USB cable, charging adapter, and power source are responsible for the majority of charging failures and all three can die without showing any obvious signs of damage.
Pull your phone out of its case completely. I see this trip people up more than they’d expect. A thick protective case pushes the cable connector at a slight angle inside the port, which is just enough to interrupt the connection. Remove the case, try again.
Now take your USB cable and plug it into a different device entirely. A laptop, a tablet, a second phone anything. If that device shows no charging response either, you have a damaged charging cable. This happens because the internal copper wires snap from repeated bending near the connector, while the rubber or nylon sheath on the outside stays intact and looks perfectly fine.
The charging brick is next. I’ve tested adapters that felt warm to the touch and gave every outward sign of working but a multimeter showed they were delivering zero output. These fail internally and silently. Try a completely different adapter before moving on.
Then the outlet itself. Plug a lamp into the same socket. If the lamp doesn’t light, the outlet is the problem a tripped breaker, loose wiring, or a dead GFCI outlet nearby that’s cutting power to the circuit.
Non original chargers are worth flagging separately. Uncertified cables and adapters can send incorrect voltage to your phone, which triggers the phone’s protection circuit and shuts down charging entirely. Some phones lock up completely after a single contact with a bad charger.

Why iPhone Users Need MFi-Certified Cables
MFi stands for Made for iPhone, and the certification means Apple has tested the cable’s electrical specifications and approved it for use with their devices. It isn’t just a branding exercise uncertified cables often deliver inconsistent voltage that iPhones are specifically designed to reject.
When your iPhone shows an “Accessory Not Supported” error, that’s the phone’s protection system working as intended. The Lightning connector or USB-C port on newer models detects that the cable doesn’t meet Apple’s electrical standards and kills the charging session before any damage can happen. Gas station cables and marketplace knockoffs trigger this constantly.
I’ve watched someone spend nearly two hours going through every software fix they could find, restarting, resetting network settings, even trying a full restore the problem was a $6 cable they’d been using for months. Swapping in a certified cable fixed it in 30 seconds.
Look for the MFi badge on the cable packaging. If it isn’t printed clearly on the box, treat the cable as uncertified. Apple maintains a certified accessories list on their website if you want to verify before purchasing. Budget-friendly certified options exist from several manufacturers — you don’t need to pay Apple’s own cable prices.
Quick Power Source Test
Not all power sources are equal, and this catches people off guard more than it should. A wall outlet and a laptop’s USB port are not the same thing — not even close in terms of how much current they can actually deliver.
Older USB-A ports on desktop computers and older laptops were designed primarily for data transfer. They often max out at 500 milliamps, which is enough to slow-charge a phone that’s already at 50% but may not move the needle at all on a phone that’s completely dead. The phone connects, shows the charging icon, and barely gains anything.
If your current setup isn’t working, move through these in order: computer USB port to wall adapter, one wall outlet to another (tripped breakers cut power to specific circuits, not the whole house), and wall adapter to a car charger for comparison. Each swap isolates one variable.
Power strips and extension cords add resistance to the circuit. Not a lot, but when your charging setup is already marginal, that extra resistance can be the difference between charging and not charging. Direct wall connection always gives you the cleanest test result.
Phone Shows Charging But Battery Won’t Go Up
This specific problem phone plugged in, charging icon visible, battery percentage frozen or still dropping is one of the most disorienting charging failures because the phone appears to be doing the right thing. It isn’t.
There are actually two separate problems that produce identical symptoms. In the first version, a software bug is displaying the charging icon while the charging circuit itself has stopped working. The phone shows charging but no real power is flowing to the battery at all. In the second version, power is flowing, but background processes are consuming electricity faster than the charger can deliver it. The battery drains despite being connected.
Low powered USB ports are the most common trigger for the second scenario. I’ve seen phones sitting connected to a computer’s USB port for three hours and losing battery percentage the entire time because the port was maxing out at 500 milliamps while the phone’s screen, GPS, and sync processes were consuming 600. The charging icon was accurate. The power math just didn’t work.
A software bug is trickier. When the operating system’s charging management crashes, the display logic and the actual charging circuit can decouple entirely — one keeps running, the other stops. A restart usually resolves this, but if it keeps happening after a software update, the update itself introduced the bug and you’ll want to check if a newer update addresses it.
Using the Ampere App to See What’s Really Happening
The Ampere app is available on the Google Play Store and is Android-only — iPhone users will need to rely on the wireless charging test covered in the next section instead. What Ampere does is measure actual electrical current flowing into your battery, not what your phone’s status bar is reporting.
Open Ampere, plug your phone in, and watch the status indicator. Green with a positive number means current is genuinely flowing into your battery. Orange with a negative number means your battery is draining despite the charging icon being visible.
The milliamp reading is where this gets specific. A wall adapter on a modern Android phone should push somewhere between 500 and 2000 milliamps depending on the adapter and fast charging capability. If you’re sitting at 80 or 90 milliamps, the phone is barely holding its current level — not actually gaining charge. That’s usually a low-quality cable or an underpowered port.
If Ampere shows strong positive current but your battery percentage still won’t move, the problem is almost certainly in the software layer — specifically the battery reporting system, not the charging circuit. At that point, a hard restart is usually enough to clear it. But if it persists after restarting, a factory reset may be the next step
When Wireless Charging Reveals the Real Problem
If your phone supports wireless charging, use it as a diagnostic tool right now before doing anything else. The logic is simple: wireless charging bypasses the port and cable entirely and connects directly to your phone’s internal charging circuit.
Put your phone on a wireless pad and wait two minutes. If it starts charging normally, your charging port or your cable is the problem not the battery, not the software, not the internal hardware. That narrows your repair significantly and usually means a cleaning or a cable replacement fixes it.
If wireless charging fails too, the issue is inside the phone. Both charging methods share the same battery management system and charging chip past the initial power input stage. When both fail, that internal hardware is where the problem lives.
There’s one specific failure pattern worth knowing: some phones show false charging indicators on both wired and wireless simultaneously when the battery management chip itself has failed. The icon appears, no charge actually happens. Wireless charging not working in tandem with wired failure is one of the cleaner signs that you’re dealing with a hardware problem that a repair shop needs to diagnose.
Software Fixes That Actually Work
The restart is always my first move with a charging problem before cleaning, before swapping cables, before anything else.
It takes 30 seconds and it resolves a surprisingly high percentage of cases where the charging management system has simply frozen or gotten stuck in a bad state.
If your phone becomes completely unresponsive during charging troubleshooting, you might need to learn how to reset your Android phone when locked or force restart your iPhone using the methods below
But there’s a meaningful difference between a regular power-off and an actual forced restart. On most modern phones, holding the power button brings up a shutdown menu that’s not the same as forcing the system to fully reset. The specific button combinations that trigger a hard restart vary by device, and most people have never needed to use them before.
Beyond restarting, both Android and iPhone carry charging-related settings that can block power delivery in ways that aren’t obvious. Android battery protection features will sometimes refuse charging above certain percentages, or throttle the charging rate so aggressively that the phone appears not to be charging at all.
The iOS optimised battery charging system on iPhones does something similar it learns your daily schedule and deliberately pauses charging overnight to protect long term battery health. When the schedule is wrong, the phone just sits plugged in at 78% and doesn’t move
Hard Reset: The Right Way for Your Phone
Each phone model requires a different button combination to force a complete restart. The power button alone doesn’t cut it on most modern devices.
For iPhone 8 and newer models with Face ID, quickly press Volume Up, then quickly press Volume Down, then press and hold the Side button. Keep holding that side button for up to 30 seconds until you see the Apple logo appear on screen.
iPhone 7 and 7 Plus users need to press and hold both the Volume Down button and the Side button simultaneously until the Apple logo shows up.
Older iPhones with home buttons require pressing and holding both the Home button and the Power button together until the restart happens.
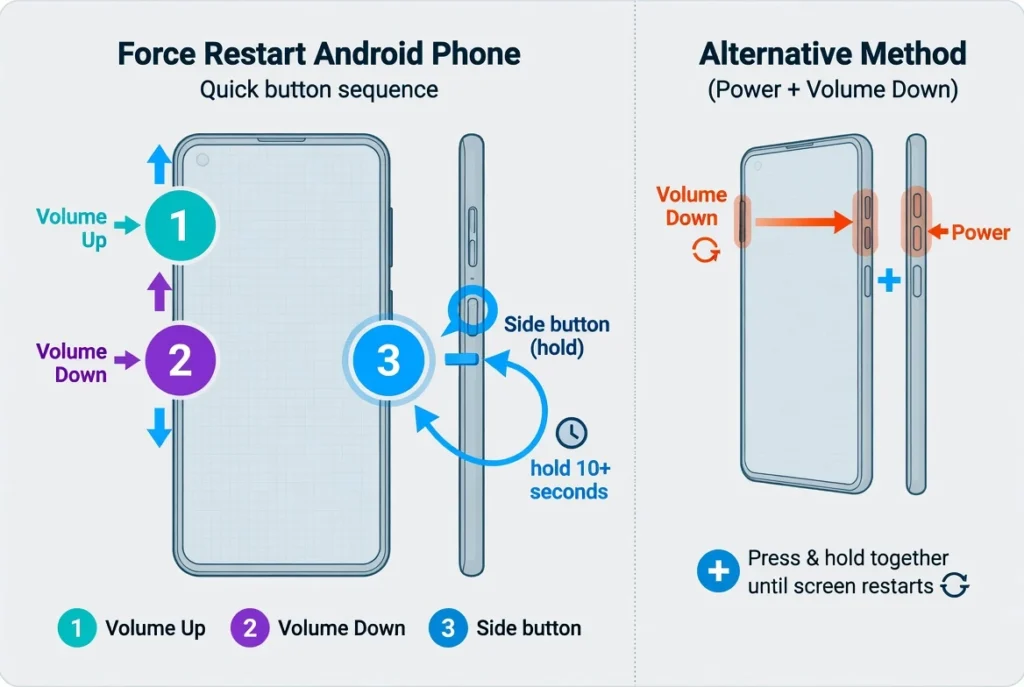
Android phones typically need the Power button and Volume Down button held together, but Samsung devices sometimes use Power and Volume Up instead. Hold the combination for 10 to 15 seconds until the screen goes black and the manufacturer logo appears.
The key is holding these buttons much longer than feels natural. Most people give up too early and miss the actual restart. Your screen might stay black for 20 or 25 seconds before anything happens.
One more thing: if you’ve recently updated iOS or Android and the restart combinations aren’t responding as expected, Apple and Google occasionally change these sequences between major versions. A quick search for your specific model and iOS/Android version confirms the current combination
Android Charging Settings Most People Don’t Know About
Android’s battery management system has gotten increasingly aggressive over the last few years, and the settings that cause charging problems are often several menus deep. Most users never find them unless they’re looking specifically.
Open Settings and navigate toward Device Care, Battery and Device Care, or just Battery — the label varies by Android version and manufacturer. Samsung devices typically use Battery and Device Care. Once inside, look for Charging Settings or Advanced Charging to find the options that can interfere.
Start by turning off fast charging temporarily. There’s a known software bug pattern across several Android models where the fast charging negotiation process fails and the phone stops accepting any charge at all not just fast charge, all charge. Disabling fast charging forces the phone into standard charging mode and often clears the conflict entirely.
Battery protection settings are the next thing to check. Look for anything labeled Battery Protection, Adaptive Charging, or Charging Optimization and turn it off for testing purposes. These features cap charging at 80% or 85% to reduce stress on the battery chemistry, which is useful for long-term health but looks identical to a charging failure if you don’t know it’s active.
Phone overheating while charging triggers a separate protection system entirely. When the device temperature rises above a threshold typically around 35 to 40 degrees Celsius internally the phone throttles or stops charging completely until it cools. If your phone feels warm and won’t charge, set it somewhere cool and flat for ten minutes before trying again
iPhone Battery Optimization Settings
iOS’s optimised battery charging feature works by learning your daily routine and deliberately pausing charging past 80% until just before you typically pick up your phone.
If you charge overnight and wake up at 7am, iOS waits until around 6am to push from 80% to 100%. When the routine breaks travel, irregular schedules, changed alarm times the phone can sit at 78% or 80% all night and you wake up wondering why it didn’t charge.
The toggle is at Settings → Battery → Battery Health & Charging → Optimized Battery Charging. Turn it off and your iPhone will charge straight to 100% every time without interruption.
Newer iPhones running iOS 17 and later also have a separate Charging Limit setting at Settings → Battery → Charging. This is distinct from Optimized Battery Charging — it’s a hard cap that stops charging at 80% permanently until you turn it off. Easy to activate by accident, easy to miss.
Third-party accessories interact with the battery management system in iOS inconsistently. Non Apple wireless chargers and car adapters that don’t carry MFi certification often trigger software conflicts that cap charging speed or halt it entirely. Disabling battery optimization temporarily while testing a third-party accessory usually isolates whether the accessory or the software is the actual problem.
On the software update side a newer iOS version is worth checking if charging problems started after an update. Go to Settings → General → Software Update. Apple frequently patches charging-related bugs in point releases.

Why Won’t My Phone Battery Hold a Charge Anymore?
If your phone drains fast even after a full overnight charge, the battery itself is the most likely explanation. Lithium ion batteries lose capacity permanently through a chemical process that happens during every single charge cycle. The electrolyte inside the battery degrades, the electrode surfaces accumulate deposits, and the battery’s maximum storage capacity shrinks. None of this is recoverable without replacing the battery.
Most phones start showing noticeable battery draining fast behaviour somewhere between 400 and 600 charge cycles though heat exposure, frequent fast charging and letting the battery sit at very high or very low charge levels for extended periods all accelerate that degradation significantly.
If your battery seems to drain unusually quickly even when it shows good health, check out our comprehensive guide on why your battery is draining so fast to identify hidden causes.
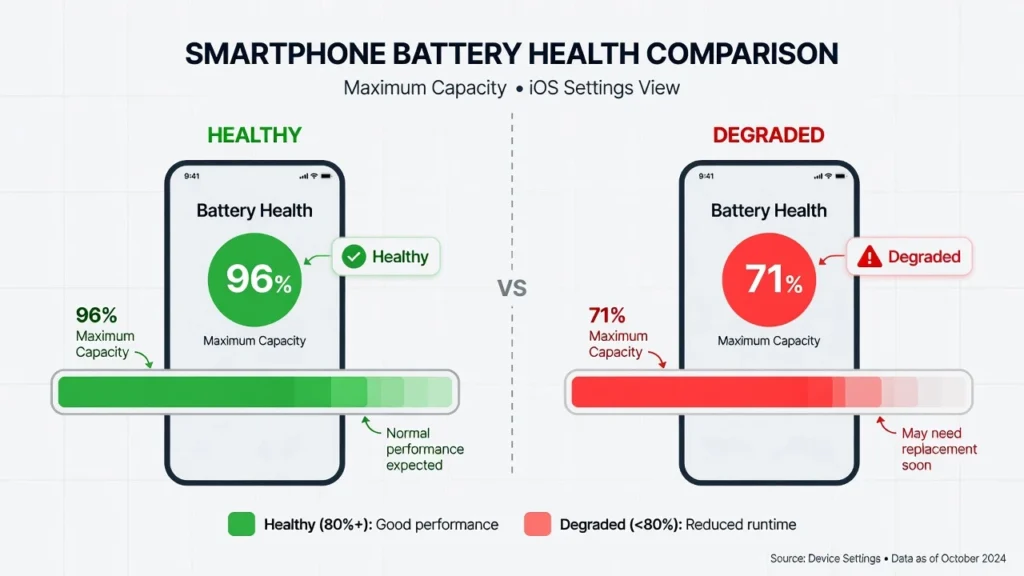
The 80% threshold is the standard benchmark repair shops use. When battery health drops below 80% of the original capacity, the battery physically cannot store enough power to get through a typical day — even though the charge percentage shown on screen reads 100%. That 100% is now representing a smaller total reservoir than it used to
How to Check Your Battery Health (iPhone and Android)
iPhone users can check battery health directly in the Settings app. Go to Settings, then Battery, then Battery Health & Charging to see your current maximum capacity percentage.
A healthy iPhone battery shows 100% maximum capacity when new. As the battery ages, this number drops. Apple recommends battery replacement when maximum capacity falls below 80% of the original amount.
You’ll also see a “Peak Performance Capability” message that tells you if your battery can still deliver full power to your phone’s processor. Degraded batteries sometimes can’t provide enough electricity for demanding tasks, which causes sudden shutdowns.
Android battery health checking varies by manufacturer. Samsung phones include battery information in Settings, then Battery and Device Care, then Battery. Look for battery health, battery life, or maximum capacity information.
Google Pixel phones show battery health in Settings, then Battery, then Battery Health. Other Android manufacturers hide this information or require third-party apps to check battery condition accurately.
Some Android phones need apps like AccuBattery or Battery Guru to measure real battery capacity compared to the original design capacity. These apps track charge cycles and estimate how much battery health you’ve lost over time.
What Those Battery Health Numbers Actually Mean
A battery at 85% health can store exactly 85% of what it could when the phone was new. That’s the whole number — nothing more complicated than that. So when your phone shows 100% charged, it’s 100% of a smaller bucket than it started with.
The 80% mark is where repair shops draw the line for replacement recommendations. Below 80%, the gap between what the phone reports and what you can actually do with that charge becomes noticeable enough to affect daily use. The battery percentage reading becomes less and less trustworthy as health declines.
Charge cycle count is a better indicator of degradation than raw age. One full charge cycle is the equivalent of using 100% of your battery’s capacity — whether that happens in one sitting or spread across several partial top-ups across a day. Most phone batteries hold up reasonably well through 500 charge cycles, with more significant capacity loss showing past that point. Heavy users who charge once or twice daily can hit 500 cycles inside 18 months. Lighter users take considerably longer.
Battery replacement cost is worth factoring in at this stage. On most midrange and flagship phones, a proper battery replacement runs between $50 and $150 at a reputable repair shop.
If your battery health is at 70% or below and the phone is otherwise working fine, replacement is almost always the more economical path compared to buying a new device.
Understanding the science behind lithium-ion battery degradation can help you make better charging decisions to extend your current battery’s lifeBattery University provides detailed research on charging practices that minimize long-term capacity loss.
What to Do After Getting a New Battery (Still Not Working?)
A brand new battery that doesn’t immediately fix the charging problem is one of the more demoralising outcomes, but it’s also one of the most misdiagnosed. The replacement itself is usually fine. The operating system just doesn’t know what to make of it yet.
When you swap in a new battery, your phone’s battery management system is still working from data calibrated to the old battery’s specific capacity and charge curve. The mismatch between that stored data and the new battery’s actual characteristics produces inaccurate percentage readings, unexpected shutdowns, and charging behaviour that looks broken but isn’t.
Calibration resolves this but it takes several full charge cycles, not minutes. Installation mistakes are a separate issue entirely. If the replacement was done incorrectly which is more common with third party services than people realise the battery contacts may not be fully seated, or a thin protective film may have been left over the connection points.
Common Battery Replacement Mistakes
The protective film issue is the most commonly missed installation error I’ve seen. New batteries ship with a thin transparent plastic cover over the metal contact points, and it’s easy to seat the battery correctly in every other way while that film is still in place.
The battery sits flush, the phone closes properly, and nothing charges. The film is nearly invisible over the contact area and won’t show up in a visual inspection unless you’re specifically looking for it.
Low-quality replacement batteries create a different category of problem. Budget cells from unknown suppliers often advertise capacity specs they can’t actually deliver a battery labelled 3500mAh may test closer to 2800mAh under real load.
Inferior electrode materials also degrade faster, so the battery that was supposed to restore your phone’s life may start showing capacity loss within a few months of installation.
If your phone was charging normally before the replacement and has charging problems afterward, the installation process itself likely caused additional damage.
Loose flex cable connections, bent contact pins, or a charging connector that was nudged during the battery swap are all common. At that point the battery isn’t the problem the repair introduced a new one
My Phone Won’t Turn On or Charge (Emergency Recovery)
A phone that won’t turn on or charge at all looks like a hardware failure. It usually isn’t.
I picked up the Fast Plug technique from a repair tech who ran a one man shop near where I worked. He’d get phones brought in by people who were convinced the device was completely dead dropped, left on a hot car seat, charged overnight with a questionable cable.
He turned most of them on before the customer had finished explaining the problem. The phone wasn’t dead. It was locked in a software state that had no exit until the right input broke it loose.
What the Fast Plug does is trigger a hardware reset and a power input at the same instant. The charging system has to respond to the incoming power signal before the software lock can re establish itself. That window is enough. The phone drops into emergency charging mode, the bad software state clears, and the device comes back to life.
This works specifically on phones that have battery charge remaining but can’t access it due to a crashed operating system. It won’t revive a phone with a genuinely dead or failed battery but it reliably saves the ones that just look dead
The Fast Plug Emergency Method
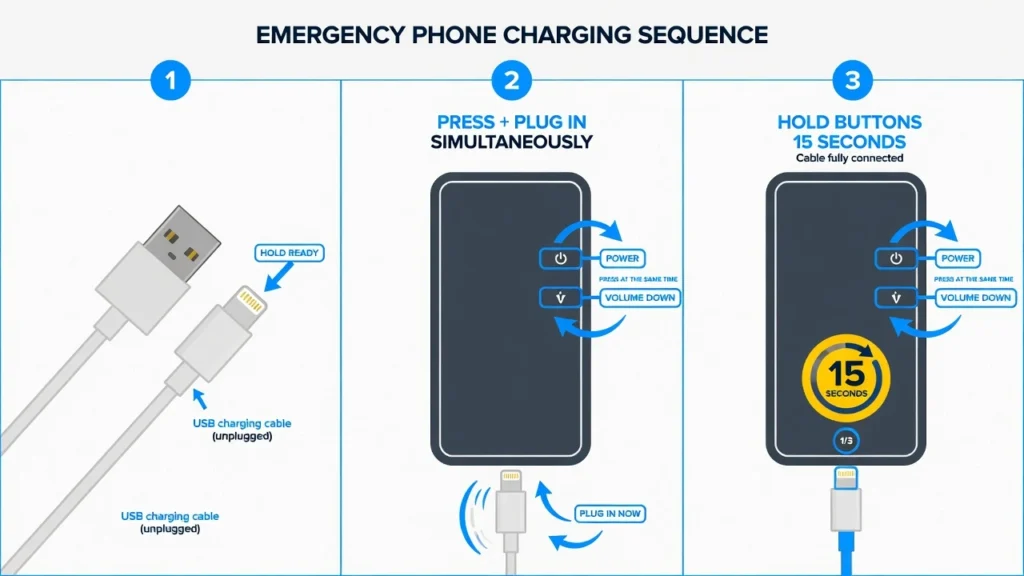
Get your charging cable ready but don’t plug it into your phone yet. You need to time this sequence precisely for the emergency recovery to work properly.
Press and hold the Power button and Volume Down button simultaneously on your phone. As soon as you start holding these buttons, immediately plug the charging cable into your phone.
Keep holding both buttons firmly for 10 to 15 seconds while the cable remains plugged in. Don’t let go of the buttons even if nothing appears to happen on the screen initially.
Release the buttons only when you see a charging logo, battery icon, or any kind of menu appear on your phone’s display. Some phones show the manufacturer logo instead of a charging indicator.

If nothing appears after 15 seconds, unplug the cable, wait 10 seconds, and repeat the entire Fast Plug sequence. Sometimes phones need two or three attempts before the emergency recovery activates successfully.
This technique bypasses the normal startup process and forces the phone directly into charging mode, even when the operating system has crashed or frozen completely.
Why Completely Dead Phones Need 30 Minutes
After the Fast Plug sequence works and you see a charging indicator, put the phone down. Don’t press any buttons, don’t try to power it on, don’t move it to a different charger. Leave it alone for at least 30 minutes.
The reason is trickle charging. When a battery has been fully depleted or when the system has been locked in a crashed state long enough to drain the remaining reserve the charging circuit deliberately starts with very low current delivery. It’s a protection mechanism to prevent damage to a compromised battery. Full charging speed doesn’t kick in until the system confirms the battery is responding safely.
Interrupting that 30-minute window resets the trickle charging sequence and forces it to start over. You end up extending the recovery time rather than shortening it.
I’ve seen this play out in a way that surprises people. One phone came in showing absolutely nothing black screen, no response, no charging icon even. After the Fast Plug sequence and 30 minutes of undisturbed charging, it powered on showing 43% battery. The phone was never actually dead. It just needed time and the right restart to get back to a state where it could communicate with the charger normally
Android Specific Fix After Phone Drops (The Massaging Trick)
Android phones have a charging issue that happens specifically after drops or falls. The flex cable connecting your charging port to the main board can come loose internally, making your charging port not working even though everything looks normal from outside.
This disconnection happens because Android phone designs route the charging connection through a thin flexible cable that runs from the charging port to the motherboard. When the phone hits the ground, that cable can shift or lose contact without any visible damage.
Repair techs call this “massaging” the connection back into place. You can try pressing on the phone’s back cover at the spot where the flex cable connects to reestablish the internal connection without opening the device.
Most Android phones have the flex cable connection point located near the bottom of the phone on the back, roughly behind where the charging port sits. Apply gentle but firm pressure to this area while pressing through the back cover.
Hold your finger over that spot and rub in small circular motions for about 30 seconds. You’re trying to press the loose flex cable back against its connection point on the main board inside the phone.
Plug in your charger immediately after massaging the connection area. If the flex cable reconnection worked, your Android phone should start charging normally again without needing any internal repairs.
This massaging technique works because Android phones use modular flex cable designs where the charging port connects to the motherboard through a removable ribbon cable. Impact from drops can knock these connections loose without breaking them completely.
The success rate isn’t perfect, but this method has saved many Android phones from expensive motherboard repairs when the charging problem was just a loose internal connection rather than actual hardware damage.
If massaging doesn’t restore charging after several attempts, the flex cable itself might be damaged or the connection point on the motherboard could be broken. At that point you’ll need professional repair to replace the damaged components.
When to Stop DIY and Call a Professional
There’s a specific point where continuing to troubleshoot at home stops making sense, and I can usually identify it in under a minute: you’ve cleaned the port, tested or replaced the cable and adapter, run the software resets, and the problem persists exactly as before. That pattern means the fault is in the hardware, and hardware diagnosis needs equipment you don’t have.
Phone repair shops use amp meters and multimeters to trace electrical flow through the charging circuit — they can see exactly where current stops, whether that’s at the port, the charging IC, or the battery connection. That matters because a charging port problem and a motherboard problem can look identical from the outside.
Battery replacement at a reputable phone repair shop runs $50 to $150 depending on your model. Charging port replacement typically falls in the $80 to $200 range. Motherboard-level repairs are $150 to $300 and up, and water damage repairs are the most unpredictable corrosion spreads to multiple components and the repair cost often exceeds the phone’s market value.
The practical rule I use: if repair costs exceed 60% of what a comparable replacement phone would cost, the repair usually isn’t worth it. Most shops charge $20 to $50 for a diagnostic fee, which they apply toward the repair cost if you proceed.
A few situations where I’d skip the DIY process entirely and call a shop immediately: visible physical damage to the port, a burning smell during charging attempts, the phone getting unusually hot during charging, or a device that worked normally until it was dropped or exposed to liquid.
If you’re dealing with screen damage alongside charging issues, our guide on extracting photos from a damaged Android phone can help you backup important data before seeking repair
The water damage indicator inside most phones a small white strip that turns red on contact with moisture is worth checking if you suspect liquid exposure. It’s located near the SIM card tray on most model.
Frequently Asked Questions
Why won’t my phone battery hold a charge like it used to?
Battery degradation is normal after 500 to 1000 charge cycles, and lithium ion batteries lose capacity permanently each time you charge them. When your battery health drops below 80%, it physically can’t store enough power for normal daily use, which is when replacement becomes necessary.
My phone shows it’s charging but the percentage doesn’t go up. What’s wrong?
This happens when a software bug displays the charging icon while no actual power flows to your battery, or when background apps consume more electricity than your charger provides.
Download the Ampere app to check if power is actually flowing versus what your phone’s interface shows.
I just replaced my phone battery but it’s still draining fast. Why?
New batteries need at least three complete charge cycles for your phone’s operating system to calibrate and recognize the battery’s actual capacity correctly. Poor quality replacement batteries or installation mistakes like leaving protective films on battery contacts also cause continued charging problems.
How do I clean my charging port without damaging it?
Create a custom swab by wrapping wood-pulp tissue around a toothpick, dip it in rubbing alcohol, and gently clean inside the port before drying with a hair dryer on cool setting. Never use metal objects or regular toilet paper as these can damage internal contacts or leave debris inside the port.
My power bank says it’s charging my phone but the battery isn’t going up. Why?
Power banks that aren’t delivering enough output current are the most common cause. Many older or budget power banks max out at 1 amp output,
which isn’t enough to charge a modern smartphone while the screen is on and apps are running in the background.
Turn your screen off while charging from a power bank, or check the output rating on the power bank’s label look for at least 2.0A or 10W output for reliable charging on current phones.”


