

You pick up your phone, the screen is shattered or completely black and the first thought that hits you are my photos actually gone? I felt that same panic when it happened to me. Those photos are not just files. They are birthdays, trips, moments you cannot recreate.
In most cases you can still extract photos from a damaged Android phone — and that includes you in most cases. A cracked screen or dead display does not wipe the data. Your photos are still in memory. The only question is which method gets them off safely.
This guide walks you through 7 methods, from completely free options to professional-grade recovery. Before jumping into any method, read the next section first to identify your exact damage type. That one step prevents hours of wasted effort and points you to the method that will actually work for your phone.
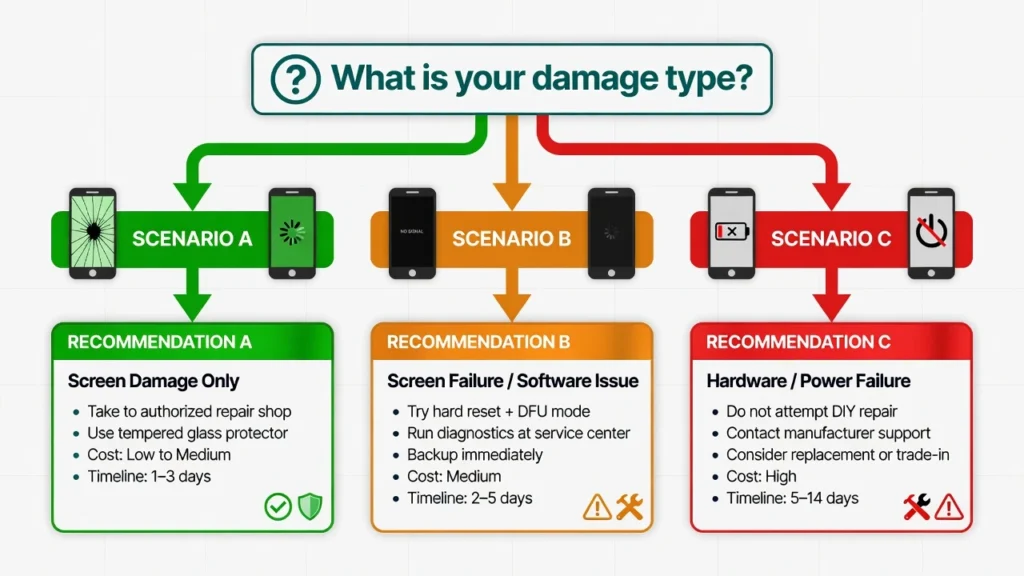
Before You Try Anything : Figure Out Which Type of Damage You Have
Different damage types need completely different solutions and choosing the wrong one wastes time. Before trying anything, take 60 seconds to figure out exactly which situation you are in. Android phone screen damage falls into three categories, and each one points to a different set of broken Android phone solutions.
Scenario A : Cracked Screen, Touch Still Works
Good news here. All 7 methods work for you. Start with Method 1 right now and check your Google Photos backup first. That takes under 60 seconds and might solve everything instantly.
Scenario B : Screen Dead or Black, Phone Is On
This one is more involved. When a phone screen goes black and won’t respond to touch, you cannot interact with the device normally. Before assuming the worst it is worth confirming the screen itself is the problem and not a deeper software freeze if you are unsure,
our guide on touchscreen not working fixes walks through exactly how to tell the difference. If the screen is confirmed dead, Methods 3 and 4 are specifically built for this scenario — a USB OTG mouse or an HDMI hub lets you take full control without ever touching the unresponsive display.
Scenario C Phone Won’t Turn On At All
Recovering dead Android phone photos from a completely unresponsive device is the most challenging scenario. Your options are cloud backup, SD card removal if the phone has a card slot, and professional data recovery. DIY options are limited when a phone has no power at all. That said, even phones that seem totally dead can sometimes be temporarily revived by professional technicians using diagnostic tools. Do not give up immediately.
Method 1 : Check Google Photos Before You Do Anything Else (Takes 60 Seconds)
Before you try anything else, check your Google Photos cloud backup — this takes under 60 seconds and often solves the problem completely. Open any web browser on a computer, tablet, or another phone and go to photos.google.com. Sign in with the same Google account that was on your damaged phone. If Google Photos backup was enabled, your photos will appear there right now, accessible from any device.
How to Check If Your Photos Are Already Saved
Sign in to photos.google.com and look through the most recent photos. If you see photos from the last few days or weeks, your Google Photos backup was running. To check the backup status more precisely, open the Google Photos app on any working Android device signed into your account. Tap your profile picture and look for the backup status message. If it shows “Backup is on” with a recent date, your photos are already safe.
Watch for one specific message: if it says “Waiting for WiFi,” backup was paused and the most recent photos may not have synced yet. Older photos are safe. The newest ones are likely still on your phone’s internal storage.
What If Only Some of Your Photos Are There?
Partial backups are far more common than people expect. Google Photos backup does not always capture every single photo. If your phone lost connection before syncing, if backup was set to WiFi only and you were on mobile data, or if you had photos stored in Samsung Gallery or another app not connected to Google Photos those photos may not be in the cloud.
One thing worth knowing: Google Photos Locked Folder photos are intentionally never backed up. If you stored photos in your Locked Folder, they will only ever exist on the device itself.
If only some photos are showing up, that is completely normal. The missing ones are likely still on your phone’s internal storage. That is exactly what Methods 2 through 6 are for. Do not stop here.
Method 2 : The Fastest Way to Recover Photos from a Broken Android Screen via USB
Connecting your damaged Android phone to a Windows PC via USB cable is one of the most direct ways to transfer photos from a broken phone. When it works, you drag photos from the DCIM folder straight to your computer in minutes. When it fails, the reason is almost always the same — and it has nothing to do with the cable.
The “Allow Access” Problem Nobody Warns You About
When you plug your damaged Android phone into a PC, Windows detects the device — but the phone is waiting for you to tap a prompt on its screen that says “Allow access to data” or “Transfer files.” Until you tap that prompt, your computer sees the phone but cannot access anything inside it.
If your screen is completely dead, you cannot tap that prompt at all. The phone shows up in File Explorer but the internal storage folder appears locked or empty. This is the number one reason the USB method fails for people with a touchscreen unresponsive to input.
Step-by-Step: Windows AutoPlay and DCIM Access
Once the Allow access prompt is resolved, the process on Windows is straightforward:
- Before starting, confirm your phone is set to “File Transfer” mode and not “Charging only.” Pull down the notification bar on your phone and tap the USB connection notification to check. If your screen is unresponsive, this is where the OTG mouse from Method 3 becomes essential.
- Connect your phone via USB.
- When AutoPlay appears, select “Open folder to view files.” If AutoPlay does not appear, open File Explorer and find your phone under “This PC.”
- Navigate to Internal Storage, then DCIM, then Camera.
- Select all photos and copy them to a folder on your computer.
Quick Note for Mac Users
Mac computers do not recognize Android phones natively. You will need to download and install the free Android File Transfer app from Google first. Once installed, connect your phone and the app opens automatically. Navigate to DCIM > Camera and copy your photos from there. The process is otherwise the same as Windows.
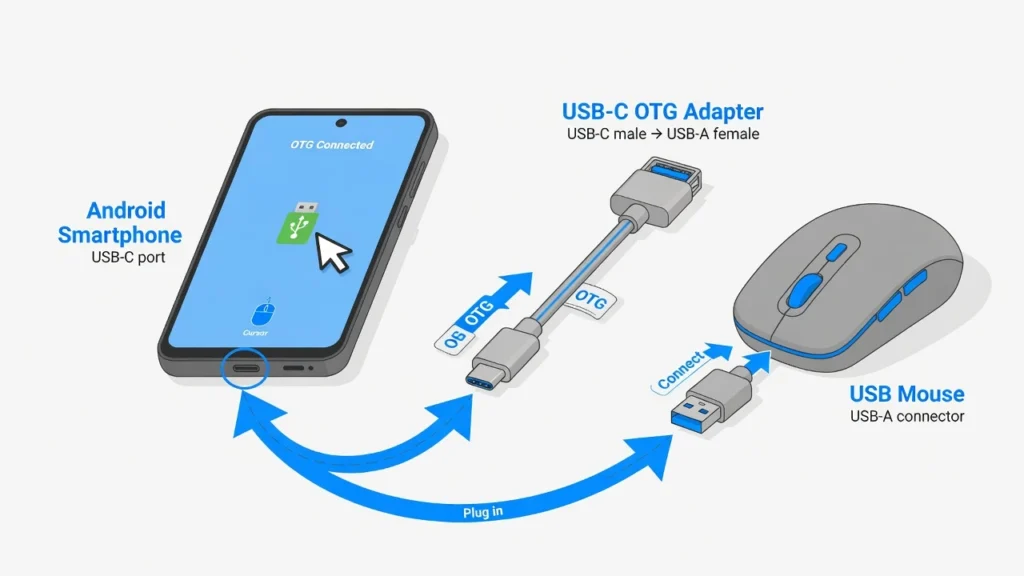
Method 3 : Using a USB OTG Adapter to Control Your Broken Android Screen with a Mouse
A USB OTG (On-The-Go) adapter is a small, inexpensive cable that lets you plug a standard USB mouse directly into your Android phone’s charging port. Once connected, a cursor appears on screen and you can navigate everything on the phone — tapping, scrolling, opening menus — without touching the display.
For anyone dealing with a smashed phone screen photo recovery situation where the touchscreen no longer responds, this method is one of the most practical solutions available. It effectively gives you back full control of the phone.
USB OTG has been supported natively on Android since version 3.1, so nearly all modern Android phones support it without any additional setup.
What You Need and Where to Get It
You need two things: a USB OTG adapter (USB-C to USB-A, matching your phone’s port) and a standard USB mouse. The adapter costs between $3 and $10 and is widely available online. Most Android phones have supported OTG for years, so this single adapter is usually all you need to get started.
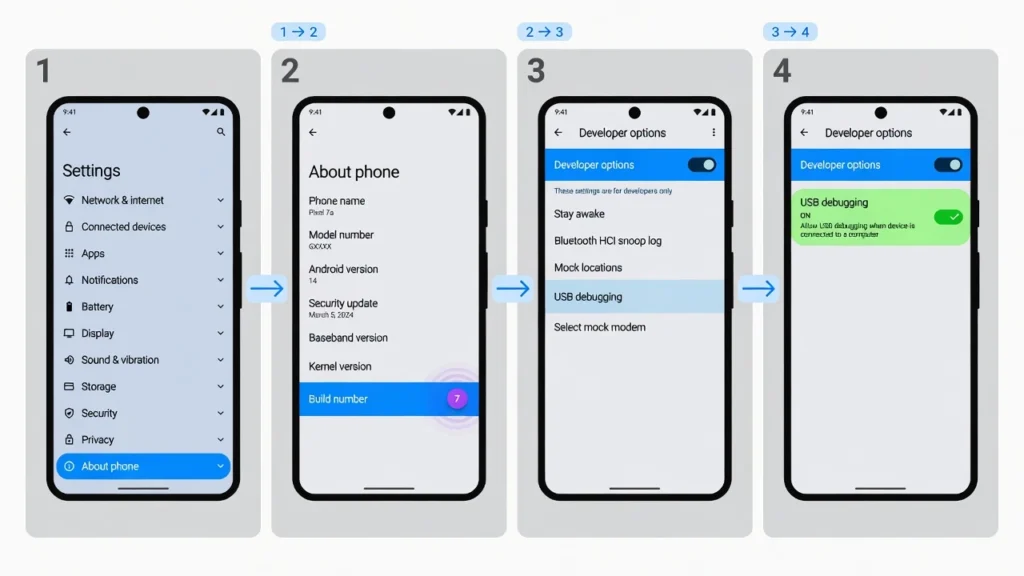
The Step You Must Do First (Most People Skip This)
Before connecting your phone to your PC, use the OTG mouse to go into your phone’s Settings and enable USB Debugging. Without this step, the file transfer process stalls at the “Allow” prompt with no way to proceed — and most people have no idea why it stopped working.
To enable USB Debugging:
- Open Settings on your phone.
- Tap “About Phone.”
- Find “Build Number” and tap it 7 times in a row.
- You will unlock Developer Options.
- Go back to Settings, open “Developer Options,” and toggle on “USB Debugging.”
Step-by-Step: Mouse Navigation to File Transfer
With USB Debugging enabled, follow these steps:
- Connect your phone to your PC using a USB data cable.
- A prompt appears on the phone screen asking to “Allow USB Debugging.” Use the OTG mouse to tap “Allow.”
- Use the mouse to pull down the notification bar, tap the USB connection notification, and select “File Transfer.”
- Your phone’s internal storage now appears in Windows File Explorer.
- Navigate to Internal Storage, open the DCIM folder, select all photos, and copy them to your computer.
That is the full process. Your photos are off the damaged phone and safe on your computer. If you prefer to see the full OTG setup in action before trying it yourself, the video below shows exactly how the mouse connection and file transfer works on a real device.
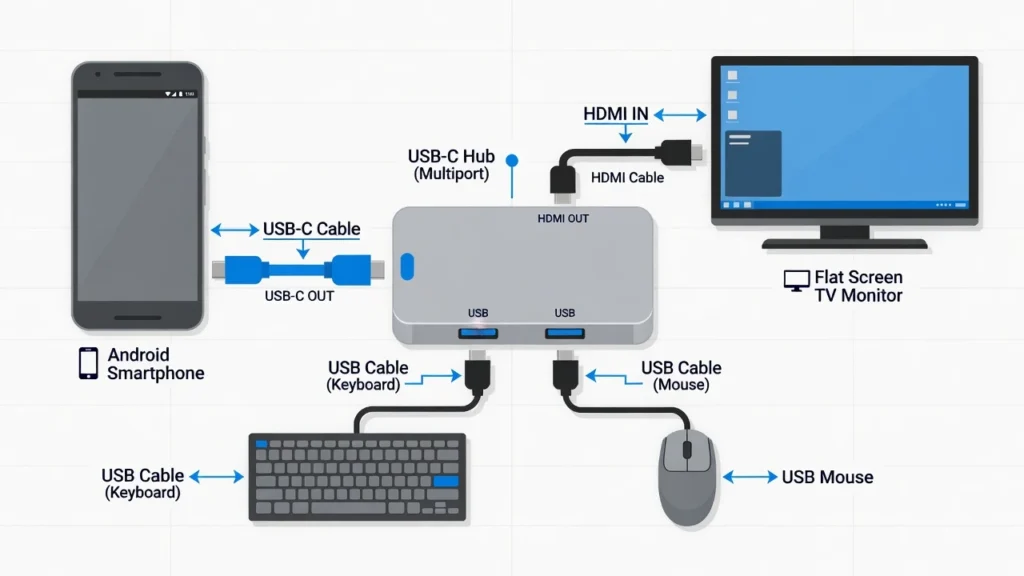
Method 4 : Mirror Your Phone Screen to a TV with a USB-C to HDMI Adapter
If your phone’s screen is completely black but the phone is still powered on, a USB-C to HDMI adapter or hub gives you a full-sized screen to work with. By connecting your phone to a TV or monitor through an HDMI cable, you can see and control everything as if the display were working perfectly. This is one of the most reliable ways to retrieve pictures from a broken Android phone when the screen is the only thing that has failed.
What You Need for the HDMI Method
For this method you need: a USB-C HDMI hub or adapter ($15 to $30), an HDMI cable, a USB mouse, a USB keyboard, and a TV or monitor with an HDMI input. Before purchasing, check whether your specific phone model supports video output over USB-C most modern Android phones do, but a quick search with your model name will confirm it in seconds.
Step-by-Step: Wake, Unlock and Transfer
Follow these steps to set up and use the HDMI method:
- Connect the HDMI hub to your phone’s USB-C port.
- Plug the HDMI cable from the hub into your TV.
- Connect the USB keyboard and mouse to the hub’s USB ports.
- Turn on the TV and select the correct HDMI input.
- Press the Spacebar twice on the keyboard — this wakes the phone’s screen on your TV display. Most people miss this step and assume the method is not working.
- Type your PIN on the keyboard to unlock the phone.
- Use the mouse to navigate to Settings, then enable USB Debugging as described in Method 3.
- Connect a PC via USB cable and transfer your photos through File Explorer.
If you have a WiFi connection available, you can also open Google Photos directly from the phone’s home screen and trigger a manual backup from there.
Samsung Users : Try DeX Mode First
If you have a Samsung Galaxy phone, Samsung DeX gives you a desktop-like interface on your TV or monitor when connected via HDMI. This is easier to navigate than standard screen mirroring because it functions like a full computer desktop with windows and a taskbar. Once you are in and can control the phone, open Samsung Smart Switch to perform a full backup, or simply connect to your PC and transfer photos through File Explorer.
Method 5 : How to Save Photos from a Broken Phone Using an SD Card
If your phone has a physical SD card slot and you store photos on the external card, this is the simplest way to save photos from a broken phone. You remove the card, plug it into a computer, and access your photos directly — no need to interact with the damaged phone at all.
Step-by-Step: Remove and Read the SD Card
Follow these steps:
- Locate the SIM and SD card tray on the side of your phone.
- Use the ejector pin (the box usually includes one — a paperclip also works) to pop the tray out.
- Carefully remove the SD card from the tray.
- Insert the SD card into a USB card reader and plug the reader into your computer.
- Open File Explorer on Windows, find the SD card drive, navigate to the DCIM or Pictures folder, and copy your photos to your computer.
If Your Phone Only Has Internal Storage (No SD Card)
Most modern Android phones no longer include SD card slots. This includes Google Pixel phones and most Samsung Galaxy models released after 2019. If your phone does not have an SD card slot, or if your photos were stored in internal storage rather than on the card, this method simply does not apply to your situation.
In that case, go to Method 3 (OTG mouse), Method 4 (HDMI hub), or Method 6 (ADB) depending on your damage scenario.
Method 6 : How to Extract Android Data Using ADB
ADB, or Android Debug Bridge, is a free command-line tool from Google that lets a computer communicate directly with an Android device at a system level. It sounds technical but the actual process is a few simple commands. ADB is one of the most reliable ways to extract Android data when the screen is completely unresponsive — as long as one prerequisite was met before the damage happened.
What Is ADB and When Will It Actually Work?
ADB only works if USB Debugging was already enabled on your phone before the damage occurred. That is the critical prerequisite. If USB Debugging was never turned on, ADB cannot establish a connection to your phone and this method will not work. In that case, skip ahead to the third-party software section or the professional recovery section below.
ADB Commands to Pull Your Photos Step-by-Step
Follow these steps to use the ADB command to extract photos from your Android phone:
- Download the Android Platform Tools package directly from the Android developer site and extract the folder to an easy location on your PC the Desktop works well and keeps the path short for the commands that follow.
- Open a Command Prompt window and navigate to that folder using the
cdcommand. - Connect your phone via USB.
- Type
adb devicesand press Enter. If your phone appears in the list, the connection is working. - Type the following command and press Enter:
adb pull /sdcard/DCIM/ C:\RecoveredPhotos\
Replace C:\RecoveredPhotos\ with any destination folder on your computer. ADB will copy every photo from the DCIM folder on your phone’s internal storage directly to your PC. This may take several minutes depending on how many photos you have.
Free Option: TestDisk for Deleted SD Card Photos
If photos were deleted from your SD card and you need a free recovery option, TestDisk is worth knowing about. TestDisk is a free open-source data recovery tool available for Windows, Mac, and Linux. It works from the command line and can scan SD cards for deleted files.
When TestDisk scans a card, deleted files appear highlighted in red. Select and recover them directly. One critical step before running any scan: back up the existing files on the SD card first. Recovery software carries a small but real risk of overwriting data.
In one documented demonstration, TestDisk recovered over 1,000 deleted files from a single SD card in under 10 minutes. Physical SD card removal and a direct card reader connection are always the safest approach — connecting the damaged phone via USB to run recovery software adds unnecessary risk to your existing data.
Method 7 : Use Third-Party Data Recovery Software
When the free and manual methods are not enough — either because the damage is too severe or because the screen is completely unresponsive — third-party data recovery software for Android fills the gap. These tools work by putting the phone into a special diagnostic mode that bypasses normal screen interaction entirely.
In my experience, starting with the free options and working downward almost always finds a solution — paid software is rarely the first thing you need. But when it is needed, these tools deliver.
Dr.Fone by Wondershare : Best for Most Scenarios
Wondershare Dr.Fone is one of the most widely used data recovery tools for Android. It handles broken screens, unresponsive phones, system crashes, and black screen situations. At the time of writing, a license costs around $34.95, though pricing may vary — check the official Wondershare website for current rates.
Note that Recovery Mode and Download Mode are different states — Dr.Fone guides you into Recovery Mode, while the Samsung Broken Android Data Extraction tool uses Download Mode. Do not confuse the two.
Broken Android Data Extraction : Free Tool for Samsung
Samsung Galaxy S and Note series users have access to a tool called Broken Android Data Extraction, which is specifically designed for Samsung devices. This free software puts Samsung phones into Download Mode — a diagnostic state separate from the normal boot process — and extracts data directly from that mode.
Multiple independent technology reviewers have demonstrated this tool working successfully on Samsung phones with completely black or unresponsive screens, which makes it a strong option for Scenario B Samsung users.
DiskDigger : Free App for Phones That Still Power On
If your phone still powers on and you need to recover recently deleted photos rather than extract from a damaged screen, DiskDigger is a free Android app worth trying. Install it from the Google Play Store, run a basic scan, and it will search for recoverable deleted photos without requiring root access.
What If My Recovered Photos Are Corrupted and Won’t Open?
After successful extraction, some recovered photos may appear glitched, show as blank white images, or simply refuse to open at all. This is not uncommon, especially after significant damage or partial data corruption.
AI photo repair tools are worth trying before giving up on those files. Wondershare Dr.Fone’s dedicated Photo Repair feature is built specifically for digitally damaged image files corrupted JPEGs, glitched components, and files that fail to display correctly. Free online photo repair tools also exist for minor corruption. Not every file can be saved, but many can, and it takes only a few minutes to find out.
What Professional Phone Data Recovery Actually Involves
When every DIY option has been exhausted and the phone is completely dead with no prior cloud backup, calling a professional is the last but still viable path.
If your phone is unresponsive but you have not yet confirmed it is beyond a software fix, it is worth checking whether a factory reset could restore access first our Android phone reset guide covers how to do this without losing data where possible. If the phone is genuinely hardware-dead, professional recovery is your only remaining option.
Knowing how to recover photos from a damaged phone without backup through professional services the real process, not just the price helps you make a confident, informed decision.
When DIY Methods Simply Won’t Work
If your phone will not charge, produces no vibration, shows no light, and has no response to anything — and you have no SD card and no cloud backup — the DIY options in this guide are exhausted. This is when professional recovery becomes the only realistic path. Some damage scenarios genuinely require specialized equipment and expertise that no consumer-level tool can replicate.
What a Professional Data Recovery Session Actually Involves
Professional technicians do not just plug your phone in and hope for the best. The process involves board-level diagnostics using DC power supply tools that measure the milliamp draw from the device. In board-level diagnostics, a flat milliamp draw reading — 140mA or similar — typically indicates a CPU fault, according to professional data recovery technicians who work at the component level. That reading tells the technician exactly what they are dealing with before any repair attempt begins.
From there, techniques like controlled heat application at precise temperatures can temporarily revive dead circuit boards enough to establish a connection. Under these controlled conditions, technicians sometimes use Samsung Smart Switch or direct SD card transfers to move data safely off the board. The goal is not to repair the phone — it is to rescue the data.
How Much Does Professional Phone Data Recovery Cost?
Basic recovery for screen damage or software failure typically ranges from $100 to $300. Board-level chip-off recovery, where the memory chip is physically removed from the board and read directly, can range from $500 to $1,500 or more depending on the shop and severity of damage.
Many reputable shops offer free diagnostics before committing to any cost. I always recommend calling 2 to 3 local repair shops and comparing their assessments before choosing one.
One critical warning: do not attempt to apply heat to your phone’s circuit board yourself. Even brief exposure to uncontrolled heat can cause damage that makes board-level recovery impossible even for professional technicians. If you are at the point of considering professional recovery, leave the phone exactly as it is until a technician sees it.
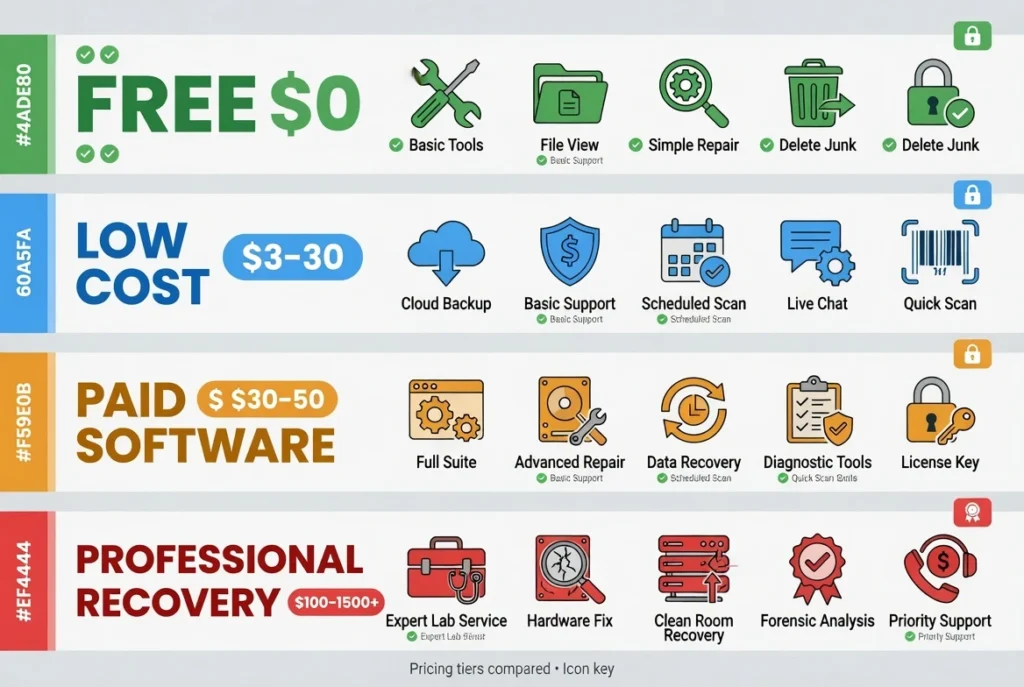
Free vs Paid: Which Method Should You Actually Try?
Matching the right method to your budget and damage type makes everything faster. Here is a quick breakdown:
Free : Zero Cost
- Google Photos backup check: All scenarios. Check this before anything else.
- USB cable + File Explorer: Scenario A and B (responsive screen required).
- ADB (Android Debug Bridge): Scenarios A and B (requires USB Debugging pre-enabled).
- SD card removal: Scenario C (phone has SD card slot).
- TestDisk: Deleted SD card photo recovery.
- DiskDigger app: Recently deleted photos on phones that still power on.
- Broken Android Data Extraction: Free tool specifically for Samsung Galaxy devices.
Low Cost : $3 to $30 in Equipment
- USB OTG adapter + mouse: Scenarios A and B, essential for unresponsive screens.
- USB-C to HDMI hub or adapter: Scenario B, most complete dead-screen solution.
Paid Software : $30 to $50
- Wondershare Dr.Fone or Tenorshare UltData: Scenarios A and B, broken screens and system crashes.
Professional Recovery : $100 to $1,500+
- Scenario C only: completely dead phones with no backup and no SD card.
None of the tools listed here are affiliated with this article. These recommendations are based on documented performance and wide usage among Android users.
How to Protect Your Android Photos So You Never Need Recovery Again
Many people who go through this experience say afterward that they wish they had simply backed up their phone and I completely understand that feeling. Rather than dwelling on it, the most useful thing to do right now is set up automatic backup so this cannot happen again. It takes about three minutes.
I set a recurring calendar reminder for the first of every month specifically to check my Google Photos backup status. It is a habit that takes ten seconds and has genuinely saved me twice.
Set Up Google Photos Automatic Backup Right Now
The simplest way to back up photos on Android automatically is through Google Photos. Open the app on your phone and follow these steps:
- Open the Google Photos app on your phone.
- Tap your profile picture in the top right corner.
- Tap “Photo settings,” then “Backup,” and toggle backup on.
- Choose “Storage saver” quality for compressed backups that use less of your Google account storage, or “Original quality” for exact copies at full resolution. Both options use your free 15GB Google storage quota.
- Set backup to run on both WiFi and mobile data for maximum protection.
Once backup is on, every photo you take syncs to your Google account automatically.
Enable USB Debugging While Your Phone Still Works
Go to Settings on your phone. Tap “About Phone.” Find “Build Number” and tap it 7 times. You will unlock Developer Options. Go back to Settings, open “Developer Options,” and toggle on “USB Debugging.”
This single step takes less than 2 minutes and dramatically improves your options if your phone is ever damaged in the future. With USB Debugging pre-enabled, the ADB method, OTG connection, and PC file transfer all work much more reliably.
One More Thing : Check Your Backup Monthly
Enabling backup is not quite enough on its own. Take 10 seconds every month to open Google Photos, tap your profile picture, and check the backup status. What you want to see is “Backup is on” with a recent timestamp. If you see “Waiting for WiFi” or a date that is weeks or months old, your photos are not fully protected and you should investigate why.
Set a monthly calendar reminder right now. Ten seconds once a month is all it takes to know your photos are safe.
Final Thoughts on Recovering Photos from a Damaged Android Phone
If your Android phone is damaged and you are worried about losing your photos, start with a Google Photos cloud backup check — that takes 60 seconds and might solve everything. If backup is incomplete, identify your damage type using the Scenario A, B, or C framework from the first section. Then work through the methods that match your situation: USB cable and DCIM access for working screens, OTG mouse or HDMI hub for dead screens, SD card removal if the phone will not power on, and ADB if USB Debugging was pre-enabled.
If those all fall short, paid software like Wondershare Dr.Fone or professional board-level recovery is still a valid path forward. Some cases of severe physical damage are genuinely beyond recovery I want to be honest about that. But many situations that look hopeless initially do have a solution.
Once your photos are safe, set up that automatic Google Photos backup. The best time to extract photos from a damaged Android phone is before you ever need to and a three-minute backup setup today makes sure you never face this problem again.
Frequently Asked Questions
My phone screen is black and won’t come on are my photos gone?
Not necessarily. A black screen does not mean your data is lost. Your photos are still in your phone’s internal storage. The screen failing is a hardware problem it does not erase memory.
Start with Method 1 to check your cloud backup, then use Method 3 (OTG mouse) or Method 4 (HDMI hub) to access the phone if the screen is unresponsive but the phone is still powered on.
Does DiskDigger need root access to recover photos?
DiskDigger’s basic scan does not require root access and can recover recently deleted photos on most Android phones. The full deep scan which searches the entire file system does require root. For most users, the basic scan is sufficient and it is completely free.
I connected my phone via USB but my computer cannot access the files what is wrong?
This is almost always caused by the “Allow access to data” prompt on your phone’s screen. Your phone is waiting for you to tap “Allow” before Windows can read the internal storage.
If your screen is unresponsive, use the OTG mouse method from Method 3 to tap the prompt, or enable USB Debugging first so the connection bypasses the prompt entirely.
How much does professional data recovery cost for a damaged Android phone?
Basic recovery for screen damage or software issues typically runs $100 to $300. If the damage is at the board level and requires chip-off recovery physically removing the memory chip costs can reach $500 to $1,500 or more.
Many shops offer free diagnostics before any commitment. Always call 2 to 3 shops and compare.
I recovered my photos but some of them are corrupted and won’t open what can I do?
Try a dedicated photo repair tool before giving up. Wondershare Dr.Fone has a Photo Repair feature specifically for corrupted image files damaged JPEGs, glitched photos and files that appear blank.
Several free online photo repair tools also exist for minor corruption. Not every file is salvageable, but many are, and the process takes only a few minutes.
I have a Huawei phone do these methods still work?
Most of these methods work on Huawei phones with some adjustments. USB OTG and HDMI hub methods work the same way. ADB works if USB Debugging was pre-enabled.
The main difference is that Huawei phones use a different port layout on some models and may require a specific OTG adapter type. Google Photos backup also works normally if your Huawei device uses a Google account.
For newer Huawei models without Google services, check whether your photos backed up to Huawei Cloud instead.
Is it safe to use third-party data recovery software on my phone?
Reputable tools like Wondershare Dr.Fone, Tenorshare UltData, and Broken Android Data Extraction are widely used and documented by independent reviewers. Always download recovery tools directly from the official brand website rather than third-party download aggregators, and check recent user reviews before running anything on your device.


